


Instructions and operating manual sweeper CSW 1200 B - CSW 1200 G (translated from original instructions)
pag. 44
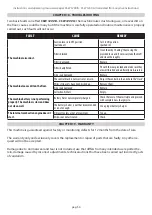
CHAPTER 12 - CORRECT USE AND ADVICES
Be very careful when driving over rails, door runners, ets. These can cause damage to dust seals. Drive
over them very slowly.
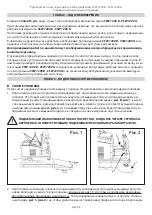
Avoid driving over puddles of water. In the presence of damp surfaces, close the suction by means of
knob
Part. 1 Fig. 6
located to the right of the operator, alongside the central brush start lever.
In the presence of large or lightweight objects (leaves, cigarette boxes etc.) lift the front flap by pres-
sing the flap-lift pedal with the heel of your left foot
Part. 1 Fig. 8.
If the surface to be cleaned is very dirty in terms of quantity and quality of the material or dust to be
picked up, first of all go over the area
“roughly”
without paying too much attention to the result.
Then with a clean bin and the filters well shaken, go over it again. This way, the desired effect will be
achieved.
Subsequently, if the machine is used regularly and properly, such
“roughly”
cleaning will no longer
be required.
The side brush must only be used for cleaning edges, profiles, corners, etc. It must be raised (disenga-
ged) immediately after use so it does not lift up dust and also because results achieved with the side
brush engaged are always inferior to those obtained with the central brush alone.
For good results, empty the container regularly and keep the filters clean, shaking them with the tools
provided.
For battery powered machines, often check on the condition of the batteries and recharge them,
NE-
VER LEAVE DISCHARGING THE BATTERIES COMPLETELY AND ALWAYS LET THE BATTERY CHAR-
GER RUN A FULL CYCLE WHEN RECHARGING THE BATTERIES.
IMPORTANT: Before starting work, make sure there are no strings, plastic or metal wires or long strips
of cloth, sticks, power leads, etc. on the floor as the are hazardous and could damage the dust seals
and brushes. These must be removed before starting work with the machine.
u
REVERSE MOVEMENT:
• Position the switch
Part. 1
of switchboard backwards and press the backward pedal with your foot
Part. 6 Fig. 2.
u
NEUTRAL:
• With the switch
Part. 1
of switchboard in central position the machine is in neutral.
u
STOP:
• Turn the switch
Part. 5
of switchboard anticlockwise.
• Turn the key
Part. 6
of switchboard anticlockwise.
Содержание 9302 0001
Страница 4: ......
Страница 58: ...CSW 1200 B CSW 1200 G 58 7...
Страница 59: ...CSW 1200 B CSW 1200 G 59 5 Honda...
Страница 60: ...CSW 1200 B CSW 1200 G 60 5 10 45 C...
Страница 61: ...CSW 1200 B CSW 1200 G 61 8 u 3 1 2 3 u 1 4 u 2 4 13 25 u 1 5 1 6 4 5 6 3 5 4...
Страница 62: ...CSW 1200 B CSW 1200 G 62 u 4 6 u 1 7 2 7 u 1 8 2 8 u 4 9 u Parking 4 9 6 7 8...
Страница 63: ...CSW 1200 B CSW 1200 G 63 u 1 6 u 2 6 u 3 9 1 u 3 9 u 1 9 1 9 9...
Страница 66: ...CSW 1200 B CSW 1200 G 66 9 u 12 3 3 u 3 8 4 9 u 4 9 7 10 CSW 1200 G 2 3 1 5 5 3 75 5 hg 10W 30 2 12 13 A...
Страница 67: ...CSW 1200 B CSW 1200 G 67 11 u 1 4 9 2 1 3 2 4 7 1 AV 5 RPM u 1 7 u 6 5 1 2 1 13 B 2 13 A 10 15 5 6 13 B...
Страница 68: ...CSW 1200 B CSW 1200 G 68 12 1 6 1 8 u 1 6 2 u 1 6 2 u 1 u 5 6...
Страница 69: ...CSW 1200 B CSW 1200 G 69 13 u 40 70 1 14 2 14 14 3 14 u 40 70 1 2 3 15 2 4 2 2 u 2 4 50 80 1 2 7 2 4 1 14 15...
Страница 70: ...CSW 1200 B CSW 1200 G 70 u 1 18 3 18 u 1 10 15 2 17 4 1 16 2 16 3 16 3 4 2 16 1 16 3 16 3 16 17 16 18...
Страница 72: ...CSW 1200 B CSW 1200 G 72 14 CSW 1200 G 1 5 2 5 5 hg 10W 30 3 40 50 4 25 CSW 1200 G OIL ALERT...
Страница 73: ...CSW 1200 B CSW 1200 G 73 30 40 13 15 16 17 1 2 3 4 1 2 7 13 CSW 1200 B 13 CSW 1200 G...
Страница 74: ...CSW 1200 B CSW 1200 G 74 19 12 18 CSW 1200 B CSW 1200 G...
Страница 75: ......


