40
chines can be used but it’s prohibited to use hoses
with running water or a high-pressure cleaner.
8.7 BATTERIES
8.7.1 PB-ACID
Carry out maintenance operations in accordance
with the manufacturer’s instructions and with all
the other instructions provided in this manual.
Exposing the element plates (not completely
immersed in the acid solution) will lead to rapid
oxidation and irreparably reduce the element’s
operating capacities. An overflowing acid solu-
tion may corrode the machine. Use battery charg-
ers recommended by the manufacturer and, in any
case, those that are suitable for the type of battery
to be charged. Always charge batteries in well-
ventilated rooms: there is an explosion risk!
The use of gel or maintenance-free batteries is
highly recommended.
8.7.2 GEL
Carry out maintenance operations in accordance
with the manufacturer’s instructions and with all
the other instructions provided in this manual.
Use only those battery chargers recommended by
the manufacturer.
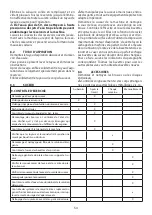
8.8
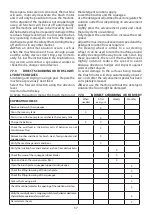
PERIODIC MAINTENANCE
For all the operations described in the following
scheduled maintenance table, refer to the instruc-
tions and detailed warnings in the relative sec-
tions.
8.9
RECOMMENDED SPARE PARTS
You’ll always be able to use your machine as ef-
ficiently as possible by maintaining a stock of
the most common consumable materials and by
scheduling routine and extraordinary mainte-
nance. Contact your dealer for a list of these spare
parts.
9. OPERATING CHECKS
9.1
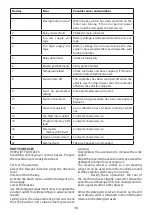
MALFUNCTIONS SELF-DIAGNOSTIC
The main electrical components and the function
controlcard are located under the front panel of
the machine (Photo A - 9). This card is equipped
with a self-diagnostic system that uses a LED to
indicate correct operation or malfunctions. The
LED remains illuminated to indicate that the card
is operating correctly, while a sequence of flashes
indicates a different error message as per the fol-
lowing list:
9.2
PROBLEM SOLVING GUIDE
These indications make it easier to understand
the underlying causes of some problems based
on specific type of inconvenience. For the type of
corrective action to take please refer to the spe-
cific sections described below.
9.2.1
THE MACHINE DOESN’T WORK
The key is not inserted or incorrectly turned.
Insert and turn the key to position “1”.
The battery connector is disconnected or
poorly attached to the main wiring connector.
Firmly connect the two connectors.
The emergency/work stoppage button is
pressed.
Disengage the emergency/work stoppage but-
ton.
The machine is charging.
Complete the charging operation.
The batteries are discharged.
Charge the batteries.
No operator in the driver’s seat.
Sit in the driver’s seat.
The main fuse is burned.
Replace it.
The control card has overheated.
Check the operating situations that may have
caused the malfunction (high slope, etc.). Wait
30 minutes and try to avoid the same incorrect
opera- tions. If the problem persists, contact
the authorised service centre.
9.2.2
THE MACHINE DOESN’T MOVE FOR-
WARD
The direction selection lever is in the neutral
po- sition.
Select a running direction.
The advancement pedal is not pressed.
Press the pedal.
The floor slope is too steep.
Manually push the machine to the new level.
The thermal breaker of the drive motor is
tripped.
Stop the machine, allow it to remain inactive for
5 minutes, replace the fuses.
The advancement pedal microswitch is broken.
Replace it.
The batteries are dead.
Charge the batteries.
The accelerator pedal was pressed when the
ma- chine was turned on.
Release the accelerator pedal, turn off and re-
start the machine.
The accelerator pedal potentiometer is malfun-
ctioning.
Replace the potentiometer.
The drive motor was not stopped when the ma-
chine was turned on.
Place the machine on a flat surface, turn it on
and off again with the key.
9.2.3
THE BRUSHES DON’T ROTATE
Содержание 9070 0007
Страница 3: ...3 1 2 A B 1 4 5 2 3 7 8 6 4 5 10 9 3 6 7...
Страница 4: ...4 C 1 1 D 2 2 3 4...
Страница 5: ...5 1 E 1 6 5 2 7 8 3 4 9 10 11 12 14 13 16 15 F 2...
Страница 6: ...6 9 1 2 3 4 5 6 3 2 7 8 1 4 G H 1 2 7 8...
Страница 7: ...7 L I 1 1 2...
Страница 8: ...8 M1 M2 M3 1 2 1 2...
Страница 9: ...9 M4 M5...
Страница 92: ...92 8...
Страница 93: ...93 7 3 12...
Страница 94: ...94 6...
Страница 95: ...95 5 2 10...
Страница 96: ...96 4 4 35 10 50 30 95...
Страница 97: ...97 3 5 1 CE CE 2 1 2...
Страница 98: ...98 2 3 1 CE 4 1...
Страница 99: ...99 1 1 1 1 1 2...
Страница 101: ...101 2 2 1 2 2 2 10 2 3 2 4...
Страница 102: ...102 2 5 3 3 1 4 35 C 10 50 C 30 95 2 10...
Страница 103: ...103 3 2 96 4 4 1 4 2 4 3...
Страница 104: ...104 4 4 Foto M1 2 M2 2 M2 1 M1 1 3 4 5 1 1 1 1 4 5 5 5 1 5 1 1...
Страница 105: ...105 15 6 8 10 20 15 100 7 8 5 1 2 20 20 20h 5 5 5h 5 20 24 5 1 3...
Страница 107: ...107 5 2 2 5 2 3 5 3 6 6 1 6 2 90 Anderson Anderson 0 6 3 7...
Страница 108: ...108 7 7 1 7 2 7 2 1 E 3 E 3 E 5 7 2 2 E 5 E 3 7 2 3 7 2 2 G 7...
Страница 109: ...109 G 7 7 2 4 G 6 G 2 45 G 6 G 2 7 2 5 7 3 1 1 7 4 50 C B 5 7...
Страница 110: ...110 H 2 7 5 O 1 7 6 7 7 7 7 1 7 7 2...
Страница 111: ...111 7 7 3 2 7 7 4...
Страница 112: ...112 7 8 3 2 7 7 5 7 4 7 5 7 4 7 5 8 8 1 50 8 2 8 3...
Страница 113: ...113 8 4 8 5 8 6 9 X X X X X X X X X X X X X X X X X X...
Страница 114: ...114 8 7 8 7 1 1 2 3 4 5 6 7 8 9 10 12 16 19 20 21 22...
Страница 115: ...115 8 7 2 8 8 8 9 9 9 1 9 L 1 9 2 9 2 1 1 30 9 2 2 5 9 2 3...
Страница 116: ...116 9 2 4 9 2 5 9 2 6 9 2 7 9 2 8 9 2 9 9 2 10 100 20 30...
Страница 117: ...117 10 12 10 1 2013 56 EU 10 2 2012 19 EU 2012 19 EU...
Страница 134: ......


