


40
Set the alarm area number and then enter the desired alarm area name. Up to 4 alarm
areas can be added. Click “Draw Area” and then select the area where you want to set
as the alarm area in the image (the alarm area should be a closed area). Click “Stop
Draw” to stop drawing. Click “Clear” to delete the alarm area. Click “Save” to save the
settings.
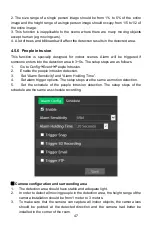
5. Set the schedule of the object removal detection. The setup steps of the schedule
are the same as the schedule recording setup.
※
Camera configuration and surrounding area
1. The detected objects should not be less than 1/50 to 1/3 of the entire image.
2. Make sure cameras can view objects for at least from 3 to 5 seconds.
3. The defined area cannot be covered frequently and continuously (i.e. people and
traffic).
4. The drawn frame must be very close to the margin of the object to enhancing the
sensitivity and accuracy of the detection.
5. Not enable object removal detection with scenes with various light changes.
6.Not enable object removal detection if there are complex and dynamic environments
in the scene.
8. Adequate light and clear scenery are crucial for object removal detection.
4.5.2 Exception
This function can detect changes in the surveillance environment affected by the
external factors.
To set exception detection:
Go to Config
Event
Exception interface as shown below.


