Comelit IP 100 SERIES Скачать руководство пользователя страница 13


13

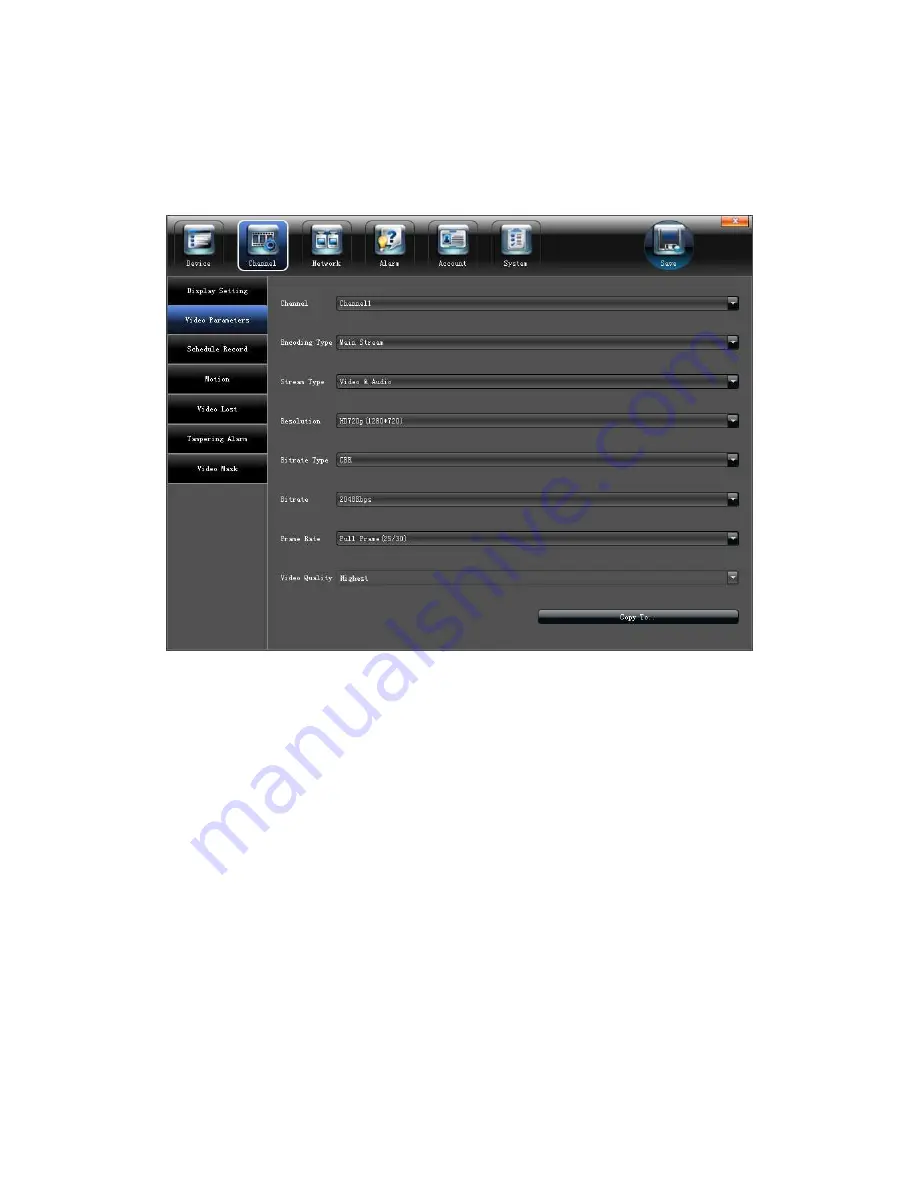
5.2.2 Video Parameters 

Modify the relevant channel video parameters on the "Video Parameters" 

interface,as shown in the below picture:   


1

Channel

Select the channel number 

2

Encoding Type: Mani stream/ Sub stream/ Main stream(Event) for selection 

3

Stream type

Video&Audio/Video optional 

4

Resolution

Several kinds of resolution which IPC supported   

5

Bit rate Type: CBR/VBR optional 

6

Bit rate: Select relevant bit rate which needed 

7

Frame Rate: Select different frame rate from the drop-down list,    "FULL"default. 

8

Video quality: Different level video quality optional, "Highest" default. 

Note: " Video setting" will be directly modify the IP cameras parameters, and only valid for 

private protocol linkage channel


Содержание IP 100 SERIES

Страница 1: ...1 NVR IP 100 SERIES Please read this manual thoroughly before use and keep it for future reference...

Страница 2: ...Channel parameters setting 12 5 2 1 Display Setting 12 5 2 2 Video Parameters 13 5 2 3 Schedule Record 14 5 2 4 Motion Detection 15 5 2 5 Video lost 17 5 2 6 Tampering Alarm 18 5 2 7 Video Mask Setti...

Страница 3: ...covery Configuration 35 6 PTZ control 35 7 Manual record 36 8 Manual snapshot 37 9 Video Playback 37 10 Screen Display Setting 38 11 Video Backup Setting 39 12 Alarm setting 40 13 File Manage 40 14 Im...

Страница 4: ...rt Shutdown System 2 1 Main menu Start Power off Reboot Login Logout 1 Start up Switch on the power source correctly and start up the devices 2 Power off Click Power off the device will shutdown 3 Reb...

Страница 5: ...5 3 Preview Start up the devices after successfully login the following interface will appear...

Страница 6: ...6 4 IP Channel setting 4 1 Search IPC At the page of IP Channel Setting click Search the local area network IPC will appear and do basic parameters modify as shown in the below picture...

Страница 7: ...IP camera will add to the left channel automatically then click save as shown in the below picture Note Click ALL will add the search menu camera to the left channel in turn 4 3 Add IPC manually Clic...

Страница 8: ...ave as shown in the below picture 1 Enable Select the relevant channel check Enable 2 Protocol ONVIF Standard protocol I8 Private protocol I9 Private protocol RTSP Standard protocol for selection 3 IP...

Страница 9: ...9 4 5 Modify IPC Parameters Double click the channel parameters which needed to modify on the Channel menu then fill in the relevant parameters click Modify as shown in the below picture...

Страница 10: ...10 4 6 Delete IPC Mark the IPC parameters which needed to delete then click Delete as shown in the below picture...

Страница 11: ...setting 5 1 Device parameters setting Click Device parameters on the Device Info interface then view and modify the relevant basic information as shown in the below picture 1 Device Info Check and mod...

Страница 12: ...in the below picture 1 Channel Modify the specified channel name 2 Local camera name Modify the input devices channel name for specified channel 3 Time format Select time display mode for the access d...

Страница 13: ...am type Video Audio Video optional 4 Resolution Several kinds of resolution which IPC supported 5 Bit rate Type CBR VBR optional 6 Bit rate Select relevant bit rate which needed 7 Frame Rate Select di...

Страница 14: ...backup Double click the time bar to set precise video backup there will be a small check appear and then double click the small check the following interface will pop up The check box in front of All...

Страница 15: ...rd Set relevant advanced recording parameters for each channel on the Advance interface as shown in the below picture 5 2 4 Motion Detection Note Fore end IP Camera must support motion detection Modif...

Страница 16: ...16 1 Click in front of Enable Motion Detection 2 Set motion areas as shown in the below picture 3 Adjust sensitivity volume 4 Set arm schedule 5 Select trigger mode as shown in the below picture...

Страница 17: ...17 5 2 5 Video lost Modify each video channel parameters on the Video lost interface as shown in the below picture 1 Click in front of Enable Video Lost 2 Set arm schedule...

Страница 18: ...the below picture 5 2 6 Tampering Alarm Note Fore end IP Camera must support tampering alarm Modify each video channel parameters on the Tampering Alarm interface as shown in the below picture 1 Clic...

Страница 19: ...s shown in the below picture 3 Set arm schedule 4 Select trigger mode as shown in the below picture 5 2 7 Video Mask Setting Modify each video channel parameters on the Video Mask interface as shown i...

Страница 20: ...n front of Enable Video Mask 2 Set mask areas as shown in the below picture 5 3 Network parameters setting Set the relevant parameters according to the need on the Network interface as shown in the be...

Страница 21: ...odify the basic network parameters on the Network setting interface as shown in the below picture 1 NIC Type Select diverse network card according to the need 2 IP Input the relevant IP address number...

Страница 22: ...relevant default gateway 7 DNS1 and DNS2 Administer main machine to realize DVR register to the servers automatically 8 MAC Display present MAC address 9 HTTP Port Input relevant port number 80 defau...

Страница 23: ...meters on the Advance interface as shown in the below picture 1 Enable PPPOE function to achieve NVR dialing 2 Click in front of Enable UPnP and setup HTTP port and TCP port it can match successfully...

Страница 24: ...his DDNS server on it 1 Select DDNS server type ex ComelitDNS 2 Input the server name ex update comelitdns com 3 Input the port 4 Input the user name 5 Input the password 10 char max 6 Confirm the pas...

Страница 25: ...P of the NTP server 2 NTP Port This NTP only supports TCP transmission It is default to 123 3 Update Frequency Input the time interval needed to be adjusted 4 Select Time Zone Select the time zone of...

Страница 26: ...tting Set up alarm linkage E mail on the Email Setting interface as shown in the below picture 5 4 Alarm Exception Set the relevant parameters according to the need on the Alarm interface as shown in...

Страница 27: ...5 4 1 Alarm Input Set alarm input parameters on the Alarm Input interface as shown in the below picture 1 Enable alarm processing 2 Set arm schedule 3 Select trigger mode as shown in the below pictur...

Страница 28: ...28 5 4 2 Alarm output Set alarm output parameters on the Alarm Output interface as shown in the below picture 1 Set alarm output delay 2 Set alarm schedule...

Страница 29: ...5 4 3 Exception Set abnormality on the Exception interface as shown in the below picture 5 5 Account Setting Set the relevant parameters according to the Account interface as shown in the below pictu...

Страница 30: ...30 5 5 1 User information Setting Modify Add Delete the user or distribute user permission on the Account Setting interface as shown in the below picture...

Страница 31: ...31 5 5 2 User Online Checking Check the current user connection status on the User Online interface as shown on the below picture...

Страница 32: ...32 5 6 System administration Set the relevant parameters according to the System interface as shown in the below picture...

Страница 33: ...rm Exception Operation for selection 2 Sub Type According to the different main types have corresponding sub type for selection 3 From Select a start time for log query 4 To Select a end time for log...

Страница 34: ...ng Click HDD Setting check HDD capacity free space and do format by click in front of HDD No as shown in the below picture 5 6 4 System Update Browsing the upgrade file on the Update click Upgrade to...

Страница 35: ...n Default to make device do corresponding operation 6 PTZ control 1 Preset setting Rotate the camera to appropriate angle and position by PTZ directional buttons select a preset number in the drop dow...

Страница 36: ...p down list and click delete to clear the cruise 3 Track setting Select a track number in the drop down list click track start buttons to make PTZ operation and click again to finish track memory oper...

Страница 37: ...ew channel and check the image picture in the file manager 9 Video Playback Select Playback on the main menu to enter into channel select interface check needed replay channels and the video image wil...

Страница 38: ...single channel screen to get full screen display 10 Screen Display Setting Select Display Setting in the main menu the following interface will pop up 1 Resolution Select different resolution accordi...

Страница 39: ...ified normally when it identified normally the following information page will display Channel Select relevant channel in the drop down list according to the need From Select a start time for video ba...

Страница 40: ...devices alarm information will appear on the list as shown in the below picture 13 File Manage Select File Manager in the main menu the file list column will show an external storage device backup fi...

Страница 41: ...41 14 Image Setting Adjust the video image brightness sharpness Saturation tone volume on the Image Setting interface as shown in the below picture...

Страница 42: ...42 15 Screen Aspect Ratio Segmentation According to the NVR version there are 4 screen 9 screen 16 screen 25 screen 36 screen for selection...

Страница 43: ...rear panel of the NVR Front Panel art IPNVR109A IPNVR116A IPNVR116B and IPNVR116C Front Panel art IPNVR125A Rear Panel art IPNVR109A and IPNVR116A Rear Panel art IPNVR116B and IPNVR116C 1 2 3 8 9 4 7...

Страница 44: ...work port 5 VGA port VGA video signal output port 6 Power supply input Power supply input port 12 VDC 7 Connecting terminal Include alarm input alarm output RS 485 port 8 HD port HDMI Video signal out...

Страница 45: ...PNVR104APOE and IPNVR104BPOE USB Rear panel art IPNVR104APOE The rear panel of port function is shown as follow Item No Parameter Description 1 USB To connect USB mouse Mobile HDD USB Storage drive et...

Страница 46: ...with PoE power supply to connect the cameras 4 HD port HDMI Video signal output port 5 VGA port VGA video signal output port 7 Power supply input Power supply input port 48 VDC Front Panel art IPNVR1...

Страница 47: ...Mbit sec RJ 45 Network port 3 PoE network ports RJ 45 Network port with PoE power supply to connect the cameras 4 HD port HDMI Video signal output port 5 VGA port VGA video signal output port 6 USB T...

Страница 48: ...present the label with the univocal code for the DNS service registration In case it was not present contact Comelit Technical support 3 connect to the site http www comelitdns com sign up by followi...

Отзывы: