background image

InteliGen 200 Global Guide

19

Note:

Use Up and

Down button to

select required

alarm reason.

Note:

Use Enter button to move to the next page of history log.

Note:

Use Up and

Down button to

select required

alarm reason.

Note:

Use Enter button to move to the next page of history log.

Note:

Use Up and

Down button to

select required

alarm reason.

Note:

Use Enter button to move to the next page of history log.

Note:

Use Up and

Down button to

select required

alarm reason.

Note:

Use Enter button to move to the next page of history log.

Содержание InteliGen 200

Страница 1: ...11 E mail info comap control com www comap control com Operator Guide InteliGen 200 Controller for parallel gen set applications SW version 1 1 0 1 Front panel elements 2 2 Display screens and pages structure 5 3 Browsing alarms 21 4 Password 22 5 Information screen 29 6 Language selection 31 7 Configuration level 33 8 Display contrast adjustment 35 ...

Страница 2: ...ge the mode if the controller mode is forced by one of binary inputs listed in the Reference Guide Operating modes chapter RIGHT button Use this button to move right or to change the mode The button can change the mode only if the main screen with the indicator of currently selected mode is displayed Note This button will not change the mode if the controller mode is forced by one of binary inputs...

Страница 3: ...essing of button will cancel current phase of stop sequence like cooling and next phase will continue GCB button Works in MAN and TEST modes only Press this button to open or close the GCB or start synchronization manually MCB button Works in MAN and TEST modes only Press this button to open or close the MCB or start the reverse synchronization manually Indicators and others Position Description G...

Страница 4: ...r is green and Mains failure indicator is red Green LED is on if mains is present and within limits Red LED starts blinking when the mains failure is detected and after the gen set has started and connected to the load it lights permanently until the mains failure disappears MCB ON Green LEDs are on if MCB is closed and Mains is healthy If Mains is not healthy and MCB is closed than middle LED is ...

Страница 5: ...ed values like i e gen set power statistic data and the alarm list on the last screen The page Setpoints contains all setpoints organized to groups and also a special group for entering password The page History log shows the history log in the order that the last record is displayed first 2 1 Main Screen 2 1 1 Symbols Padlock active when LBI ACCESS LOCK is active R active when there is active rem...

Страница 6: ...easurement Screens Note Use Up and Down button to move between measurement pages Note Use Up and Down button to move between measurement pages Note Only for SPtM application Note Use Up and Down button to move between measurement pages ...

Страница 7: ... Up and Down button to move between measurement pages Note Use Up and Down button to move between measurement pages Note Use Up and Down button to move between measurement pages Note Use Up and Down button to move between measurement pages ...

Страница 8: ...ton to move between measurement pages Note Only for MINT application Note Use Up and Down button to move between measurement pages Note Use Up and Down button to move between measurement pages Note Use Up and Down button to move between measurement pages ...

Страница 9: ... Up and Down button to move between measurement pages Note Use Up and Down button to move between measurement pages Note Use Up and Down button to move between measurement pages Note Use Up and Down button to move between measurement pages ...

Страница 10: ...urement pages Note Available only with plug in module Note Use Up and Down button to move between measurement pages Note Available only with plug in module Note Use Up and Down button to move between measurement pages Note Use Up and Down button to move between measurement pages ...

Страница 11: ...urement pages Note Use Up and Down button to move between measurement pages Note Use Up and Down button to move between measurement pages Note Available only with plug in module Note Use Up and Down button to move between measurement pages Note Available only with plug in module ...

Страница 12: ...etween measurement pages Note Available only with plug in module Note Use Up and Down button to move between measurement pages Note Available only with plug in module Note Use Up and Down button to move between measurement pages Note Available only with plug in module ...

Страница 13: ...ween measurement pages Note Use Up and Down button to move between measurement pages Note From all of these pages it is possible to switch seamlessly to the setpoint group page by pressing Page button Note There can be some additional screens and also some screens can be hidden Screen s visibility depends on actual configuration usage of extension or communication modules ECU etc ...

Страница 14: ...n fluently go to the setpoint group page by pressing Page button Note Use Up and Down button to select required setpoint group Note Use Enter button to enter selected setpoint group Note Use Left and Right button to select required setpoint Note Use Enter button to enter selected setpoint ...

Страница 15: ...ton to confirm adjusted value of setpoint Note Use Page button to discard changes to set setpoint to previous value and to return to the list of setpoints of selected group IMPORTANT Cannot change setpoint Setpoints marked with an padlock are password protected Enter password as described in the chapter Password page 22 ...

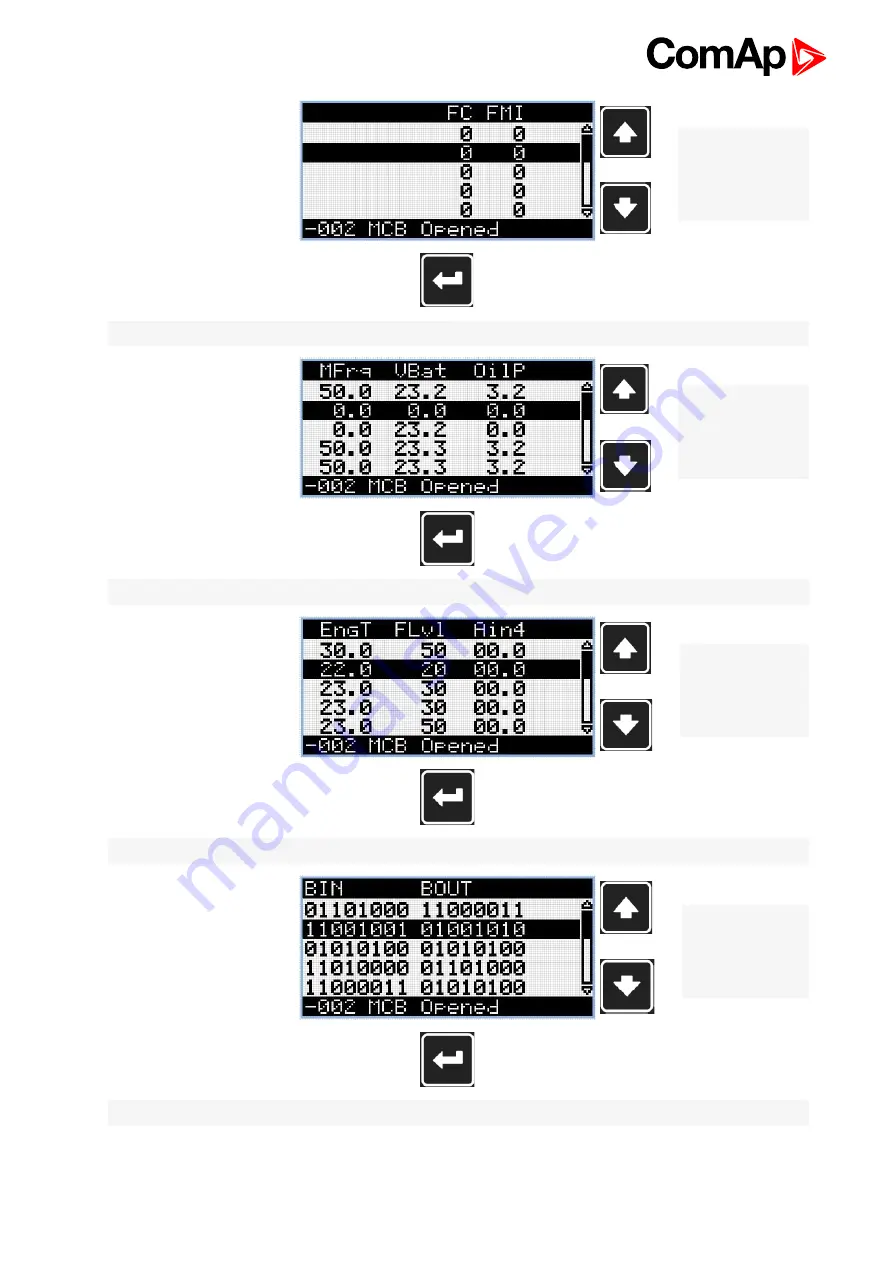
Страница 16: ...n fluently go to the setpoint group page by pressing Page button Note From setpoint group page we can fluently go to the history log pages by pressing Page button Note Use Up and Down button to select required alarm reason Note Use Enter button to move to the next page of history log ...

Страница 17: ...se Up and Down button to select required alarm reason Note Use Enter button to move to the next page of history log Note Use Up and Down button to select required alarm reason Note Use Enter button to move to the next page of history log Note Use Up and Down button to select required alarm reason Note Use Enter button to move to the next page of history log ...

Страница 18: ...se Up and Down button to select required alarm reason Note Use Enter button to move to the next page of history log Note Use Up and Down button to select required alarm reason Note Use Enter button to move to the next page of history log Note Use Up and Down button to select required alarm reason Note Use Enter button to move to the next page of history log ...

Страница 19: ...se Up and Down button to select required alarm reason Note Use Enter button to move to the next page of history log Note Use Up and Down button to select required alarm reason Note Use Enter button to move to the next page of history log Note Use Up and Down button to select required alarm reason Note Use Enter button to move to the next page of history log ...

Страница 20: ...the first page of history log IMPORTANT The records are numbered in reverse order i e the latest newest record is 0 and older records have 1 2 etc Note This is only basic history record There can be some additional screens in case that in controller is extension module or ECU is configured Also it depends on connection type ...

Страница 21: ...the appropriate alarm conditions are still present Inactive alarms are displayed as black text on white background It means the alarm is no more active i e the appropriate alarm conditions are gone Not confirmed alarms are displayed with an asterisk It means the alarm is still not acknowledged confirmed ECU alarms SPN FMI OC SC SPN Suspect parameter number FMI type of protection OC number of error...

Страница 22: ...es we can fluently go to the setpoint group page by pressing Page button Note Use Up and Down button to select setpoint group Password Note Use Enter button to enter setpoint group Password Note Use Up and Down button to select Enter Password Note Use Enter button to enter selected setpoint ...

Страница 23: ...ected setpoint Note Use Left and Right button to move between digits Note Use Enter button to confirm the password or Page button to cancel entering the password Note In case that invalid password is entered the controller shows Invalid password screen Use Page button to go back to menu ...

Страница 24: ...ge button Note Use Up and Down button to select setpoint group Password Note Use Enter button to enter setpoint group Password Note Use Up and Down button to select Change Password Note Use Enter button to enter selected setpoint Note Use Up and Down button to select required level of password Note Use Enter button to enter selected setpoint ...

Страница 25: ...set required value of password again Note Use Left and Right button to move between digits Note After setting new password again use Enter button to confirm adjusted password or Page button to discard changes and to cancel changing password Note Before changing the password controller has to be unlocked In case that controller is locked the controller shows Password required screen In that case th...

Страница 26: ...s we can fluently go to the setpoint group page by pressing Page button Note Use Up and Down button to select setpoint group Password Note Use Enter button to enter setpoint group Password Note Use Up and Down button to select Enter Password Note Use Enter button to enter selected setpoint ...

Страница 27: ...de which must be sent to ComAp technical support 2 ComAp technical support will send an unique one time action code to the backup e mail address specified in the controller 3 Copy the received action code to InteliConfig and reset the administrator level password to default IMPORTANT It is extremely important to adjust the backup e mail address in the controller Otherwise you will not be able to r...

Страница 28: ...blocked it refuses any further attempts to enter password 3 When unblocked again the controller accepts one attempt to enter password If the password is incorrect again the controller will be blocked for 2 minutes 4 Each further attempt to enter invalid password will double the blocking time but maximum blocking time is 20 minutes 5 When incorrect password is entered 100 times after each other the...

Страница 29: ...ide 29 5 Information screen Note On Main measurement screen press Enter and Page button together Enter button has to be pressed first Note Use Page button to move to the next page Note Use Page button to move to the next page ...

Страница 30: ...InteliGen 200 Global Guide 30 Note Use Up button to move back to main measurement screen ...

Страница 31: ...ide 31 6 Language selection Note On Main measurement screen press Enter and Page button together Enter button has to be pressed first Note Use Page button to move to the next page Note Use Page button to move to the next page ...

Страница 32: ...InteliGen 200 Global Guide 32 Note Use Page button to move to the next page Note Use Up and down button to select required language Note Use Enter button to confirm selected language ...

Страница 33: ...de 33 7 Configuration level Note On Main measurement screen press Enter and Page button together Enter button has to be pressed first Note Use Page button to move to the next page Note Use Page button to move to the next page ...

Страница 34: ...34 Note Use Page button to move to the next page Note Use Page button to move to the next page Note Use Up and down button to select required level of configuration Note Use Enter button to confirm selected level of configuration ...

Страница 35: ...rast adjustment Note On any measurement screen press Enter and Down button together for lower contrast Note On any measurement screen press Enter and Up button together for higher contrast Note After setting a contrast no another action is needed ...

Отзывы: