background image

14

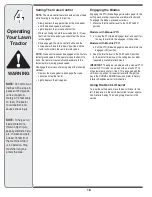
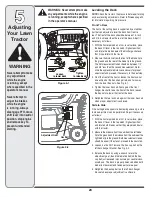
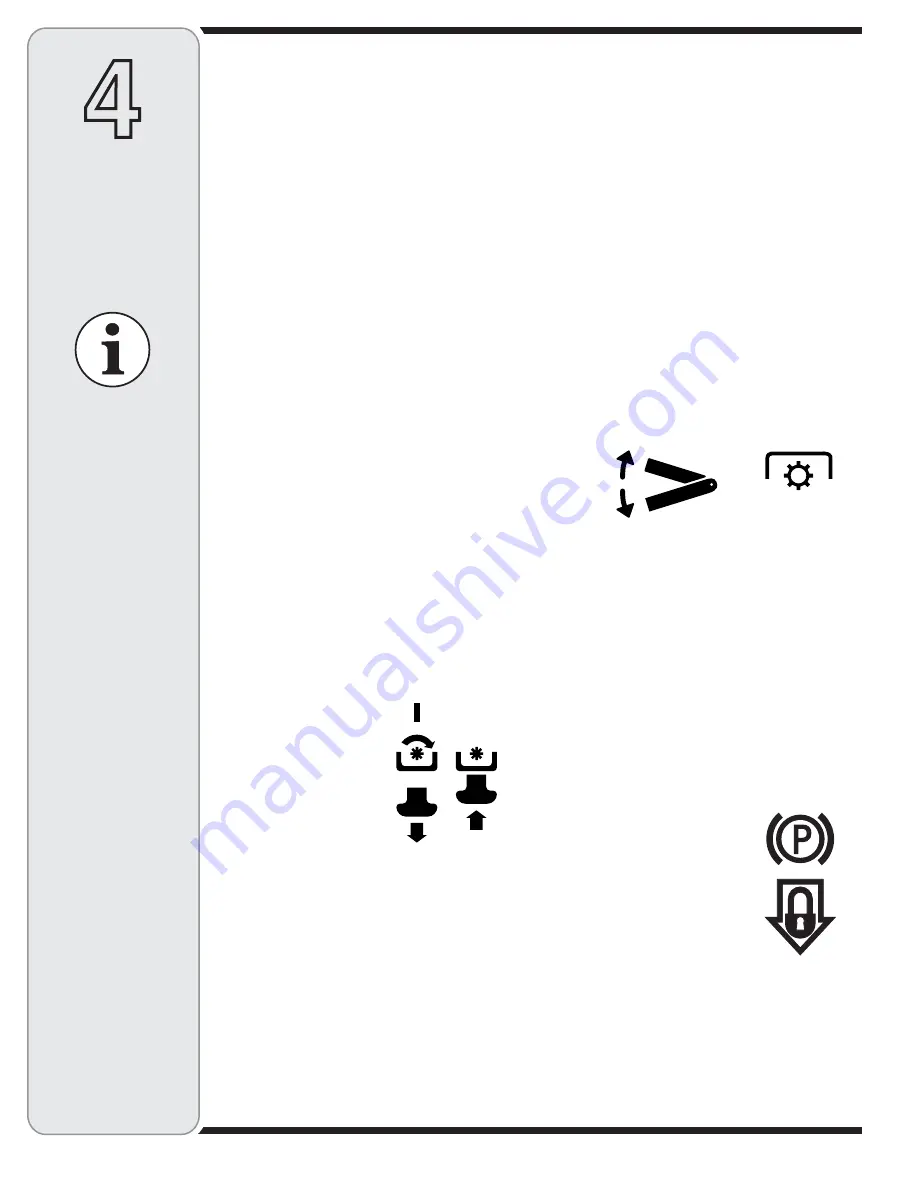
Electric PTO (Blade Engage) Knob 

(If 

Equipped)

To engage the power to the cutting deck or other (sepa-
rately available) attachments on models equipped with 
an electric PTO, pull outward on the PTO (Blade Engage) 
knob. Push the PTO (Blade Engage) knob inward to 
disengage the power to the cutting deck.
NOTE: The PTO (Blade Engage) knob must be in the 
disengaged (OFF) position when starting the engine, 
when traveling in reverse and if the operator leaves the 
seat.

PTO (Blade Engage) Lever

On models equipped with a manual PTO (Blade Engage), 
the PTO (Blade Engage) lever is located on the left side of 
the dashboard next to the steering wheel. Move the PTO 
(Blade Engage) lever forward to engage the power to the 
cutting deck or other (separately available) attachments; 
move the PTO (Blade Engage) lever rearward to disen-
gage the power to the attachments. 

NOTE: The PTO (Blade Engage) lever must be in the 
disengaged (OFF) position when starting the engine, 
when traveling in reverse and if the operator leaves the 
seat.

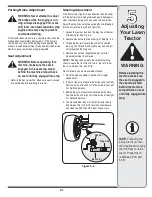
Deck Lift Lever 

Found on your tractor’s right fender, the deck lift lever is 
used to change the height of the cutting deck. To use, 
move the lever to the left, then place in the notch best 
suited for your application.

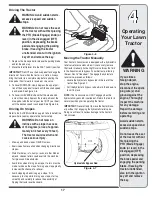
Parking Brake Button

To set the parking brake, fully 
depress the brake pedal and push 
the parking brake button in. Hold 
the button in while taking your foot 
off the brake pedal. Both the park-
ing button and the brake pedal will 
then stay depressed. To release 
the parking brake, depress the 
brake pedal slightly. The parking 
brake button will then return to its 
original position.
NOTE: The parking brake must be set if the operator 
leaves the seat with the engine running or the engine will 
automatically shut off.

IMPORTANT: Always set the parking brake when leaving 
the tractor unattended.

The Indicator Monitor will also remind the operator of 
maintenance intervals for changing the engine oil. The 
LCD will alternately flash the recorded hours, “CHG” and 
“OIL” for five minutes, after every 50 hours of recorded 
operation elapse. The maintenance interval lasts for 
two hours (from 50-52, 100-102, 150-152, etc.). The 
LCD will also flash as described above for five minutes 
every time the tractor’s engine has been started during 
this maintenance interval. Before the interval expires, 
change the crankcase oil level as instructed in this 
Operator’s Manual.

Brake 

If the Brake light illuminates when attempting to start the 
tractor’s engine, depress the brake pedal.

PTO (Blade Engage)

If the PTO light illuminates when attempting to start the 
tractor’s engine, move PTO lever (or button) into the 
disengaged (OFF) position.

Oil

It is normal for the Oil light to illuminate while the engine 
is 

cranking during start-up, but if it illuminate’s during 

operation, 

while the engine is running, stop the 

tractor immediately and check the crankcase oil level as 
instructed in this Owner’s Manual.

Battery

It is normal for the Battery light to illuminate while the 
engine is 

cranking during start-up, but if it illuminate’s 

during operation, 

while the engine is running, the 

battery is in need of a charge or the engine’s charging 
system is not generating sufficient amperage. Refer 
to the 

MAINTENANCE section of this manual for the 

proper battery charging procedure or have the charging 
system checked by your 
service dealer.
The ammeter (if so 
equipped) measures the 
electrical output of the 
engine’s charging system. 
Under normal operating 
conditions, with the engine 
at full throttle, the 
ammeter’s needle should 
measure a positive charge.
The 

hour meter (if so equipped) operates whenever the 

engine is running and records the actual hours of tractor 
operation.

4

Operating 

Your Lawn 

Tractor

04/",!$%%.'!'%

ON

OFF

PTO

The PTO (Blade 
Engage) knob (or 
lever) must be in 
the disengaged 
(OFF) position 
when starting 
the engine, when 
traveling in reverse 
and if the operator 
leaves the seat.

Содержание Series 81GH

Страница 1: ...S A IMPORTANT READ SAFETY RULES AND INSTRUCTIONS CAREFULLY BEFORE OPERATION OPERATOR S MANUAL LES DISTRIBUTIONS RVI LIMITÉE 2955 JEAN BAPTISTE DESCHAMPS LACHINE QUEBEC H8T 1C5 MTD LLC P O BOX 361131 CLEVELAND OHIO 44136 0019 769 04784 1 17 09 Hydrostatic Garden Tractor Model Series 81GH ...

Страница 2: ...you have difficulty assembling this product or have any questions regarding the controls operation or maintenance of this unit please call an authorized dealer Please have your unit s model number and serial number ready when you call See previous section to locate this information 2 The engine manufacturer is responsible for all engine related issues with regards to performance power rating speci...

Страница 3: ... and you could slip resulting in serious injury Operate RIDING mowers up and down slopes never across the face of slopes Operate WALK BEHIND mowers across the face of slopes never up and down slopes Sight and hold this level with a vertical tree or a corner of a building or a fence post F o l d a l o n g d o t t e d l i n e r e p r e s e n t s a 1 5 s l o p e 15 Use this page as a guide to determi...

Страница 4: ...it until the blade s come to a complete stop before removing grass catcher emptying grass unclogging chute removing any grass or debris or making any adjustments 21 Never leave a running machine unattended Always turn off blade s place transmission in neutral set parking brake stop engine and remove key before dismounting 22 Use extra care when loading or unloading the machine into a trailer or tr...

Страница 5: ...and turn machine off if a child enters the area c Before and while backing look behind and down for small children d Never carry children even with the blade s shut off They may fall off and be seriously injured or interfere with safe machine operation e Use extreme care when approaching blind corners doorways shrubs trees or other objects that may block your vision of a child who may run into the...

Страница 6: ...e while the engine is running 11 Grass catcher components and the discharge cover are subject to wear and damage which could expose moving parts or allow objects to be thrown For safety protection frequently check components and replace immediately with original equipment manufacturer s O E M parts only listed in this manual Use of parts which do not meet the original equipment specifications may ...

Страница 7: ...NG BLADES Never carry passengers Never carry children even with the blades off DANGER ROTATING BLADES Always look down and behind before and while backing to avoid a back over accident WARNING ROTATING BLADES Do not put hands or feet near rotating parts or under the cutting deck Contact with the blade s can amputate hands and feet WARNING THROWN OBJECTS This machine may pick up and throw and objec...

Страница 8: ...nto service after the date shown on the battery charge the battery as instructed in the Maintaining Your Lawn Tractor section of this manual prior to operating the tractor Gas and Oil Fill up The gasoline tank is located under the hood and has a capacity of either two or three gallons Do not overfill WARNING Use extreme care when handling gasoline Gasoline is extremely flammable and the vapors are...

Страница 9: ...Styles vary by model If the steering wheel for your tractor did not come attached the hardware for attaching it has been packed within the steering wheel beneath the steering wheel cap Carefully pry off the steering wheel cap and remove the hardware 1 With the wheels of the tractor pointing straight forward place the steering wheel over the steering shaft 2 Place the washer with the cupped side do...

Страница 10: ...the instruc tions below to attach it 1 Remove the two hex screws and nuts from the seat pivot bracket 2 Align the front holes of the seat mounting bracket with the holes in the seat pivot bracket on your tractor and secure with previously removed hex screws and nuts See Figures 3 6 or Figure 3 7 Knob Adjustment Seat To adjust the position of the seat loosen the knob on the bottom of the seat See F...

Страница 11: ...ock nuts and shoulder screws which secure them to the deck See Fig 3 9 c Place the deck lift lever in the desired mowing height setting d Reinsert the shoulder screw with each gauge wheel into the index hole that leaves approxi mately inch between the bottom of the wheel and the pavement Refer to Leveling the Deck in the Maintenance section of this manual for more detailed instructions regarding v...

Страница 12: ...W 0OSITION Figure 4 2 NOTE Any reference in this manual to the RIGHT or LEFT side of the tractor is observed from operator s position Throttle Control Lever The throttle control lever is located on the right side of the tractor s dash panel This lever controls the speed of the engine and on some models when pushed all the way forward the choke control also When set in a given position the throttle...

Страница 13: ...oth Safety Interlock Switches and Starting The Engine in this section of the manual for detailed instructions regarding the Ignition Switch Module and operating the tractor in REVERSE CAUTION MODE Drive Pedal The drive pedal is located below the brake pedal on the right front side of the tractor along the running board Depress the upper portion of the drive pedal forward to cause the tractor to tr...

Страница 14: ...ll also remind the operator of maintenance intervals for changing the engine oil The LCD will alternately flash the recorded hours CHG and OIL for five minutes after every 50 hours of recorded operation elapse The maintenance interval lasts for two hours from 50 52 100 102 150 152 etc The LCD will also flash as described above for five minutes every time the tractor s engine has been started durin...

Страница 15: ...de Engage knob in the engaged ON position regardless of whether the parking brake is engaged With the ignition key in the NORMAL MOWING position the electric PTO Blade Engage clutch will automatically shut off if the PTO Blade Engage knob is moved into the engaged ON position with the drive pedal in Reverse WARNING Do not operate the tractor if the interlock system is malfunctioning This system wa...

Страница 16: ...OT OPERATE THE UNIT WHERE IT COULD SLIP OR TIP IF MACHINE STOPS GOING UPHILL STOP BLADE S AND BACK DOWNHILL SLOWLY DO NOT MOW WHEN CHILDREN OR OTHERS ARE AROUND NEVER CARRY CHILDREN EVEN WITH BLADES OFF LOOK DOWN AND BEHIND BEFORE AND WHILE BACKING KEEP SAFETY DEVICES GUARDS SHIELDS AND SWITCHES IN PLACE AND WORKING REMOVE OBJECTS THAT COULD BE THROWN BY THE BLADE S KNOW LOCATION AND FUNCTION OF A...

Страница 17: ... cause serious injury Mow up and down slopes NEVER across Exercise extreme caution when changing direction on slopes Watch for holes ruts bumps rocks or other hidden objects Uneven terrain could overturn the machine Tall grass can hide obstacles Avoid turns when driving on a slope If a turn must be made turn down the slope Turning up a slope greatly increases the chance of a roll over Avoid stoppi...

Страница 18: ...rottle control lever to the FAST rabbit position Models with Manual PTO 2 a Grasp the PTO Blade Engage lever and pivot it all the way forward into the engaged ON position Models with Electric PTO b Pull the PTO Blade Engage knob outward into the engaged ON position 3 Keep the throttle lever in the FAST rabbit position for the most efficient use of the cutting deck or other separately available att...

Страница 19: ...stalled For best results it is recommended that the first two laps be cut with the discharge thrown towards the center After the first two laps reverse the direction to throw the discharge to the outside for the balance of cutting This will give a better appearance to the lawn Do not cut the grass too short Short grass invites weed growth and yellows quickly in dry weather Mowing should always be ...

Страница 20: ...ved Side to Side If the cutting deck appears to be mowing unevenly a side to side adjustment can be performed Adjust if necessary as follows 1 With the tractor parked on a firm level surface place the deck lift lever in the top notch highest position and rotate both blades so that they are perpendicular with the tractor 2 Measure the distance from the outside of the left blade tip to the ground an...

Страница 21: ...If the tractor turns tighter in one direction than the other or if the ball joints are being replaced due to damage or wear the steering drag links may need to be adjusted Adjust the drag links so that equal lengths are threaded into the ball joint on the left and right side 1 Loosen the jam nut found on the drag link at the rear of the ball joint See Fig 5 3 2 Remove hex nut on the top of ball jo...

Страница 22: ...ne Operator Owner Manual packed with your unit Perform the above steps in the opposite order after oil has finished draining 7 Refill the engine with new motor oil as instructed in the Engine Operator Owner Manual packed with your unit IMPORTANT Refer to the Engine Operator Owner Manual packed with your unit for information regarding the quantity and proper weight of motor oil Air Cleaner Service ...

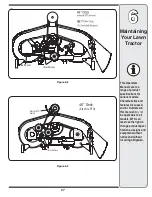
Страница 23: ...1 on the opposite side of the 46 cutting deck Cutting Deck Removal To remove the cutting deck proceed as follows 1 Place the PTO Blade Engage knob or lever in the disengaged OFF position and engage the parking brake 2 Lower the deck by moving the deck lift lever into the bottom notch on the right fender 3 Remove the belt keeper rod from around the engine pulley by removing the self tapping screw 4...

Страница 24: ... of time charge the battery with an automotive type 12 volt charger for a minimum of one hour at six amps WARNING Batteries give off an explosive gas while charging Charge battery in a well ventilated area and keep away from an open flame or pilot light as on a water heater space heater furnace clothes dryer or other gas appli ances Jump Starting WARNING When removing or installing the battery fol...

Страница 25: ...that secures the blade to the spindle assembly See Figure 6 5 4 To properly sharpen the cutting blades remove equal amounts of metal from both ends of the blades along the cutting edges parallel to the trailing edge at a 25 to 30 angle IMPORTANT If the cutting edge of the blade has already been sharpened to within 1 5 8 from the edge or if any metal separation is present replace the blades with ne...

Страница 26: ...on key discon nect the spark plug wire s and ground against the engine to prevent unintended starting before remov ing the belt s Avoid the possibility of a pinching injury Do not place your fingers on the idler spring or between the belt and a pulley while removing the belt Figure 6 7 5 Remove the deck belt from around all pulleys including the deck idler pulleys and the electric PTO clutch units...

Страница 27: ...gure 6 9 This Operators Manual covers a range of product specifications for various models Characteristics and features discussed and or illustrated in this manual may not be applicable to all models MTD LLC reserves the right to change product speci fications designs and equipment without notice and without incurring obligation ...

Страница 28: ...ignition prior to draining fuel Follow the instructions in the separate engine manual packed with your unit for proper engine care prior to storing your tractor WARNING Never store the machine or fuel container indoors where there is an open flame spark or pilot light such as on water heater furnace clothes dryer or other gas appliance Attachments Accessories The following attachments and accessor...

Страница 29: ...idge element or clean pre cleaner if so equipped 1 Unit running with CHOKE applied 2 Spark plug wire s loose 3 Blocked fuel line or stale fuel 4 Vent in gas cap plugged 5 Water or dirt in fuel system 6 Dirty air cleaner Engine overheats 1 Fill crankcase with proper oil 2 Clean grass clippings and debris from around the engine s cooling fins and blower housing 1 Engine oil level low 2 Air flow rest...

Страница 30: ...use or exposure d Service completed by someone other than an authorized service dealer e MTD does not extend any warranty for products sold or exported outside of Canada including possessions and territories f Replacement parts that are not genuine MTD parts g Transportation charges and service calls h If Products are used commercially MTD may separately offer Limited Commercial Warranties on cert...

Страница 31: ... AGAINST THESE COMPONENTS MUST BE HANDLED THROUGH THE RESPECTIVE MANUFACTURERS SERVICE DEALERS Belts light bulbs clutch parts friction wheels grass bags tires seats rider deck wheels and cutting blades are covered by a 60 day limited warranty Batteries are warranted against defect for 90 days at 100 of their value and 50 of their value for the period between the 91st day and the 120th day Fuses sh...

Страница 32: ...p Inc s application for certification The warranty period begins on the date the lawn mower is delivered to an ultimate purchaser or first placed into service The warranty period is two years Subject to certain conditions and exclusions as stated below the warranty on emission related parts is as follows 1 Any warranted part that is not scheduled for replacement as required maintenance in the writ...

Страница 33: ...ring System Cold start enrichment system soft choke Carburetor and internal parts Fuel pump Fuel tank 2 Air Induction System Air cleaner Intake manifold 3 Ignition System Spark plug s Magneto ignition system 4 Exhaust System Catalytic converter SAI Reed valve 5 Miscellaneous Items Used in Above System Vacuum temperature position time sensitive valves and switches Connectors and assemblies 6 Evapor...

Страница 34: ...without incurring obligation Hydrostatic Garden Tractor Drive Belt Mowing Deck 46 Deck 754 04033 Deck Blade 46 Deck Center Blade one ea 742 0612A Deck Blade 46 Deck Outer Blades two ea 742 0611A Deck Spindle 46 Deck three ea 618 0666A Deck Wheel Rear 5 0 x 1 38 two each 734 0973 Deck Wheel Front 5 0 Dia Ball two each 734 04155 Battery 925 1707D Tire Front 16 x 7 5 x 8 Square Shoulder 634 04088A Ti...

Отзывы: