


Colortrac SmartLF Installation and Operating Manual
PAS144 P/N: P002038 Colortrac Ltd © 2004
8
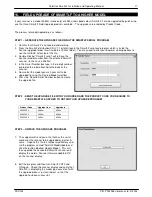
Windows will search through the CD contents
until it locates the driver and then transfer it to the
computer file system. You should see a screen
similar to this.
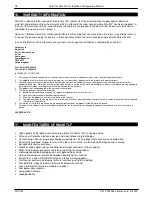
During copying Windows will interrupt the
process with a ‘Continue Anyway / STOP
installation -
Windows Logo
testing failure’
message.
This is completely normal.
Click the button labelled
‘Continue Anyway’
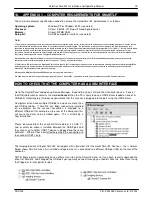
The Hardware Wizard will finish by
showing this screen. Click the Finish
button to complete the installation of the
SmartLF driver.
The SmartLF USB driver is now transferred. Whenever the scanner is plugged into the computer, Windows will
identify the USB (Universal Serial Bus) device as SmartLF and automatically load this driver. The scanner can be
plugged and disconnected freely like any regular USB device without needing to re-boot the computer.
CHECKING FOR THE SMARTLF DRIVER
The Windows system will allow the operator to check for
correct installation of the driver. Should the driver ever
be accidentally removed or require updating or in the
unlikely event of the user experiencing problems with
SmartLF this check can be useful.
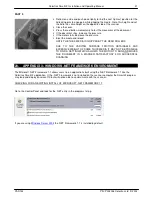
Using the Windows Control Panel click on the System
Properties icon. From here click the Hardware tab and
look for the Imaging devices entry.
Right clicking on the SmartLF Scanner entry will bring up
the Properties for the device where the status of the
scanner is displayed. The status should be ‘ This device
is working properly’
NOTE: When SmartLF is not connected or not
powered-up there will be no SmartLF Scanner entry
visible under the Imaging devices heading in the
hardware listing of the computer.