background image

ColorLite GmbH  |  Rugged 2

63

Geometry

6.7 Geometry

The measuring head version or geometry can be set in the 
menu „

Geometry“

.


Attention: Do not make any changes 

             at the Rugged 2. 
             There is only one measuring geometry 
             permanently installed. 

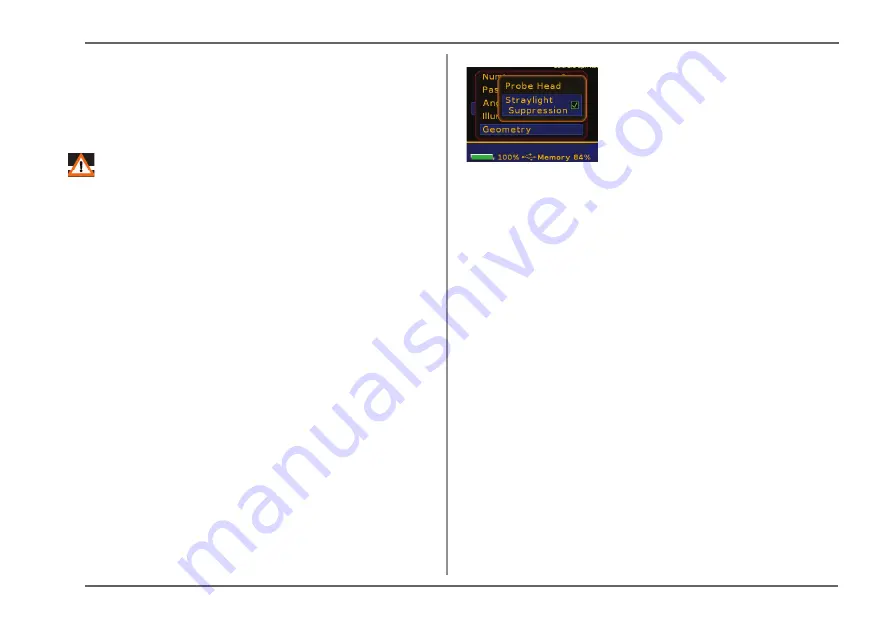
The function „

Stray light suppresion“ 

can be activated 

here. 

To access the menu, select the 

 „Geometry“

 dialog in the 

„Settings“

 menu.

The “

Stray light suppression

” measures any ambient 

light that might be entering the probe head. This “

stray

” 

light can aff ect the reproducibility and so this option should 

be used if the opening of the sensor is not fully covered 

by the sample or especially when measuring transparent 

materials such as glass or translucent materials. To activate 

the “

Stray light suppression

”, proceed as follows:

Please choose “

Geometry

” from 

menu “

Setting

”. Turn on the “Stray 

light suppression” by selecting 

the appropriate menu item and 

confi rm.

6.8  Standard search selection

The ColorLite Rugged 2 off ers the user three methods 

of selecting a standard from the memory. Change which 

method to use in the menu “Settings” opening the window 

“Standard selection” The three options are:

• 

By index

” selection is made by entering the index 

number of the standard.

• 

By list & Best Match

” names of standards are listed 

or measure any colour and the device fi nds the best 

matching standard colour.

• 

By name

” enter the name of the standard.

6.9  Save spectrum

Here you have the option to set the checkbox to store the 

entire spectrum. Confi rm with „Center“. The checkbox is 

set.

Содержание Rugged 2

Страница 1: ...Bedienungsanleitung User Manual Spektralphotometer Rugged 2 ...

Страница 2: ......

Страница 3: ... Folgen die auf falschen Angaben Nichtbefolgen der Anweisungen oder Missachtung der einschlägigen Sicherheits bestimmungen zurückzuführen sind übernimmt die ColorLite GmbH keine juristische Verantwortung bzw Haftung Alle Rechte vorbehalten Die Reproduktion dieser Dokumentation durch Drucken Fotokopieren oder andere Verfahren auch auszugsweise ist nur mit ausdrücklicher Genehmigung der ColorLite Gm...

Страница 4: ... Version der Datenbank Software ColorDaTra Kalibrierstandard mit Zertifikat Versandverpackung Bitte bewahren Sie die Versandverpackung gut auf Sollten Sie das Gerät zur Wartung Kalibrierung oder aus anderen Gründen an uns einsenden empfehlen wir zum Versand die Versandverpackung zu verwenden Ausstattung PASS FAIL Anzeige für 2 ΔE Grenzen oder ΔL Δa Δb Grenzen Metamerie Index für D65 A und D65 F11 ...

Страница 5: ... wird ständig für neue Einsatzzwecke erweitert Sie finden eine Vielzahl unseres Zubehörs mit Bild und Beschreibung auf unserer Internetpräsentation www colorlite de Selbstverständlich stellen wir auch kundenpezifisches Sonderzubehör her zögern Sie nicht uns anzusprechen Produktsupport ...

Страница 6: ... 14 4 4 Gerät ausschalten 14 4 5 Bildschirmschoner 14 4 6 Auto Power Off 14 4 7 Datum und Uhrzeit einstellen 14 4 8 Sprache einstellen 15 4 9 Handhabung 16 5 Messen mit dem Rugged 2 16 5 1 Kalibrierung 16 5 1 1 Kalibrierung mit PTB Standard 17 5 2 Standard messen 18 5 3 Standard speichern 19 5 4 Standard laden 20 5 4 1 Standard laden durch INDEX 21 5 4 2 Standard laden durch Liste Best Match 21 5 ...

Страница 7: ... Messungen 28 6 4 PASS FAIL 29 6 5 Beobachterwinkel 30 6 6 Lichtart 30 6 7 Geometrie 30 6 8 Standard Auswahl 31 6 9 Spektrum speichern 31 7 PC Schnittstelle 31 8 Fehlerbehebung 32 9 Pflege und Wartung 33 9 1 Gerät 33 9 2 Messkopf 33 9 3 PTB Standard 33 9 4 Service Wartung 33 10 Technische Daten 34 11 Umweltschutz 35 11 1 Gerät 35 11 2 Akkus 35 Inhaltsverzeichnis 11 3 Verpackung 35 12 Herstellergar...

Страница 8: ...ät nicht Vermeiden Sie starke Temperaturschwankungen Das Messgerät darf nur entsprechend der angegebenen Schutzart IP Code eingesetzt werden 1 3 Bestimmungsgemäßer Gebrauch Das Rugged 2 ist ein tragbares Gerät mit einem festem Sensorkopf das während der Messung in der Hand gehalten wird Mit dem Gerät werden Farbwerte durch spektrale Erfassung des remittierten Lichts der Oberfläche eines Objekts od...

Страница 9: ...nde Langzeit Reproduzierbarkeit Bis zu 1000 Farben bzw 300 Farben mit Remissions Spektrum plus 1000 Farbstandards können im nicht flüchtigen Speicher des Rugged 2 abgelegt werden Der Datenaustausch mit der optional erhältlichen ColorDaTra Software erfolgt über die integrierte USB Schnittstelle über Bluetooth oder WLAN 2 2 Messprinzip Das Farbmessgerät Rugged 2 arbeitet nach dem Spektralverfahren s...

Страница 10: ...ere Farbwerte umzurechnen welche der Farbempfindung bezogen auf die Differenz zwischen zwei Farben ähnlich ist Hierzu gibt es eine Vielzahl von Farbsystemen z B Y x y L a b oder L u v Farbdifferenzen ΔE also Unterschiede zwischen zwei Farben werden aus der Summe der Differenzen der drei Farbwerte für einen bestimmten Farbraum berechnet 3 Geräteübersicht 3 1 Bedien und Anzeigeelemente Abb Anzeige u...

Страница 11: ...Standard ist auf Vergleichsmessungen der Normale der PTB Physikalisch Technische Bundesanstalt rückführbar und wird mit einem Zertifikat der PTB Pysikalisch Technische Bundesanstalt ausgeliefert Um eine sichere und gleichbleibende Kalibrierung ermöglichen zu können ist der Kalibrierstandard in eine für den Messkopf präzise passende Kappe eingearbeitet die Kalibrierkappe Der Kalibrierstandard für d...

Страница 12: ...t blau hinterlegt Je nach Menü stehen hier verschiedene Einträge zur Auswahl Die Statusleiste unten ist farblich zum Menü abgetrennt 3 5 2 Die Statusleiste Je nach ausgewählter Funktion oder angezeigtem Menü sind in der Statusleiste zusätzliche Informationen angezeigt die noch vorhandene Akkuleistung und der verfügbare Speicher Die in Abb Statusleiste gezeigte Ansicht ist während einer Proben oder...

Страница 13: ...onen Akku ausgestattet 4 2 Akku aufladen Verbinden Sie das Gerät mit dem beiliegendem USB Kabel und dem Netzteil und stecken es in die Steckdose Beim Ladevorgang leuchtet ein rotes Batteriesymbol unten links am Gerät auf Bei vollständiger Aufladung wechselt das Licht auf grün Laden Sie den Akku vor der ersten Inbetriebnahme bitte vollständig auf Sie können auch das USB Kabel in jeden USB Anschluss...

Страница 14: ...genbeleuchtung wieder eingeschaltet 4 6 Auto Power Off Um die Laufzeit des Rugged 2 im Akku Betrieb weiter zu erhöhen ist das Gerät mit einer automatischen Abschaltung ausgerüstet die Auto Power Off Funktion Sollte nach dem Einschalten des Bildschirmschoners das Gerät weitere 5 Minuten nicht benutzt werden wird das Rugged 2 komplett ausgeschaltet Um das Gerät wieder in Betrieb zu nehmen muss die A...

Страница 15: ...aliges Drücken der Taste Links gelangen Sie zum Hauptmenü zurück Verfahren Sie zum Einstellen der Uhrzeit auf die gleiche Weise 4 8 Sprache einstellen Um die Spracheinstellung zu ändern wählen Sie wie bei der Datums und Uhrzeiteinstellung im Kapitel 4 7 Datum und Uhrzeit einstellen Einstellungen aus rufen danach System auf und öffnen das Fenster Sprache Die aktuelle Sprachauswahl ist mit einem Häk...

Страница 16: ...achtet werden 5 1 Kalibrierung Die Kalibrierung dauert nur wenige Sekunden und setzt das Gerät in einen definierten Status Gleichzeitig werden wichtige Grundfunktionen des Gerätes überprüft Die Kalibrierung sollte vor jedem Arbeitsbeginn durchgeführt werden Kalibrieren Sie ebenfalls wenn Sie einen Standard messen und speichern wollen Bei der Messung einer größeren Anzahl von Proben und oder bei st...

Страница 17: ...erung zu starten betätigen Sie die Taste Mitte Wenn die Kalibrierung erfolgreich durchgeführt wurde erscheint eine Meldung im Display des Gerätes Kehren Sie durch Drücken der Taste Mitte in das Hauptmenü zurück Sollte während des Kalibriervor ganges ein Fehler auftreten wird eine Warnmeldung angezeigt Kalibrierung ungültig Das Rugged 2 verfügt über eine automatische Kalibrierüberwachung Falls eine...

Страница 18: ... der zur Verfügung stehenden Farbräume können Sie unter Einstellungen Farbräume Standard vornehmen siehe auch 6 2 Farbräume Um die Prozedur abzubrechen und in das Menü Messen zurückzukehren drücken Sie die Taste LINKS Um fortzuführen und den gemessenen Standard zu verwenden drücken Sie die Taste Mitte Jedem Standard kann ein eindeutiger Name zugeordnet werden Der Name kann aus bis zu 20 Zeichen Zi...

Страница 19: ...aden oder ein neuer Standard gemessen wird Weiterschreiben Die Eingabe des Namens wird weitergeführt 5 3 Standard speichern Zum dauerhaften Speichern des Standards im Standard Speicher wählen Sie Speichern und verwenden aus Bevor Sie einen Standard im Speicher ablegen können muss mindestens ein Ordner verfügbar sein Bis zu fünf Ordner können über Speicher Ordner verwalten angelegt werden Bestimmen...

Страница 20: ...greichem Speichern einer Standard Referenzfarbe wechselt das Gerät automatisch auf die Betriebsart Probe messen 5 4 Standard laden Um einen Standard aus dem Speicher aufzurufen wählen Sie aus dem Hauptmenü die Option Messen Öffnen Sie Standard wählen Als nächstes wählen Sie mit den Navigationstasten entweder des lokalen Standard Ordner oder den Cloud Standard Ordner aus Öffnen Sie den Ordner durch...

Страница 21: ...eicherten Standards und markiert den Standard mit der bestmöglichen Übereinstimmung Um diesen Standard zu laden drücken Sie die Mitte Taste 5 4 3 Standard laden Durch Name Die dritte Methode ist die Auswahl eines Standards über den Namen die Software überprüft die verfügbaren Namen und listet nur mögliche Buchstaben auf Die Auswahl eines Standards ist hierdurch sehr einfach und schnell Eine Meldun...

Страница 22: ...uf Probe messen Setzen Sie den Messkopf auf die zu messende Probe siehe 4 9 Handhabung Das Auslösen der Messung kann nun durch Drücken der Auslösetaste ausgelöst werden Die Messdaten werden angezeigt Um die Messdaten in verschiedenen Farbräumen anzuzeigen drücken Sie die Navigationstasten Die Auswahl der zur Verfügung stehenden Farbräume können Sie unter Einstellungen Farbräume Probe vornehmen sie...

Страница 23: ...e 6 Einstellungen Im Menü Einstellungen können wichtige System und Messparameter geändert werden Die Navigation im Menüraum und die Auswahl einzelner Menüpunkte bzw Parameter erfolgt wie in den vorigen Kapiteln beschrieben mit den Tasten und Zum Abbruch dient die Taste Links 6 1 Systemeinstellungen Wählen Sie aus dem Hauptmenü Einstellungen und danach den Menüpunkt System aus Die folgenden Systemp...

Страница 24: ...iges Passwort ein Die Auswahl der Ziffer nehmen Sie mit den Tasten vor eine Änderung mit den Tasten und Um die Eingabe zu beenden markieren Sie die rechte Ziffer und drücken Sie Rechts Einstellungen und Speicher im Hauptmenü können nun nicht mehr ausgewählt werden Weiterhin ist es nur noch möglich einen Standard aus dem Speicher zu laden Um den Anwender Modus zu deaktivieren wählen Sie Messen aus ...

Страница 25: ...r sobald eine Kalibrierung notwendig werden sollte Temperaturabweichung Die Sensitivität dieser Funktion kann unter Einstellungen System Kalibrierwarnung eingestellt werden Die Empfindlichkeit kann zwischen 0 AUS und 9 gewählt werden Markieren Sie die gewünschte Einstellung mit den Navigationstasten und bestätigen Sie Ihre Auswahl mit Mitte Zeitintervall Der zeitliche Abstand seit der letzten Kali...

Страница 26: ...iert werden Nur Bluetooth Nur BT 4 0 LE Nur Wlan Wlan BT Wlan BT 4 0 LE BT Etikettendrucker 6 1 10 Best Match Die gemessene Probe wird automatisch mit dem nächst ähnlichen abgespeicherten Farbstandard verglichen Die folgende PASS FAIL Anzeige erscheint Der ähnlichste gefundene Standard innerhalb eines Ordners wird zur Berechnung der Farbdifferenz herangezogen Der ausgewählte Standard wird angezeig...

Страница 27: ...e aus und drücken Sie danach Mitte Die gewählten Farbräume werden markiert Folgende Farbräume können gewählt werden Lab E Absolutwerte CIE L a b und Lab E Y x z Y Tristimulus Wert und Chromatizi tät Werte x und y HLab Absolutwert Hunter Lab und E Luv E Absolutwerte CIE L u v und E X Y Z Tristimulus Werte X Y and Z L a b CIE Lab Werte Pass Fail Siehe Kapitel 6 5 PASS FAIL Graph L a b Relatives CIE ...

Страница 28: ... 1 1 Helligkeit und Chroma CMC2 1 Delta E mit Gewichtung 2 1 Helligkeit und Chroma dECMCdyn Delta E CMC mit dynamischen Indizes 6 3 Anzahl Messungen Für die Messung von inhomogenen Proben wie Granulat oder strukturierten Oberflächen wie Leder ist es möglich die Anzahl der Messungen für die Farbwertberechnung festzulegen Als Anzahl kann ausgewählt werden 1 aus 3 5 10 15 20 Bei einer Anzahl größer e...

Страница 29: ...Drei E Bereiche können über die beiden E Grenzen definiert werden PASS FAIL und einen dazwischen liegenden Bereich Alternativ können Grenzwerte für L a b als positive oder negative Differenzen angegeben werden um die PASS FAIL Werte einzustellen Die Grenzwerte werden im PASS FAIL Ergebnis mit angezeigt Ändern von gespeicherten Grenzwerten 1 Laden Sie den zu ändernden Standard über den Menüpunkt St...

Страница 30: ...Standardlichtart wird im Menü Einstellungen unter Lichtart angezeigt Die Grundeinstellung ist Standardlichtart D65 Zum Ändern wählen Sie Lichtart und drücken Mitte Im folgenden Fenster können Sie zwischen verschiedenen Lichtarten auswählen 6 7 Geometrie Im Menü Messgeometrie kann die Messkopf Version bzw Geometrie eingestellt werden Achtung beim Rugged 2 hier keine Änderung vornehmen da dort nur e...

Страница 31: ...s getroffen Durch Liste Best Match Die Namen der Standards werden in einer Auswahlliste angezeigt Oder messen Sie eine Farbe und aus der Liste wird die bestmögliche Übereinstimmung ausgewählt Durch Name Die Auswahl wird durch den Namen getroffen 6 9 Spektrum speichern Hier haben Sie die Möglichkeit den Haken zu setzen um das gesamte Spektrum zu speichern Bestätigen Sie mit Mitte Bei Auslieferung i...

Страница 32: ...en Schalten Sie über die Syste meinstellungen die Anzeige des Remissionsspektrums ein Die Datenübertragung zum PC funktioniert nicht Überprüfen Sie die Kabelverbindung zwischen dem Rugged 2 und PC Kontrollieren Sie die Schnittstellenparameter und die Bluetootheinstellungen Ihres PC Fehlermeldung ACHTUNG KALIBR UNGÜLTIG Überprüfen Sie die Messkopföffnung auf Verunreinigungen und reinigen Sie den Me...

Страница 33: ... Standard Um eine sichere und gleichbleibende Kalibrierung ermöglichen zu können ist der PTB Standard in eine für den Messkopf präzise passende Kappe eingearbeitet Damit der PTB Standard vor Verschmutzung geschützt wird stecken Sie die Kappe nach dem Gebrauch wieder auf den Messkopf Berührungen mit den Fingern oder der Versuch den PTB Standard zu reinigen können diesen unbrauchbar machen und zu fa...

Страница 34: ...auigkeit 0 03 E CIELab ideale Bedingungen Datenspeicher 1000 Standardfarben 1000 Messwerte 300 Spektren 400 700nm 3 5nm Kalibrierung Mit PTB Physikalisch Technische Bundesanstalt zertifiziertem Weißstandard Schwarzreferenz Strom versorgung Lithium Ionen Akku Betriebszeit 20 Stunden Ladezeit ca 2 Stunden Anzeige Hochauflösendes kontraststarkes O LED Farbdisplay PC Schnitt stellen USB 2 0 Bluetooth ...

Страница 35: ...Altbatterien abgegeben werden Auch die verbrauchten Akkus nimmt die ColorLite GmbH zur Entsorgung zurück 11 3 Verpackung Verpackungen können wiederverwertet werden Sollten Sie Verpackungsmaterial nicht mehr benötigen führen Sie es dem Recycling Kreislauf zu 12 Herstellergarantie Der Garantiezeitraum für das Rugged 2 sowie dessen Zubehör beträgt 12 Monate nach Lieferung Die Herstellergarantie umfas...

Страница 36: ...ColorLite GmbH Rugged 2 36 ...

Страница 37: ...y consequences resulting from false information failure to follow instructions or failure of the relevant safety regulations the ColorLite GmbH will take no legal responsibility or liability All rights reserved Reproduction of this documentation by printing photocopying or other means also in part is permitted only with explicit authorisation of the ColorLite GmbH Katlenburg Lindau 03 08 2018 Colo...

Страница 38: ...ficate Transport case Please retain your transport case for future use If you return the device to us for maintenance calibration or other reasons we recommend using the transport case Features PASS FAIL output for 2 E limits or L a b limits Metameric Index for D65 A and D65 F11 DIN 6172 E Colour difference CIE 94 CMC 1 1 CMC 1 2 White and Yellow Index High resolution remission spectrum graphic CI...

Страница 39: ... Switching the Rugged 2 on 45 4 4 Switching the Rugged 2 off 45 4 5 Screen saver 45 4 6 Auto Power Off 46 4 7 Date and time settings 46 4 8 Language settings 47 4 9 Handling 47 5 Measuring colours with the Rugged 2 47 5 1 Calibration 48 5 1 1 Calibration with the PTB Standard 48 5 2 Standard measurement 50 5 3 Saving a standard 52 5 4 Loading a standard 53 5 4 1 Loading a standard By index 53 5 4 ...

Страница 40: ... 4 Pass Fail 61 6 5 Observer angle 62 6 6 Illumination 62 6 7 Geometry 63 6 8 Standard search selection 63 6 9 Save spectrum 63 7 PC Interface 64 8 Trouble shooting 64 9 Care and maintenance 65 9 1 Casing 65 9 2 Probe head 65 9 3 PTB Standard 65 9 4 Service 65 10 Technical Data 66 11 Environmental protection 67 11 1 Device 67 11 2 Batteries 67 11 3 Packaging 67 Table of contents 12 Manufacturers w...

Страница 41: ... into the probe head when measuring because of the risk of dazzling Do not open or disassemble the device Avoid excessive temperature changes The instrument may be used only in accordance with the specified protection class IP code 1 3 Specified use The Rugged 2 is a portable device with a fixed measuring head With the device colour values are determined by spectral measurement of the reflected li...

Страница 42: ...tral method which is the most accurate method of measurement colours The sample is illuminated with a defined light source and the remitted light from the surface is measured spectrally Since the surface colour depends on the illumination the reflected spectrum must be weighted with a standardised source of light The resulting spectrum is then evaluated with the three spectra which are based on th...

Страница 43: ...obe head the sample is illuminated at an angle of 45 and the diffuse reflected light measured at an angle of 0 For a d 8 probe head the sample is illuminated with diffused light and measured at an 8 angle For a d 0 probe the sample is illuminated with diffused light and measured at a 0 angle Fig Device overviews Rugged 2 Fig Probe head Device overview ...

Страница 44: ... of a very matt surface It must not be touched If the surfaced is contaminated it will affect the absolute values This is critical when measuring against stored standards Please always return the calibration cap with the device for servicing Fig Calibration cap Device overview 3 3 Optional Digital Code Camera The Rugged 2 spectrophotometer has an optional integrated data matrix scanner The interna...

Страница 45: ...displayed Status bar displays the status bar of the sample or standard measurement level a Active standard name b Standard illumination and viewer c Number of scans d Geometry Selected menu position The selected menu position is highlighted in blue Menu text Depending on the level different text is displayed Status bar The status bar is highlighted Device overview 3 6 The key board UP DOWN RIGHT a...

Страница 46: ...sibility to continue using the device during charging As a further alternative the battery can also be removed and charged with an external charger Charge the battery before using the frist time 4 3 Switching on Press the Trigger button to switch the device on After a short welcome window is displayed before the main menu opens The Rugged 2 is now fully operational and measurements can be made 4 4...

Страница 47: ...ation keys to select System in the settings window Press the CENTER key to open system window Select Date from the menu and confirm option with the CENTER key The first digit is highlighted Set the correct number using the keys Set the correct number using Set the correct number using Set the correct number using Set the correct number using Set the correct number using Move the cursor right to th...

Страница 48: ... an ideal interface between the probe head and the sample During the scanning period it is essential that the probe head is not moved or tilted and is securely placed on the sample When possible the probe opening should be covered If not to minimized the effects of ambient light switch on the stray light compensation 5 Measuring colours with the Rugged 2 A main feature of the ColorLite Rugged 2 sp...

Страница 49: ...Calibration The calibration takes only a few seconds and sets the device to a defined status At the same time main functions of the device are checked The calibration should be performed at the beginning of work Always calibrate before measuring a standard that is to be stored for later use When measuring a larger number of samples and or when ambient temperatures fluctuate the calibration should ...

Страница 50: ...u turn on the Rugged 2 the last selected standard will be automatically load Open the Measure window from the top menu level Select Scan standard using the Select Scan standard using the Select Scan standard using the Select Scan standard using the Select Scan standard using the Select Scan standard using the keys The measurement is triggered by pressing the CENTER key or with the trigger key see ...

Страница 51: ...can be selected in the Settings Colour systems Standard menu see 6 2 Colour systems To leave the window and return to the Measure level press the LEFT key To continue and use the standard press the CENTER key Each standard can be assigned an exclusive name This name can consist of up to 20 characters digits or letters Each character is selected using the navigation buttons Each character is select...

Страница 52: ...ompleted by leaving the index editor by pressing CENTER or abort the procedure using the LEFT key If the selected memory cell is in use the text Slot is free is re placed by the name of the stand ard Also the colour values and the date of storage are displayed If an occupied memory cell is se lected a warning message warns that the old standard will be deleted The storage routine can be cancelled ...

Страница 53: ...e standard index number using navigation keys The standard name values and date of storage is displayed Select the standard using the Center key Abort the routine using the Left Select the standard using the key 5 4 2 Loading a standard By list Best Match After selecting the folder where the standard is stored a list of available standards in the folder is displayed To load scroll through the stan...

Страница 54: ...y load any reference colour stored in the internal memory The name of the standard can be up to 20 characters and must be stored with exactly the same spelling as on the digital code This allows for a extremely simple handling Scan measure and print optional bluetooth printer the results in three simple steps 5 5 Sample measurement Before measuring a sample a reference standard colour must be meas...

Страница 55: ... using the navigation buttons using the navigation buttons using the navigation buttons and entered using the Center key Select the symbol to open a menu with the last used names These names can be edited to create a new name If the last character is a number it will be automatically increased by 1 digit Save sample data Pressing the Left key will delete the last character To complete the entry se...

Страница 56: ...Language To set the language follow the instructions in chapter 4 8 language settings 6 1 4 User Mode By activating the User mode operation is limited to basic functions measure samples loading standards from the device memory and calibrating The mode is protected by a four digit password To activate select User Mode from the System window in Settings menu In the input field enter a four digit pas...

Страница 57: ... Working Standard are activated it is only possible to calibrate with the Working Standard Warnings 6 1 5 Calibration warning The Rugged 2 has a calibration warning function This informs the user that a recalibration is needed Temperature control The sensitivity of this function can be adjusted in Settings System Calibration warning The sensitivity can be selected as an index of 0 off to 9 most se...

Страница 58: ...ning message is displayed the user can The setting of the warning limit should be dependent on the homogeneity of the sample 6 1 8 Autosave The function automatically saves the sample with the last name used If this name had a number as the last character then this number will be automatically incremented To change the sample name switch the function off and enter new name as described in chapter ...

Страница 59: ...down the scanner will take a few seconds to power up before the scan will start 6 2 Colour systems 6 2 1 Settings Colour systems The ColorLite Rugged 2 the possibility to display the measured colour data in different colour systems or values In the menu Settings Colour systems a list of available systems are listed Up to 8 colour systems can be selected at one time for the sample values In the sam...

Страница 60: ...ious settings Metameric Metameric index between D65 F11 A Contrast RI Contrast value between standard and sample LCh Absolute values lightness chroma and heu ΔL ΔC Δh Relative values lightness chroma and heu RGB Red green and blue values CMYK Cyan magenta yellow and black Best Match smallest difference to the sample Gardner Gardner absolute and relative values and HAZEN 6 2 2 dE formula In the men...

Страница 61: ...nction PASS FAIL the device displays an easy to understand Pass or Fail result The result is dependent on the difference between the standard and sample values with limits for E CIE L a b or CIE L a and b Numbers of scans In the Settings menu select Pass Fail with Center key Select which Pass Fail limits are to be checked E or L a and b To set the limits select the menu Limits Depending on the mod...

Страница 62: ...ion to choose between a 2 degree or 10 degree observer The selection is made in the Settings menu The active value is displayed on the Angle menu line The default setting is 10 Use the up down arrow keys to select the observer angle and confirm your selection by pressing Center 6 6 Illumination The standard illuminant for calculating the colour value scan be selected here The active standard illum...

Страница 63: ...r translucent materials To activate the Stray light suppression proceed as follows Please choose Geometry from menu Setting Turn on the Stray light suppression by selecting the appropriate menu item and confirm 6 8 Standard search selection The ColorLite Rugged 2 offers the user three methods of selecting a standard from the memory Change which method to use in the menu Settings opening the window...

Страница 64: ...ranty and warranty claims against the ColorLite GmbH invalid Problem Solution The device cannot be switched on The display remains off Reload the rechargeable battery No remission spec trum is displayed after a loading a standard from the memory Colour standards can be stored with or without the remission data To store with remission spectrum switch on in the Settings window Save spectrum Please s...

Страница 65: ...leansers abrasives or solvents 9 3 PTB Standard To provide a reliable and stable calibration the PTB Standard is fitted into a cap precisely matching the diameter of the probe head To protect the PTB Standard from dirt always close the cap immediately after use Touching or attempting to clean the surface of the PTB Standard can make it unusable and result in invalid readings 9 4 Service The ColorL...

Страница 66: ...Spectral and chromaticity measurement of light source such as LED s optional Scanner Data Matrix and Bar Code Sample photos 350 colour photos to display scanning positi on dimension 160 x 120 Pixel Spectral range 400nm to 700nm Spectral Resolution Holografic grating Spectrometer FWHM 500 nm 10 nm Scanningin 3 5 nm intervall 115 steps per scan Light sour ce Blue and white LEDs Repeata bility DE 0 0...

Страница 67: ...d to the ColorLite GmbH for proper disposal 11 3 Packaging Packaging can be recycled If no longer needed dispose of packaging material at a recycling depot 12 Manufacturers warranty The warranty period for the Rugged 2 and accessories is 12 months after delivery The warranty covers manufacturing and material defects Excluded is damage to the device or consequential damage caused by improper or inc...

Страница 68: ...ColorLite GmbH Rugged 2 68 ColorLite GmbH Am Mühlengraben 1 D 37191 Katlenburg Lindau Germany Tel 49 0 5552 999 58 0 Fax 49 0 5552 999 58 9 Email info colorlite de Web www colorlite de ...

Отзывы: