background image


S101 Series

English

42

Chapter 3 BIOS Setup Utility

3.1 When to Use BIOS Setup?

You may need to run the BIOS Setup when:

An error message appears on the screen during the system booting up and is requested

to run SETUP.

You want to change the default settings for customized features.

You want to reload the default BIOS settings.

3.2 How to Run BIOS Setup?

To run the BIOS Setup Utility, turn on the netbook and press the <Del> key during 

the POST procedure.

If the message disappears before you respond and you still wish to enter Setup, 

either restart the system by turning it OFF and ON, or simultaneously pressing 

<Ctrl>+<Alt>+<Delete> keys to restart.

Note: Be noted that the screen snaps and setting options in this chapter are for your 

references only. The actual setting screens and options on your Netbook may be 

different because of BIOS update.

3.3 Control Keys

      Press F1 to pop up a small help window that describes the appropriate keys to use and 

      the possible selections for the highlighted item. 

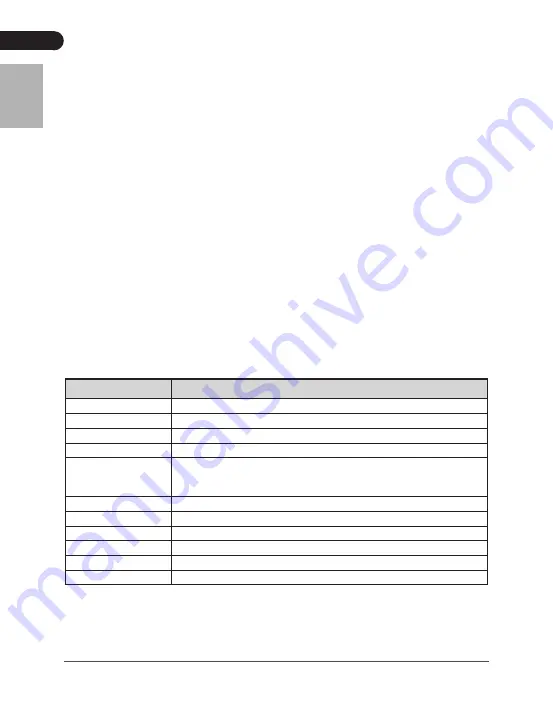
      Please check the following table for the function description of each control key.

Control Key(s)

Function Description

← 

Move cursor left or right to select Screens


Move cursor up or down to select items

 +/ -

To Change option for the selected items

<Enter>

To bring up the selected screen

<ESC>

Main Menu - Quit and not save changes into CMOS Status Page 

Setup Menu and Option Page Setup Menu - Exit current page and 

return to Main Menu

<F1>

General help

<F2/F3>

Change Colors

<F7>

Discard Changes

<F8>

Load Failsafe Defaults

<F9>

Load Optimal Defaults

<F10>

Save configuration changes and exit setup

Содержание S101 Series

Страница 1: ...1 0 2008 12 P N 10EC810A10 Netbook S101 Website http www colorful cn...

Страница 2: ......

Страница 3: ...5 1 1 5 1 2 6 1 3 7 7 8 9 9 1 4 10 10 11 11 12 13 14 15 2 17 17 SoftwareCenter 18 18 18 19 19 3 BIOS 20 3 1 BIOS 20 3 2 BIOS 20 3 3 20 3 4 20 3 5 BIOS 21 3 5 1 Boot 21 3 5 2 Security 22 3 5 3 Exit BI...

Страница 4: ...HDD AC AC...

Страница 5: ...Colorful Netbook 1 1 1 X 1 X 1 X 1 X 1 X 1 X 1 X 1 X 1...

Страница 6: ...SVGA 1024x600 576 ACPI V3 0 S0 S3 S4 S5 DDR2 533 MHz DDR2 SO DIMM 2 0 GB 2 5 9 5mm SATA MS MS pro SD MMC 3 x USB 2 0 USB 1 1 1 x 1 x 1 x VGA 1 x RJ45 1 x Azalia Codec 2 1 v1 2 130 CMOS 10 100Mbps IEEE...

Страница 7: ...Colorful Netbook 1 3 1 2 3 4 5 6 7 8 9...

Страница 8: ...S101 1 2 4 3 5 6 1 2 3 4 5 6 1 130 2 3 4 5 Windows 6 7 8 9...

Страница 9: ...Colorful Netbook 1 2 3 MMC SD MS MS PRO 4 USB USB 1 2 3 4 2 1 3 6 5 4 1 USB USB 2 3 4 VGA LCD 5 RJ45 10 100 based 6 Kensington Kensington...

Страница 10: ...S101 10 1 4 1 2 3 8 1 2 3...

Страница 11: ...11 Colorful Netbook 1 2 3 1 Netbook Netbook 19V DC 3 42A 2A AC100 240V 50 60Hz 1A 19V 3 42A 2A Netbook 2 1 3...

Страница 12: ...S101 12 2 1 Windows 2 Netbook...

Страница 13: ...13 Colorful Netbook Num Lock Num Lock Caps Lock Caps Lock...

Страница 14: ...S101 14 2 1 3 2 1 3 1 3 2...

Страница 15: ...15 Colorful Netbook Windows Caps Lock Caps Lock Num Lock Fn Ins Numlk Num Lock Scroll Lock Fn Del ScrLK Scroll Lock Scroll Lock Num Lock Num Lock Fn...

Страница 16: ...S101 16 Fn Fn F2 Fn F3 Fn F4 Fn F5 Fn F6 Fn F7 Fn F8 Fn F9 Fn F10 Fn F11 Fn F12 Windows Windows D E Windows F L R Windows Windows...

Страница 17: ...17 Colorful Netbook 2 X Autorun exe X 1 2 3...

Страница 18: ...S101 18 SoftwareCenter SoftwareCenter Power Saving Normal Performance Super Performance Auto Power Saving Normal Performance Super Performance Auto SoftwareCenter 38...

Страница 19: ...19 Colorful Netbook 1 2 3 4 5...

Страница 20: ...c Press DEL to run Setup Enter ESC BIOS F1 F2 F3 F7 F8 F9 F10 CMOS 3 4 F11 BIOS Please select boot device SATA PM Hitachi HTS3543216L9A300 USB Generic Multi Card and to move selection ENTER to select...

Страница 21: ...lect Screen Select Item Enter Go to Sub Screen F1 General Help F10 Save and Exit ESC Exit Boot Settings Configuration Boot Device Priority Hard Disk Drives Removable Drives v02 61 C Copyright 1985 200...

Страница 22: ...xit Security Settings Exit system setup after saving the changes F10 key can be used for this operation Select Screen Select Item Enter Go to Sub Screen F1 General Help F10 Save and Exit ESC Exit Save...

Страница 23: ...Rev 1 0 Dec 2008 P N 10EC810A10 Netbook S101 Series User s Manual Website http www colorful cn...

Страница 24: ...not guarantee the accuracy of the contents This manual is purely technical documentation without any hint or other meanings and we won t commit users misunderstanding of the typesetting error Our prod...

Страница 25: ...33 Startup 33 Shut down 34 Indicators 35 Touchpad 36 Using the keyboard 37 Chapter 2 Driver install and utility 39 Driver install 39 SoftwareCenter 40 Performance utility 40 Network Connection settin...

Страница 26: ...entilation is provided Never push objects of any kind into this product through cabinet slots as they may touch dangerous voltage points or short out parts that could result in a fire or electric shoc...

Страница 27: ...or part missing please contact with your franchiser Netbook Computer User s Manual Lithium Ion battery AC adapter with power cord Driver and Applications CD Package Service Manual The items listed abo...

Страница 28: ...9 5mm HDD User Interface 3IN1 MS MS pro SD MMC 3 x 4 pin USB2 0 Ports 1 x MIC 1 x Line Out 1 x VGA Port 1 x RJ45 Port 1 x DC In Port Audio Azalia Codec supports 2 1 channel output Built in audio conn...

Страница 29: ...English 29 Colorful Netbook 1 3 Knowing the Parts After check package complete and install your laptop afterwards let us know well your laptop together Top view 1 2 3 4 5 6 7 8 9...

Страница 30: ...a The built in 1 3 megapixel camera allows you to snap a photo or create a video chat or video conference with just a click 2 Microphone Internal microphone for sound recording 3 Display screen Also c...

Страница 31: ...hones 3 Microphone in jack Accepts input from external microphones 4 External display VGA port Connects to a display device e g external monitor LCD projector 5 Ethernet RJ 45 port Connects to an Ethe...

Страница 32: ...ebound in situ There will unable smoothly install if cell doesn t aim at flute line Please aim at the line and install again if force to install that maybe destroy cell or netbook 3 Then gently push t...

Страница 33: ...jack Startup 1 Open your Netbook LCD panel The Netbook is apply for 19V DC 3 42A 2A power spec and input spec is AC100 240V 50 60Hz 1A Output spec is 19V 3 42A 2A Please don t force press the LCD pan...

Страница 34: ...click shut down item to shut down the operating system in start menu under windows mode 2 Please press the power button till power off when your Netbook unable normal shutdown Note Please don t press...

Страница 35: ...affron and hint battery is charging the led will be display green color if the battery charges complete Power According to led light status for opinion adapter working status the led will always light...

Страница 36: ...These two buttons are similar to the left and right buttons on a mouse Tapping on the touchpad is the same as clicking the left button Function Left button 1 Right button 3 Main touchpad 2 Execute Qui...

Страница 37: ...e when you need to do a lot of numeric data entry A better solution would be to connect an external keypad Scroll Lock Fn Del ScrLK When Scroll Lock is on the screen moves one line up or down when you...

Страница 38: ...es the computer s volume Fn F8 Volume up Increases the computer s volume Fn F9 Speaker toggle Turns the speakers on and off Fn F10 Power Management Open the power management program Fn F11 Wireless LA...

Страница 39: ...menu should appear as below If the menu does not appear double click My Computer double click CD ROM drive or click Start click Run type X AUTORUN EXE assuming X is your CD ROM drive This picture is o...

Страница 40: ...ce the relevant performance item meanwhile it can provide friendly UI for hotkey on the keyboard and convenience well operation Performance utility Click softwareCenter at right status bar and will po...

Страница 41: ...click Connect to set the connection Note If you can t find the desired access point click Refresh network list in the left pane and search in the list again 3 After connection you may enter a password...

Страница 42: ...setting options in this chapter are for your references only The actual setting screens and options on your Netbook may be different because of BIOS update 3 3 Control Keys Press F1 to pop up a small...

Страница 43: ...ives Click Enter key to enter submenu it will be display specifies the boot device priority sequence from available removable drives BIOS SETUP UTILITY Main Advanced Boot Security Exit Boot Settings C...

Страница 44: ...the Supervisor Password under this item up to six characters in length Change User Password Set the User Password under this item up to six characters in length Password Check Setup The password promp...

Отзывы: