background image

DeviceNet

®

 Interface Module Installation & Reference 


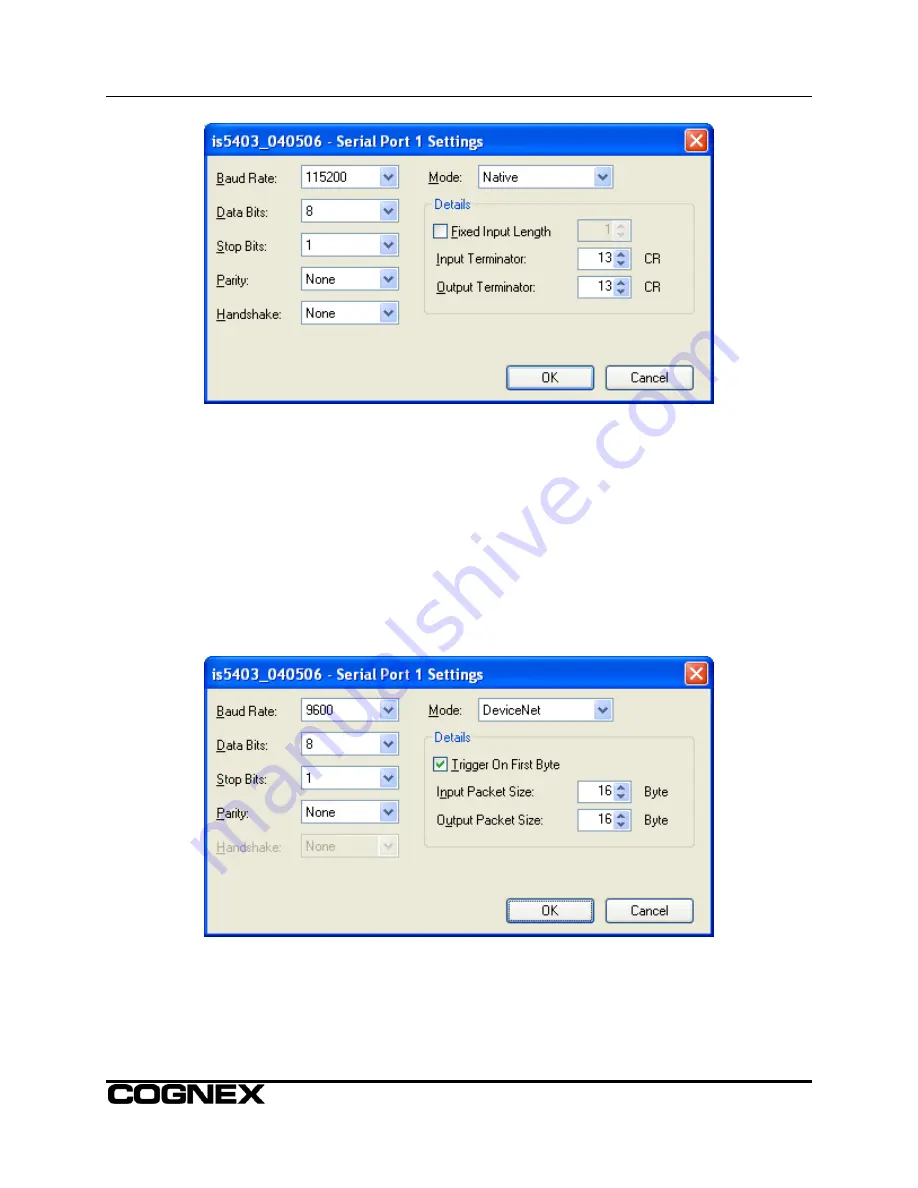
Figure 2:  Serial Port Dialog 

6.  In the Serial Port dialog, select 

DeviceNet

 from the Mode drop-down. 

7.  Set the communications parameters on the left side of the dialog to agree with those defined for 

the Interface configuration (EDS file default: 9600 baud rate; 8 data bits; 1 stop bit; parity none; 
Hardware handshaking). 

8. In 

the 

Details

 portion of the dialog (see Figure 3), set the Input Packet Size to the Interface 

Module’s DataTransmit Size Instance (EDS parameter #69) value minus 1 byte.  Similarly, set the 
Output Packet Size to the Interface’s DataReceive Size Instance (EDS parameter #25) value 
minus 1 byte. If you want the sensor to trigger acquisitions via the PLC, check the Trigger on First 
Byte box. When a value of 1 is in the first data byte sent from the PLC, the sensor will trigger an 
acquisition and the PLC will transmit data. 


Figure 3:  DeviceNet Details Dialog 


Содержание CIO-2550-00

Страница 1: ...it through DeviceNet to or from a DeviceNet scanner attached to a PLC To set up this connection configure two communications channels one from the In Sight sensor to the DeviceNet Interface Module and...

Страница 2: ...S file contained on the DeviceNet Interface Module diskette supplied using the EDS Wizard 2 On the Interface Module set the two rotary MACID switches to the unused MACID you want to assign to the modu...

Страница 3: ...stance 1 Parameter 8 1 byte which defines the length of the receive byte array c Parameter 69 Data Size Instance 1 Parameter 8 1 byte which defines the length of the transmit byte array d Parameter 49...

Страница 4: ...nd data this changes from a value of 0 to a value of 1 triggering the PLC to send the data to the Interface Module the second byte is a sync byte and the third is the size of data being sent user ente...

Страница 5: ...haking 8 In the Details portion of the dialog see Figure 3 set the Input Packet Size to the Interface Module s DataTransmit Size Instance EDS parameter 69 value minus 1 byte Similarly set the Output P...

Страница 6: ...is sent to In Sight from the PLC Data can be sent between the PLC and the In Sight sensor via the DeviceNet Interface Module using the Input Output spreadsheet functions ReadDeviceNetBuffer and WriteD...

Страница 7: ...FormatOutputBuffer Dialog 4 Select another empty cell highlight Input Output from the left pane of the Insert Function dialog select WriteDeviceNetBuffer from the right pane and press the OK button t...

Страница 8: ...Cell State of the WriteDeviceNetBuffer function may have to be toggled to initiate a send to the PLC Refer to In Sight Explorer Help Reference for more detailed information on the WriteDeviceNet func...

Страница 9: ...the Insert menu and select Function to open the Insert Function dialog 6 Highlight Input Output from the left pane select FormatInputBuffer from the right pane and press the OK button to insert the f...

Страница 10: ...n the ReadDeviceNetBuffer function parameters ReadDeviceNetBuffer example In this example assume that the incoming data in the FormatInputBuffer function is as follows An integer is expected at byte 0...

Страница 11: ...the NET LED is blinking either the Interface Module was not assigned a Master device or the Master device is not polling it Go into RSNetworx and make sure that it is set up correctly and that the In...

Страница 12: ...olation 500 volts ESD protection 10 kv Overload protection 30 volt Short circuit Indefinite Output levels 7 9 volts typical Data size 8 7 bits software configurable Parity Even Odd None Stop bits 1 fi...

Страница 13: ...und 6 NC 7 Request to Send 8 Clear to Send 9 NC P N 597 0010 02 Copyright 2001 2008 Cognex Corporation All Rights Reserved All information in this document is subject to change without notice Cognex a...

Отзывы: