


7
VOLUME
+10
MUTE
OPEN/CLOSE
STOP
REV-SEARCH-FWD
PREV-CHAPTER-NEXT
PAUSE
PLAY
A-B
PBC
ZOOM
RESUME
N/P
SUBTITLE LANGUAGE ANGLE
MENU
TITLE
REPEAT
VOL. SELECT
SETUP
PROG
DISPLAY
L/R
SLOW
P-SCAN
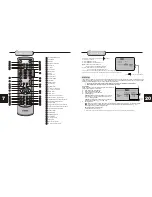
REMOTE CONTROL
2
4
5
6
22
7
13
19
14
15
36
12
10
11
9
21
20
8
24
27
25
26
OPEN/CLOSE BUTTON
PROGRAM
DISPLAY
NTSC/PAL TV MODE
SUBTITLE
+10KEY
TITLE button
VOL button for master volume increase
VOL button for master volume decrease
SLOW button
L/R button for channel selection
MENU button
SETUP
ZOOM button
RESUME play button
REPEAT button
SCROLL RIGHT
ENTER Button
button for previous track
button for next track
button for rewind skip
button for forward skip
STOP button
PAUSE button
PLAY button
A - B repeat button
PBC button
1
28
29
32
31
30
33
35
34
17
18
16
23
3
SCROLL UP
SCROLL LEFT
SCROLL DOWN
MUTE button
ANGLE button for angle selection
LANGUAGE button for language selection
0-9 numbered selection buttons
P-SCAN button
Channel VOLUME Select button
20
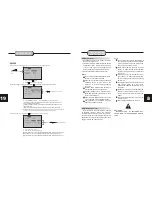
SYSTEM SETUP
A
. Press
ENTER
to confirm
B. Press
SETUP
to exit the Setup Menu
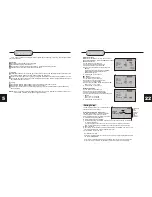
Select [Video Output], and press ENTER or to display
the [Video Out] submenu:
Note:
The Composite video and
S-video output is always available.
Press to change your selection
Language Video Audio More Aud Rating
TV Shape
TV System
Video Output
S-Video
YUV
Y Pb Pr
4:3 PS
NTSC
[S-Video] -Select if you connected the DVD player
to your TV using thecomposite Video output.
[YUV] -Select if you connected the DVD player to your TV using the YUV output.
[Y Pb Pr] - Select if you connected the DVD player to your TV using progressive scan.
S-video
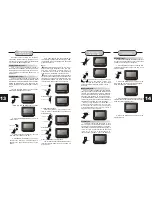
Audio Setup
The Audio menu allows you to set the analog and digital audio outputs to correspond with the external components you have
connected to the player. For example, if you connected the player to a TV using the Stereo Audio jacks, you should set Dolby
Digital and others settings to 2 channel to enjoy downmixed stereo audio.
You can set the audio format for each of the following sources: Dolby Digital, MP3, CD and
.
DVD playback must be stopped in order to adjust the Audio setup.
Others
AC-3 Setting
Follow these steps to set the analog and digital audio formats of
outgoing Dolby Digital 5.1 soundtracks:
A.
From Stop mode, press SETUP.
B.
Select Audio and press ENTER.
C.
Select Dolby D and press ENTER.
D.
Set Analog out to:
6 Channel
(default) to output Dolby Digital 5.1 channel
audio from the 5.1 channel analog audio outputs; e.g.,
to a 5.1 channel amplifier.
2 Channel
to output downmixed 2 channel stereo from
the stereo audio outputs; e.g., to a VCR or TV.
E.
Set Digital out to:
PCM
(default) to output 2 channel digital from the optical/coaxial digital audio outputs; e.g., to a Minidisc recorder.
RAW
to output the raw 5.1 channel digital bitstream form the optical/coaxial digital audio outputs; e.g., to an
external amplifier with a Dolby Digital decoder.
Off
to disable Dolby Digital decoder.
F.
Press SETUP to save and exit.
AC3
MP3/WMA
Others
Digital Out
PCM
PCM
PCM
Analog Out
5.1 channel
5.1 channel
5.1 channel
PCM
Raw
Off
Language Video Audio More Aud Rating
5.1 channel
2 channel
Off
PCM stands for Pulse Code Modulation, and is the standard 2-channel stereo format used for audio Cds.


