background image

3

Page  

Coby Electronics Corporation

www.cobyusa.com 

Page 

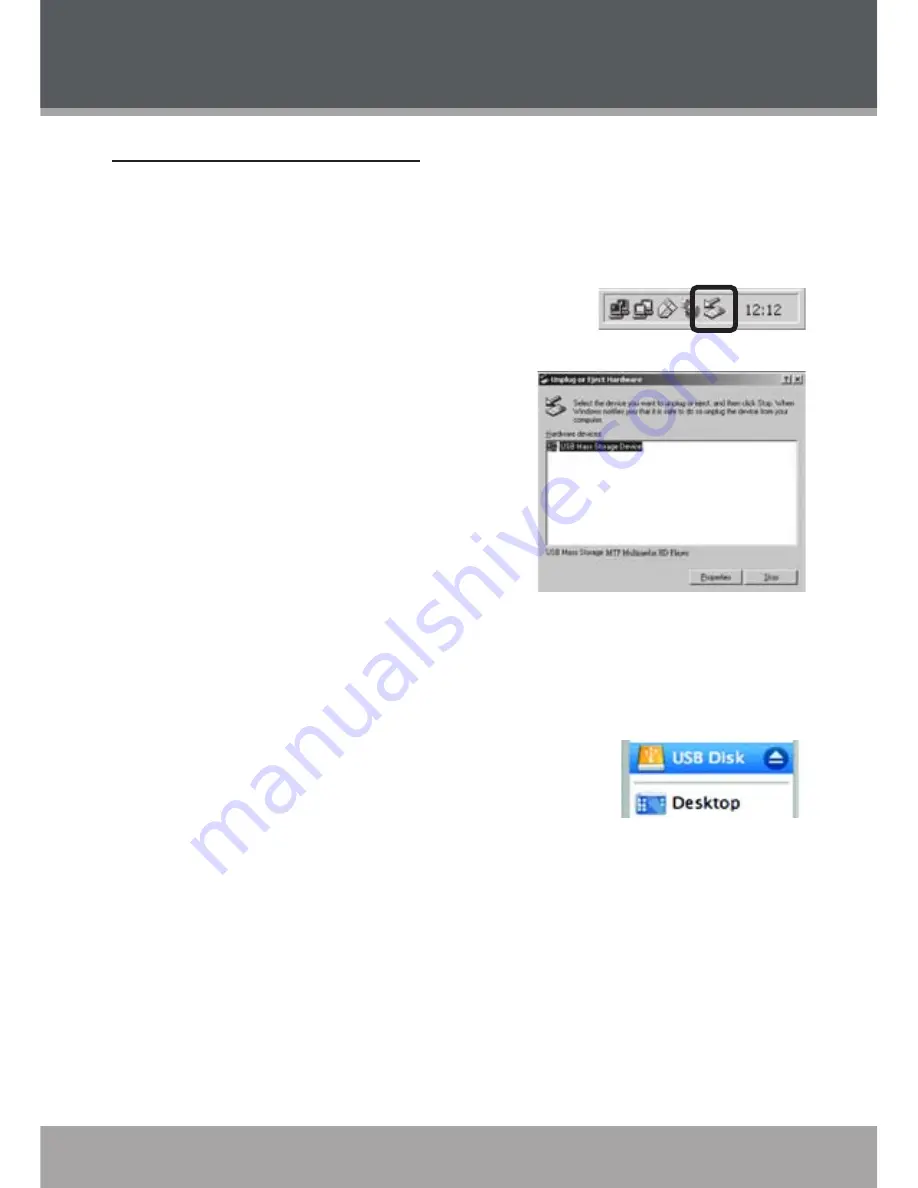
Disconnecting from a Computer

Disconnect your player as instructed below to detect data loss or file/firmware 

corruption.

Microsoft Windows

Double-click the green arrow in the taskbar 

located on the lower-right side of the computer 

screen (Safely Remove Hardware).

Safely Remove Hardware:


Select “USB Mass Storage Device” from 

the list that appears and then click on 

“Stop”. 


Stop a Hardware Device:

 Select “USB 

Mass Storage Device” from the list that 

appears and then click on “OK”.

When the “Safe to Remove Hardware” 

window appears, click the OK button and disconnect the USB cable from 

the player and your computer.

Macintosh OS X

On the left side of the Finder Window, identify the 

appropriate Removable Disk icon.

Click on the “Eject” arrow on the right of the Remov-

able Disk icon.

Disconnect the USB cable from the player and your computer.

1.

.

3.

1.

2.

3.

USB CONNECTIONS

Содержание C7055 - 512 MB Digital Player

Страница 1: ...Instruction Manual Please read this manual carefully before operation MP C7055 MP C7085 MP C7095 MP C7405 Super Slim MP3 and Video Player with Touchpad Control ...

Страница 2: ... WARNING Handling the cords on this product will expose you to lead a chemical known to the State of California to cause cancer and birth defects or other reproductive harm Wash hands after handling NOTICE This product is protected by certain intellectual property rights of Microsoft Use or distribution of such technology outside of this product is prohibited without a license from Microsoft Conte...

Страница 3: ...e use and seek medical advice Note If the product suddenly has no response or powers off an electrostatic discharge may be the cause In this circumstance please follow the procedures below for recovery Turn off the unit by pushing and holding the slide button at the right Power off position for 15 seconds Turn on the unit again For recycling or disposal information about this product please contac...

Страница 4: ...rence to radio communications However there is no guarantee that interference will not occur in a particular installation If this equipment does cause harmful interference to radio or television reception which can be determined by turning the equipment off and on the user is encouraged to try to correct the interference by one or more of the following measures Reorient or relocate the receiving a...

Страница 5: ... product on an unstable cart stand tripod bracket or table Use only with carts stands tripods brackets or tables recommended by the manufacturer or sold with the product Any mounting of the product should follow the manufacturer s instructions and should use a mounting accessory recommended by the manufacturer A product and cart combination should be moved with care Quick stops excessive force and...

Страница 6: ...n to replace the obsolete outlet Do not defeat the safety purpose of the polar ized plug Power Cord Protection Power supply cords should be routed so that they are not likely to be walked on or pinched by items placed upon or against them paying particular attention to cords at plugs convenience recep tacles and at the point which they exit from the product Protective Attachment Plug The product m...

Страница 7: ...ct with them might be fatal Overloading Do not overload wall outlets extension cords or integral con venience receptacles as this can result in a risk of fire or electric shock Object and Liquid Entry Never push objects of any kind into this product through openings as they may touch dangerous voltage points or shout out parts that could result in a fire or electric shock Never spill liquid of any...

Страница 8: ...ng Your Player 13 LOCATION OF CONTROLS 14 DISPLAY OVERVIEW 15 BASIC OPERATIONS 16 Using the Touchpad Controls 16 Using the Controls to Navigate 16 Music Playback Controls 17 Smart Menu Options 17 Repeat 17 Equalizer 18 Speed 18 Browsing 18 PHOTO MODE 19 Photo Controls 19 VIDEO MODE 20 Video Controls 20 FM RADIO MODE 21 Normal Manual Tuning 21 Preset Preset Tuning 21 Auto Save Preset Stations 21 Sm...

Страница 9: ...n Required for Windows 98 SE Only 29 Connecting to a Computer 30 Transferring Files 30 Microsoft Windows 31 Macintosh OS X 31 Disconnecting from a Computer 32 Microsoft Windows 32 Macintosh OS X 32 VIDEO CONVERSION 33 System Requirements 34 Installation 34 Video Converter at a Glance 35 Converting Video 36 WINDOWS MEDIA PLAYER 37 Windows Media Player 10 WMP10 37 Music File Transfers 37 Creating Pl...

Страница 10: ...sure that the items shown below are included in the package Should an item be missing please contact the local retailer from which you purchased this product COBY MP3 Player USB Cable Instruction Manual Professional Stereo Earphones AC Adapter Installation CD 1 2 3 4 5 6 ...

Страница 11: ...l with LED backlight 1 66 TFT LCD Full color display Plays Music Video Photos and Text Plays Digital Music from most online stores and subscription services ID3 and LRC Support for song and synchronized lyric information display Integrated FM Radio USB 2 0 high speed transfers ...

Страница 12: ...Plug one end of the USB cable into the player s USB port and plug the other end into the USB port of a powered on computer When connected to a USB hub the hub must be self powered to charge the player s battery File transfers will extend the charging time The battery used in this device may present a fire or chemical burn if mistreated Do not disassemble incinerate or heat the battery Do not conne...

Страница 13: ...to prevent accidental key presses when it is in your pocket or bag To lock the player slide the HOLD switch to right The Lock icon will appear on screen To unlock the player slide the HOLD switch to the left from the Lock posi tion Resetting Your Player Reset your player if it should freeze and not respond or otherwise malfunction Disconnect your player if it is connected to a computer Use a pin t...

Страница 14: ...ion LOCATION OF CONTROLS Top Front Bottom Back 1 2 3 4 5 6 7 8 9 10 11 12 HOLD Switch Power On Off MENU UP Volume up Left Previous DOWN Volume down Option Play Pause Right Previous 1 2 3 4 5 6 7 8 9 USB Port Headphone Jack Reset 10 11 12 ...

Страница 15: ...www cobyusa com Page 15 DISPLAY OVERVIEW Plays Status Current track Total track Time Elapsed Time Clock Play Mode Time Remaining Music Playing Mode Battery Level Lock icon Equalizer Song name ...

Страница 16: ...utton and the controls will light up If you touch and hold a key it will register as a continuous button press Using the Controls to Navigate To navigate through the different menu options and files on your player Touch the Arrow keys to move the selection in the direction of the arrow Moves the selection up Moves the selection down Select the next selection Select the previous selection Music Pho...

Страница 17: ...st forward through the track Touch and hold to reverse through the track Touch to pause playback Touch again to resume playback Touch or to adjust the volume level Smart Menu Options The Smart Menu gives you quick access to your player s option settings To access the Smart Menu touch The Smart Menu options are Repeat Equalizer Speed and Browsing Touch or to select an option Touch when you are fini...

Страница 18: ...izer option optimizes the way your player processes audio signals Select the option which best suits the music you are listening to The options are Normal Pop Rock Classic Jazz and Bass Speed Use the Speed function to adjust playback tempo The Play options are 70 Slowest 80 100 Normal 120 and 130 Fastest Browsing This option allows you to browse your music library to select another track during mu...

Страница 19: ... menu Photo Controls Upon entering Photo mode you will see a list of all photos that located on your player Touch or to move the selection up or down Touch to confirm and display a selection While a photo is displayed Touch to display the next photo in the list Touch to display the previous photo in the list Touch to return to the photo list ...

Страница 20: ...eo mode you will see a list of all videos that located on your player Touch or to move the selection up or down Touch to confirm or play a selection While a video is playing Touch to pause playback and display the elapsed time total time cur rent track and total tracks Press again to resume playback Touch to play the next track Touch to play the previous track Touch and hold to fast forward throug...

Страница 21: ...ill utilize the headphone cord as an antenna Normal Manual Tuning The Normal mode allows you to manually scan and tune to all radio frequen cies Touch to increase the station frequency Touch to decrease the station frequency Preset Preset Tuning Preset mode allows you to tune to your preset stations Touch to tune to the next preset station Touch to tune to the previous preset station Auto Save Pre...

Страница 22: ...ning mode Tune to the station you want to store and then touch to access the Smart Menu Touch or to select Add Preset and touch to confirm Preset confirm Save will appear on screen Touch to confirm and save Del Preset Delete a Preset station Make sure the player is in Preset tuning mode Tune to a Preset station that you want to delete and then touch to ac cess the Smart Menu Touch or to select Del...

Страница 23: ...K from the Main Menu Upon entering E BOOK mode you will see a list of all text files that located on your player Touch or to move the selection up or down Touch to confirm and play a selection While a text file is displayed Touch to skip backward one page touch to skip forward one page Touch to return to the E BOOK file list ...

Страница 24: ...w its contents Touch to access the Smart Menu Options If there are no files in a selected folder the player will not enter the folder Smart Menu Options The Smart Menu gives you quick access to your player s option settings To access the Smart Menu touch Access the Smart Menu to delete files from the browser list Delete Controls Delete the file s from your player Highlight and select a file that y...

Страница 25: ...setting of Off will disable this power saving feature Touch or to adjust the Power Off option Touch when you are finished to save Touch to return to the Setting menu without saving Sleep Set the duration of time in minutes that your player will shut off after the preset time is due A setting of off will disable this power saving feature Touch or to adjust the Sleep option Touch when you are finish...

Страница 26: ... On A setting of On will disable this power saving feature Touch or to adjust the Screen option Touch when you are finished to save Touch to return to the Display menu without saving Sys Tools There are 3 options in Sys Tools setting Format Reset and Sys Info Format It may become necessary to format your player if data or files become corrupt You have two types to format your player Quick and Comp...

Страница 27: ...of your player Time Set the internal clock of your player Touch or to select field to adjust The clock fields from left to right are Hour Minutes Seconds and AM PM Touch or to adjust the value of the selected field Touch or when you are finished to save USB Mode Set the USB Mode to MSC or MTP that when you connect your player to a computer MSC The player will connect as a USB MSC device This setti...

Страница 28: ...e 28 Coby Electronics Corporation To set the USB mode of your player Touch or to select MSC mode or MTP mode Touch when you are finished to save Touch to return to the Setting menu without saving SETTING MODE ...

Страница 29: ...Insert the Installation CD into your computer s CD or DVD drive Make sure to place the mini CD in the center recessed well of the drive tray Navigate to MY COMPUTER and double click on the CD DVD drive icon usually D Double click on the folder Win98 USB Drivers to open it Find out and double click on the SETUP icon Win98Driver EXE to start the USB driver installation program Follow the on screen i...

Страница 30: ...t to Devices Transferring Files The USB 2 0 Hi Speed connection makes it easy to transfer music video pho to and text files or any other data quickly between the player and your com puter Simply use the player as you would a floppy disk using basic operating system commands If you need further assistance with transferring files please refer to your operat ing system s instruction manual or on scre...

Страница 31: ...ta files are only visible from a computer these files will not be available from within the player itself Macintosh OS X Open a finder window Located the files you would like to transfer from your computer Select the files folders with the mouse and press APPLE C copy on the keyboard Click on the Removable Disk icon located on the left side of the finder window The computer will display all files ...

Страница 32: ...orage Device from the list that appears and then click on Stop Stop a Hardware Device Select USB Mass Storage Device from the list that appears and then click on OK When the Safe to Remove Hardware window appears click the OK button and disconnect the USB cable from the player and your computer Macintosh OS X On the left side of the Finder Window identify the appropriate Removable Disk icon Click ...

Страница 33: ... copyright holders and or other parties provide the program as is without warranty of any kind either expressed or implied including but not limited to the implied warranties of merchantability and fitness for a particu lar purpose The entire risk as to the quality and performance of the program is with you Should the program prove defective you assume the cost of all necessary servicing repair or...

Страница 34: ...r capable of 24 bit color for QuickTime sup port Sound DirectX 7 compatible sound card supporting 2 au dio channels stereo sampled at 16 bit 44 1Khz or better DirectX DirectX 9 0 QuickTime QuickTime 7 0 WMP Windows Media Player 9 or better Installation Copy the folder MTV Video Converter to your computer To start the software double click the file VideoConvert exe 1 2 VIDEO CONVERSION ...

Страница 35: ...eview and time selection Starting and Ending time point selection Select the video file to convert Select the size of the converted video ensure that this is set to 160X128 1 2 3 4 Video preview window Select the destination folder of the converted video file 5 6 VIDEO CONVERSION ...

Страница 36: ...g QuickTime mov qt MPEG 2 vob RealMedia rm rmvb MPEG 4 or 3GP 3gp DirectX 9 0 Windows Media Player 9 0 and other codecs must be installed to support all media types Select the destination folder that the converted file will be saved to Ensure that the Output Frame Size is set to 96X64 Click Start Conversion to start the conversion process When the conversion is complete copy the converted files to...

Страница 37: ...Window Media Player 10 Connect your player to the computer A Device Setup window will ap pear In the Device Setup window choose Synchronize this device with this library for this session only and click Finish Select Sync There are 2 ways to sync your files with your player Drag your songs photos or converted video files to the sync list on the left hand side Click Start Sync to start transferring ...

Страница 38: ... List drop down menu Click Start Sync to start transferring the files in the selected playlist For more information and support regarding music trans fer and synchronization with Windows Media Player WMP please see the help section included with WMP click Help Synchronizing Content to Devices ...

Страница 39: ...te music mixes so you can listen to them whenever you want When a playlist is transferred using Windows Media Player every song in the playlist will be transferred as well To create playlists using WMP10 Run Window Media Player 10 Select Library and then drag the desired song s to the Now Playing List on the right side 1 2 ...

Страница 40: ...ngs in the Now Playing List and then use the mouse to right click the list Choose Add to and then Additional Playlists An Add to Playlist window will appear Select New and enter the playlist name then click OK A new playlist will be created 3 4 WINDOWS MEDIA PLAYER ...

Страница 41: ...727 3592 Weekdays 8 00AM 11 00PM EST Weekends 9 00AM 5 30PM EST 718 416 3197 Weekdays 8 00AM 5 30PM EST The player does not turn on The battery level may be too low Try charging the player or operate the player on AC power Ensure that the Lock switch is disengaged Reset the player use a pin to press the Reset button on the rear of the player and try again The player does not turn charge when conne...

Страница 42: ...disengaged The player will not play my music file Ensure that the file is in a compatible format MP3 WMA or WAV The file may be copy protected Use Windows Media Player to transfer the file The file may be copy protected Ensure that the license has not expired The LCD characters are corrupted Ensure that the correct language has been selected Try transferring some songs and restart the player to au...

Страница 43: ...files to my player but they are missing from the Music Library Ensure that the file in a supported format MP3 MTV JPG WAV WMA Ensure that there are less than 2500 items loaded on the player If the player is in MTP mode ensure that there are less than 2500 items loaded on the player I cannot see some files on my computer Ensure that the correct USB mode is in use MSC or MTP Files trans ferred in on...

Страница 44: ...t ID3 Windows Media PC Interface USB 2 0 High Speed Dual Mode MSC and MTP DRM Support Windows Media DRM 10 Requires Windows XP and Windows Media Player 10 or higher Plug and Play Support Windows 98SE 2000 ME XP or newer Audio Output 3 5mm Stereo Headphone Menu Language Support Chinese Trad Chinese Simp English Ger man Spanish Portuguese French Power Supply Integrated Rechargeable Lithium ion Batte...

Страница 45: ...www cobyusa com Page 45 NOTES ...

Страница 46: ...46 Page 46 Coby Electronics Corporation NOTES ...

Страница 47: ...www cobyusa com Page 47 NOTES ...

Страница 48: ...s a registered trademark of Coby Electronics Corporation Printed in China Coby Electronics Corporation 56 65 Rust Street Maspeth NY 11378 www cobyusa com www ecoby com 7055ALD10 7085ALD10 7095ALD10 7405ALD10 ...

Отзывы: