background image

29

STEp 47

Assembly detail in case of using a larger transponder.

M2x10

M3x5

M3x5

M2x10

M2x10

M2x10

M3x5

STEp 46

Assembly detail in case 

of NOT using a switch.

M2x10

Содержание SRX8

Страница 1: ......

Страница 2: ...ossible Additional info may be published in our website www serpent com or you may ask your dealer or the Serpent distributor for advice or email Serpent direct info serpent com The Serpent Facebook Twitter and Youtube pages give additional means of support and communications Safety Read and take note of the Read this First section before proceeding to assemble the car kit This car kit is intended...

Страница 3: ...heck very well Apply a small amount of cyano glue Use wear protection for eyes and hands Detail view to explain assembly or order of parts better Default set up This symbol indicates the default setup Grease apply a small amount of grease to the parts shown Left and right parts should be assembled in the same way Silicone oil use the indicated silicone oil for the shocks and differentials Parts or...

Страница 4: ...tellite gears and cross pins Use the silicone oil supplied in the kit For the correct cst value please check the default setupsheet 2 2 2 1 Note the correct pin location Note the correct pin location 14 7 14 9 mm VOLUME COMPENSATORS When the differential gets hotter the foam insertswillabsorbthepressureoftheexpansion of the oil 1 Thesuppliedfoamtubemustbecuttosizeas indicated here below 2 Penetrat...

Страница 5: ...ilicone oil supplied in the kit For the correct cst value please check the default setupsheet Use a digital scale to measure the exact amount of oil in the diff Differential weight with volume compensators 40 8 grams Differential weight without volume compensators 41 0 grams 1mm AMOUNT OF OIL IN THE DIFFS OIL LEVEL 3 5x7x0 1 3 5x7x0 1 ...

Страница 6: ...pins Use the silicone oil supplied in the kit For the correct cst value please check the default setupsheet 8x16x5 6x11 75x0 2 2 5x12 M3x4 Note the correct pin location Note the correct pin location 14 7 14 9 mm VOLUME COMPENSATORS When the differential gets hotter the foam insertswillabsorbthepressureoftheexpansion of the oil 1 Thesuppliedfoamtubemustbecuttosizeas indicated here below 2 Penetrate...

Страница 7: ...licone oil supplied in the kit For the correct cst value please check the default setupsheet 1mm Use a digital scale to measure the exact amount of oil in the diff Differential weight with volume compensators 40 15 grams Differential weight without volume compensators 40 35 grams AMOUNT OF OIL IN THE DIFFS OIL LEVEL 3 5x7x0 1 3 5x7x0 1 ...

Страница 8: ... 1 1 2 12 1 12 2 M3x16 Flanged M3x6 M3x16 Flanged M3x6 Front Front Front Rear Rear Rear Diff mounts are NOT symmetrical Please check below picture to ensure front and rear bracket assembly are assembled properly DoNOTovertighten the screws ...

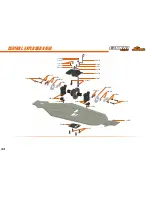
Страница 9: ...9 STEP 13 M4x12 M4x12 ...

Страница 10: ...t M3 3 2x7x0 5 M3x10 M3x4 M3x4 1 1 2 2 3 4 M3x12 3 2x7x0 5 Nylock Nut M3 M3x4 Note the correct brake wires position M3x10 Front Long Short Rear Front Rear The long cam is assembled in the front bracket the short one in the rear bracket BRAKE CAMS ...

Страница 11: ...n When you assemble the diff with too much initial play the gears will not run in properly and may wear quickly After 1 or 2 hours of running the car re check the gear mesh between the ring gear and the pinion All parts should have run in properly now You may add or remove 8x11x0 1 shims as needed 16 1 16 2 1 2 3 4 2 5x13 8x16x5 8x11x0 1 5x13x4 M5x6 M3x14 M3x12 Flanged 1 2 2 3 8x11x0 1 2 5x13 8x16...

Страница 12: ...0 1 M3x22 13x16x0 1 2 1 1 M3X16 M3x22 M3x16 13x16x0 1 After 1 or 2 hours of running the car re check the gear mesh between the ring gear and the pinion All parts should have run in properly You may add or remove 13x16x0 1 shims as needed ...

Страница 13: ...2 5X6 M2 5X6 STEP 20 STEP 21 M3X16 20 1 20 2 REAR TOEININSERTSCHART REAR ANTISQUAT INSERTS CHART M3x16 M2 5x6 BAG 3 34 mm ANTIROLL BAR ROD LENGTH Tighten anti roll bar cap until there is no play and it moves freely ...

Страница 14: ...14 STEP 23 STEP 22 REAR ANTIROLL BAR ASSEMBLY Make correct holes in the mudguards as required M3X3 M3X8 M3X8 M3X3 5X8X2 5 Flanged M3x3 5X8X2 5 Flanged M3x8 ...

Страница 15: ...2 4 3 5 6 1 2 7 8 M3x6 2 5x13 3x17 Nylock Nut M3 8x16x5 13x19x4 M5x4 BAG 4 Note the correct coupler assemby REAR UPRIGHT ROLL CENTERINSERTS CHART LOW MID LOW MID HIGH HIGH REAR DEFAULT WHEELBASE SHIMS Applyshimssize8x11x0 1 and or 8x11x0 2mm as needed to remove play 8x11x0 1 8x11x0 2 ...

Страница 16: ...5 1 25 2 STEP 25 M3X20 M3X20 3 2x7x0 5 Nylock Nut M3 Flanged Nylock Nut M3 1 2 M3x20 3 5x7x0 5 Nylock Nut M3 Nylock Nut M3 Flanged M3x20 BAG 5 17 7 mm REAR CAMBERLINK LENGTH REAR CAMBERLINK DEFAULT POSITION ...

Страница 17: ...17 STEP 26 M3X25 M3X16 Nylock Nut M3 STEP 27 M4x12 M4x20 Nylock Nut M3 M3x25 M3x16 M4x12 M4x20 ...

Страница 18: ...e the diff with too much initial play the gears will not run in properly and may wear quickly After 1 or 2 hours of running the car re check the gear mesh between the ring gear and the pinion All parts should have run in properly now You may add or remove 8x11x0 1 shims as needed 8x11x0 1 2 5x13 8x16x5 5x13x4 M3x22 13x16x0 1 M3x16 BAG 6 After 1 or 2 hours of running the car re check the gear mesh ...

Страница 19: ...19 31 1 31 2 STEP 30 STEP 31 M2 5X6 M2 5X6 M3x16 M3x16 34 mm M2 5x6 BAG 7 ANTIROLL BAR ROD LENGTH Tighten anti roll bar cap until there is no play and it moves freely ...

Страница 20: ...20 STEP 32 STEP 33 M3x16 M3x3 M3x3 5X8X2 5 Flanged M3x16 M3x3 5X8X2 5 Flanged FRONT ANTIROLL BAR ASSEMBLY FRONT SUSPENSION KICKUP INSERTS FRONT REAR INSERTS ...

Страница 21: ...M5x4 M3x10 M2 5x6 M3x3 BAG 8 Note the correct coupler assemby 3 2 Nylock Nut M3 1 M3x3 34 3 34 2 M4x6 M2 5X6 2 5x5x0 4 M4x6 4 1 3 2 2 3 Align the flat spot on the shaft with the grubscrew Steering arm 1 is included in the kit STEERING ARMS Apply shims size 8x11x0 1 and or 8x11x0 2mm as needed to remove play 8x11x0 1 8x11x0 2 ...

Страница 22: ... 1 35 2 STEP 35 M3x20 M3x20 3 2x7x0 5 Nylock Nut M3 Flanged Nylock Nut M3 1 2 M3x20 3 5x7x0 5 Nylock Nut M3 Nylock Nut M3 Flanged M3x20 BAG 9 16 7 mm FRONT CAMBERLINK LENGTH FRONT CAMBERLINK DEFAULT POSITION ...

Страница 23: ...23 STEP 36 M4x20 M4x12 M4x12 M4x20 ...

Страница 24: ...38 38 1 38 2 1 1 2 M4x8 M2x10 M3x12 3x6x0 5 3x6x0 5 M3x12 M4x10 The servo saver spring should be preloaded 4 5mm Also notice the correct orientation of the collar Nylock Nut M3 4 5 mm M4x8 M4x10 M2x10 M3x12 3x6x0 5 Nylock Nut M3 BAG 10 ...

Страница 25: ...ct position of the conical shim Note correct position of the conical shim Note correct orientation of the outer steering balljoints Nylock Nut M3 Nylock Nut M3 Flanged Nylock Nut M3 Flanged 1 1 2 2 39 1 39 2 11 mm 3x7 5x1 Conical 6x10x3 M3x18 M3x20 Nylock Nut M3 3x7 5x1 Conical 3x7 5x1 Nylock Nut M3 Flanged STEERING TRACKROD LENGTH ...

Страница 26: ...P 42 M4x12 M3x12 M4x30 M4x10 M3x14 M3x10 M3x12 Nylock Nut M3 Nylock Nut M3 Nylock Nut M4 Flanged 1 1 1 1 2 2 2 2 3 3 M3x12 M3x10 M3x14 Nylock Nut M3 Nylock Nut M3 M4x10 M4x12 M3x12 M4x30 Nylock Nut M3 Flanged BAG 11 ...

Страница 27: ...27 STEP 43 M3x6 M3x6 M3x6 PutthreadlockinalltheM3x6screws thatfixthesideguardstothechassis ...

Страница 28: ...m STEERING LINK LENGTH Note correct position of the conical shim STEP 45 Useenoughservospacerssobothservosareflushwiththebottomofthe radiotray posts This will prevent the servo to touch the chassis under torsion flex SERVO SPACERS Between differnet servo brands there could be slight differences Check how many teeth your servo spline has 23 24 or 25 and use the right lever ...

Страница 29: ...29 STEP 47 Assembly detail in case of using a larger transponder M2x10 M3x5 M3x5 M2x10 M2x10 M2x10 M3x5 STEP 46 Assemblydetailincase of NOT using a switch M2x10 ...

Страница 30: ... 48 2 M2x10 M4x12 M4x12 M4x12 M2x10 M2x10 M3x4 3x7 5x1 Conical 1 1 2 2 Nylock Nut M3 M2x10 M3x4 3x7 5x1 Conical M4x12 Nylock Nut M3 Apply the supplied decal on the battery cover Apply the supplied decal on the receiver cover ...

Страница 31: ...HROTTLE BRAKE SPOKE LENGTHS Cut the spoke at the non threaded side THROTTLE ASSEMBLY Note the correct orientation of the brake balls M3x12 M3x3 M3x3 M3x5 M3x3 3 5x7x0 5 1 2 2 3 4 5 5 6 4 46 mm THROTTLE 65 mm BRAKE Check how many teeth your servo spline has 23 24 or 25 and use the right lever ...

Страница 32: ... oil during the assembly Use some silicone oil during the assembly Insert the o ring inside the spring collar Nylock Nut M2 5 2 5x6x0 5 2 5x6x0 5 Nylock Nut M2 5 BAG 13 fr shocks bag 14 rr shocks Note the correct orientationofthe shock spacers Note the correct position of the o ring ...

Страница 33: ...ilicone oil supplied in the kit For the correct cst value please check the default setupsheet 2 Extend the shockrod fully 3 Move the shockrod slowly up and down to let ALL air bubbles escape 4 Close top only 3 4 1 Bleed push the shockrod all the way in slowly to allow excessive oil to escape 2 Close completely the shock cap Assemble the spring and spring cup align correctly to complete the shock ...

Страница 34: ...M3x6 M3x6 M3x6 M3x6 M3x25 M3x25 Nylock Nut M3 Flanged Nylock Nut M3 Flanged 1 2 2 3 3 Nylock Nut M3 Flanged Nylock Nut M3 Flanged M3x6 M3x6 M3x25 M3x25 1 3 3 2 2 FRONT SHOCKS DEFAULT POSITION REAR SHOCKS DEFAULT POSITION ...

Страница 35: ... 3 58 2 M3x18 M3x12 M3x12 M3x16 Flanged M2x6 M2x6 M2x6 Nylock Nut M3 M2x6 M3x18 Nylock Nut M3 M3x12 M3x16 Flanged BAG 15 M3x14 M3x14 The fuel tank features a premounted 3cc insert You can remove it if needed as shown FUEL TANK INSERTS ...

Страница 36: ... M3x14 STEP 59 STEP 60 59 1 59 2 5x8x0 1 5x8x0 3 M3x8 3 2x7x0 5 5x10x4 3 2x7x0 5 5x8x0 1 5x8x0 3 5x10x4 M3x8 M3x14 Pushthelonglegofthe spring in the inner hole of the clutch shoe Do not fully tighten the M3x14 screws till Step 61 BAG 16 ...

Страница 37: ... to trim off some plastic from the center diff cover to give the carburetor enough clearance over the brake plates This could be done with a hobby knife 1 Assemble and fully tighten the M4x10 screws 2 Position the engine in such way on the engine mount that the gearmesh is correct 3 Fully tighten M3x14 screws assembled during the Step 60 ...

Страница 38: ...38 STEP 63 ...

Страница 39: ...ART AIR FILTER ASSEMBLY 1 2 3 M3x18 M3x6 M3x6 Body Clip M3x18 2º 4º 6º Oil the airfilter with a high quality foam airfilter oil not included Do NOT use silicone oil Usetierapstofixthetheairfilterboot to the airfilter and to the carburator BAG 17 FRONT REAR ...

Страница 40: ...40 STEP 66 ...

Страница 41: ...reamer not included Make a longer bodypost holeintherear toallowforchassisflexmovement 2 Before painting the body apply the precut masking sheet elements to the inside of the body Follow the cleaning painting instructions supplied by the polycarbonate paint supplier you choose 3 Apply the Serpent and Cobra logo decals on the body and wing Body Clip 1 2 3 3 ...

Страница 42: ...ls exploded view 42 central exploded view 43 rear exploded view 44 front exploded view 45 steering exploded view 46 radio exploded view 47 shocks exploded view 48 clutch exploded view 49 final 1 exploded view 50 final 2 exploded view 51 ...

Страница 43: ... 600421 600421 110207 110207 110111 1396 1396 600200 600200 600831 110115 600727 600727 600728 600376 600376 600813 600814 opt 600815 opt 600283 Diff pin 10T alu 2 600814 Spur gear 47T SRX8 600815 Spur gear 48T SRX8 600868 Diff set 44T front rear SRX8 600869 Diff set 46T center SRX8 ...

Страница 44: ...ploded view 600721 600742 600747 600742 600745 600746 110115 110127 110109 600746 110115 110109 110402 110401 600742 110105 600808 110122 110122 600743 600743 110146 110146 600748 600748 600744 600744 600829 600829 ...

Страница 45: ...t 600434 opt 600239 opt 600684 opt 600237 600339 opt 600338 opt 803134 110401 110111 803134 600484 opt 600484 opt 1312 1312 600192 600622 opt 600828 600794 110441 110110 110130 110130 600823 110193 600795 110107 600338 Antiroll bar rear 1 8mm 600339 Antiroll bar rear 2 0mm 600434 Antiroll bar rear 2 4mm 600238 Antiroll bar rear 2 5mm 600239 Antiroll bar rear 2 7mm 600684 Antiroll bar rear 3 0mm 60...

Страница 46: ... 110110 110193 110431 1396 1340 110116 110116 803134 803134 1312 600185 110121 600622 opt 600485 opt 600484 opt 600336 Antiroll bar front 1 8mm 600337 Antiroll bar front 2 0mm 600241 Antiroll bar front 2 5mm 600242 Antiroll bar front 2 7mm 600484 Antirollbar spacer 3mm alu 2 600485 Pivotball threaded anti roll bar alu 2 600622 Pivotball antirollbar alu 4 600782 C hub 13deg L R alu SRX8 600784 C hu...

Страница 47: ...439 110159 600749 600749 110402 110405 110402 110127 110127 110402 110402 110184 600754 600724 110108 110108 110108 110108 600729 110105 110183 110102 110102 600752 600753 600170 600812 600330 110112 600180 110125 110125 600830 110192 600178 110439 600844 Transmission brace alu FR SRX8 600845 Transmission brace alu RR SRX8 600844 opt 600845 opt ...

Страница 48: ...0761 600761 804181 600333 600333 600761 600763 600763 600761 600762 110116 110116 110116 1639 1639 1639 600762 600761 600757 110146 110146 600757 110128 600757 600106 600178 600178 600290 Servo lever steering 23T alu 600291 Servo lever steering 24T alu 600292 Servo lever steering 25T alu 600841 Servo lever throttle alu 23T SRX8 600842 Servo lever throttle alu 24T SRX8 600843 Servo lever throttle a...

Страница 49: ...FR blue V2 2 600649 Shockspring FR purple V2 2 600650 Shockspring FR green V2 2 600658 Shockspring set FR V2 6x2 600652 Shockspring RR orange V2 2 600653 Shockspring RR red V2 2 600654 Shockspring RR blue V2 2 600655 Shockspring RR purple V2 2 600657 Shockspring RR green V2 2 600659 Shockspring set RR V2 6x2 600357 Membrane webbed silicone 4 600816 Shock piston blank 4 SRX8 600817 Shock piston 5 h...

Страница 50: ...opt 600519 opt 600217 opt 600216 600233 opt 600518 Clutch bell 13T vented 600217 Clutch bell 14T 600519 Clutch bell 14T vented 600229 Clutch spring soft 0 85mm 4 600231 Clutch spring hard 0 95mm 4 600232 Clutch spring X hard 1mm 4 600233 Clutch spring set 4x4 600175 Clutchshoe alu 4 600355 Clutch shoe setAlu Carbon 2 2 600244 Clutch set alu carbon 600298 Flywheel steel ...

Страница 51: ...110195 110146 110402 600768 600835 600282 opt 600282 opt 600839 opt 600765 600768 600779 600824 110102 110127 110137 600824 600824 600824 600779 600779 600769 110194 110194 600769 600832 600835 110441 110441 110137 600282 Shock pivot bushing delrin 4 600839 Motormount mono alu SRX8 ...

Страница 52: ...840 opt 600872 opt 600263 110159 600772 600222 600297 opt 600620 opt 600719 opt 600621 opt 600297 Wheel nut 17mm flanged light 4 600143 Wing white nylon 600277 Wing black nylon 600439 Wing white low 811 600440 Wing black low 811 600719 Body SRX8 High Downforce 600826 Wing straight MD white 1 8 600840 Wing lexan HD with gurney 1 8 600872 Wing gurney 600620 Rim 1 8 buggy White 4 600621 Rim 1 8 buggy...

Страница 53: ...HANDISING www serpent com product Merchandising TEAM SERPEnT neTWORK SRX8 SPARE PARTS www serpent com 600017 spares SRX8 OPTIONALS PARTS www serpent com 600017 Optionals SERPENT TOOLS www serpent com product Tools ...

Страница 54: ...t com www dragon rc com www youtube com user SerpentMRC www twitter com SerpentMRC www plus google com SerpentModelcars posts www weibo com teamserpent SERPENT PROMO PAGES http promo serpent com SERPENT FACEBOOK GROUPS http promo serpent com indexfb htm SERPENT ADVANCED MANUALS http promo serpent com sam ...

Страница 55: ......

Страница 56: ...Manual Cobra SRX8 82806 1 ...

Отзывы: