


Coastal Electronic Technologies, Inc.
GMX550 Lockpick™
Thank you for your purchase of the Coastal Electronic Technologies, Inc. GMX550 LOCKPICK. The
GMX550 Lockpick is the replacement for the GMX322 and is the latest in a long history of Lockpicks designed to
enable full and additional functionality to your factory GM navigation system. The GMX550 Lockpick
incorporates many important standard features including:
•
NAVIGATION ADDRESS INPUT in motion
•
DVD play and AUX input fully enabled (in equipped vehicles)
•
Audio/Video input
•
Special cables and connectors for plug-in installations that are completely reversible
PLUS - NEW FOR GMX550
∗
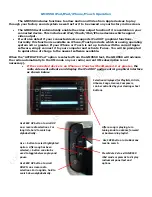
Advanced use of steering wheel controls for Lockpick operation
∗
Full text menus on your factory instrument panel of all Lockpick functions
∗
USB update ability to keep current with new software revisions
∗
Front/rear/left/right camera input and control for automatic operations or manual viewing anytime
∗
iPod/iPad/iPhone/iTouch connection with activation of all available video functions
∗
Use of steering wheel controls to search and play songs on iPhone/iTouch devices
At this time, Coastal Electronic Technologies, Inc. would like to recommend that you have this installation
completed by a certified mechanic or someone familiar with automotive electronics. This installation, while not time
consuming, does require careful attention to detail and precise following of installation instructions.
Coastal Electronic Technologies, Inc. accepts no responsibility due to the improper installation or use of this
product. Installation and / or use of this product implies and signifies user acceptance of this term of use. Please
adhere to all driving laws in your state.
INSTALLATION
OVERVIEW
1.
Remove radio trim panels to gain access to radio mounting screws.
2.
Remove the radio partially to expose rear connectors.
3.
Unplug factory connectors from radio and then plug them into Lockpick harness connectors.
4.
Plug in Lockpick harness connectors to radio.
5.
Connect camera(s) power and ground if installing aftermarket system(s).
6.
Reassemble and enjoy.
This written guide will detail the connections for the Lockpick harness and provide reference for general installation and
operations. The GMX550 is universal for many different GM models and individual dash disassembly is not addressed in this
manual.
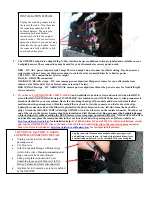
1.
Start with the car and radio turned off. The GMX550 is designed with a dual “T” harness, equipped with factory male
and female connectors for direct connections to your screen. With access to the rear of the screen, unplug the
matching
Black and Brown connectors
and plug them into the female connectors of your LOCKPICK. Then plug the
male connectors of the LOCKPICK harness into the earlier factory locations. The connectors are keyed and cannot be
plugged in to the wrong location. For most installations, the disassembly needed to get to the rear of the screen will
consist of “popping” loose the trim around the face of the radio to expose the 7mm or 10mm bolts holding the radio in
position. Remove the bolts and the radio can be tilted rearward to view the connectors needed. The trim around the
face of the radio is held in place with spring loaded friction locks which sometimes can require extra pressure to
release. Videos and have been provided on the CoastalEtech.com website to provide you assistance as well as details
and photos for Cadillac Escalade installations.


