background image

10

DECORATIVE EXTRACTOR HOOD

Dear Customer,
Thank you for buying our hood. Please read these instructions carefully for its 
optimum installation, use and maintenance.
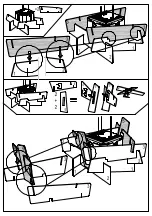
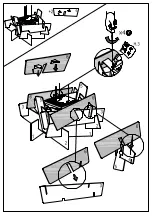
Hood installation on walls (look for the  symbol in 

the figures)

Warning: consult local regulations regarding fumes outlets. Do not connect the 

hood to a fume, ventilation or hot air duct. Confirm that room ventilation 
is  appropriate  with  the  local  authorities.  Make  sure  the  maximum  air 
extraction flow rate for the appliances in the room does not exceed 4 
Pa (0.04 mbar).The room must have adequate ventilation if an extractor 

hood is used simultaneously with appliances that run on gas or other fuels. The 
evacuated air must be extracted through ducts that are used for evacuating 
fumes from appliances that run on gas or other fuels. Regulations regarding air 
extraction must be complied with.
Use a rigid PVC pipe with a min. Ø l20 mm to evacuate fumes outside.
The above restrictions do not apply to hoods with no fumes outlet to outside 
(recirculation system with activated charcoal filter).
Install the hood in line with the instructions on the template  

Install the 

hood in line with the instructions on the template 


provided.

For gas cooking appliances only: the minimum distance to the hood must be 
at least 65 cm.
Connecting the hood to the grid

Warning: before connecting the hood: switch off the electricity supply 
and check that the supplied voltage and frequency coincide with that 
indicated on the appliance nameplate.

If the extractor hood has a plug, connect it to a power socket in line with 
applicable regulations, located in an accessible area.
If the hood does not have a plug, connect it directly to the electrical grid, 
protected by a separator device accessible for disconnection, in line with local 
regulations.
Use of the hood – Safety

Warning: the hood may stop working during an electrostatic discharge 
(e. g. lightning). This involves no risk of damage. Switch off the electricity 
supply to the hood and reconnect after one minute.

Do  not  allow  the  hood  to  be  used  by  children  or  persons  with  reduced 
(physical, sensory or mental) capabilities or lack of experience and knowledge, 
unless they have been given instruction concerning use of the appliance by a 
person responsible for their safety.
Children should be supervised so that they do not play with the appliance.
To  avoid  the  risk  of  fire,  clean  the  metal  filter  regularly,  permanently  control 
pans containing hot oil and do not flambé food underneath the hood.
Do not use the hood if it shows signs of damage or imperfection. Contact an 
official distributor or authorised dealer.
Accessible parts may heat up when using cooking appliances.
Use of the hood - Control panel (look for the  

symbol in the figures)

The different control panels are described below. Check the panel model 
installed on your hood and see the figure indicated in each case.
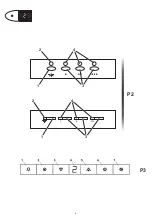
Panel with electronic button (Fig. P2)
1-  Lighting on and off.
2-  Lighting operating control pilot light.
3-  Extractor fan speed - button: speed 1, 2 and 3 Press the current speed again 

to switch off the extractor fan.

4-  Extractor fan operating speed control pilot light.
Timer: keep the chosen speed button pressed down for two seconds until the 
display flashes. The extractor fan stops after 15 min. and the lighting switches 
off. To cancel the timer: press the chosen speed button once.
Four-speed panel - Digital display (Fig. P3)
1-  Lighting on and off.
2-  Extractor fan on and off.
3-  Decrease extractor fan speed.
4-  Extractor fan speed display panel.
5-  Increase extractor fan speed.
6-  Enable extractor fan turbo speed.
7-  Enable and disable extractor fan timer.
Timer: the extractor fan works for 5 min. at the current speed and another 5 min. 
at each of the lower speeds until it stops and the lighting switches off.
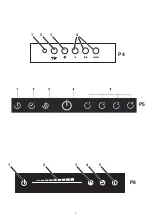
Five-button panel (Fig. P4)
1-  Extractor fan operating control pilot light.
2-  Lighting on and off.
3-  Extractor fan off.
4-  Extractor fan speed - button: speed 1, 2 and 3

Touch panel (Fig. P5)
1-  Filter clean warning display/button. Warning  of  the  need  to  replace  the 

filter – press to deactivate once the filter has been cleaned or replaced.

2-  Enable and disable extractor fan timer.
3-  Lighting on and off. Keep pressed down to adjust the lighting intensity.
4-  Extractor fan on and off.
5-  Extractor fan speed - button: speed 1, 2 and 3/4
Timer: the extractor fan works for 5 min. at the current speed and another 5  
min. at each of the lower speeds until it stops.
Sliding touch panel (Fig. P6)
1-   Extractor fan on and off.
2-   Sliding touch panel for extractor fan speed control. Also used in combination 

with button -3-.

3-  Lighting on and off.  Press  the  button  and,  while  it  is  flashing,  adjust  the 

lighting intensity using the sliding touch panel -2-.

4-   Enable and disable extractor fan timer.
5-  Filter clean warning display/button. Warning  of  the  need  to  replace  the 

filter – press to deactivate once the filter has been cleaned or replaced.

Timer: the extractor fan works for 2 min. at the current speed and another 2 min. 
at each of the lower speeds until it stops and the lighting switches off.
Hood maintenance

Warning:  always  switch  off  the  electricity  supply  before  carrying  out 
maintenance  work  on  the  hood.
  In  the  event  of  a  fault,  contact  an 
official distributor
 or authorised dealer.

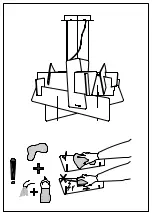
Exterior cleaning: use non-corrosive, liquid detergent and avoid the use of 
abrasive cleaning products.
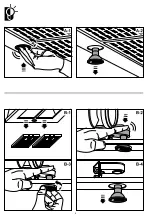
Grease filters: to avoid fires, clean thoroughly once a month or whenever the 
display pilot light indicates as such. To do so, remove the filters and wash with 
hot water and detergent. If using a dishwasher, position the filters vertically to 
prevent solid remains from depositing on them.
Activated charcoal filters: replace the every 3 months.

Important:  increase  the  filter  cleaning/replacement  frequency  if  the 
hood is used for more than 2 hours a day. Always use genuine filters from 
the manufacturer.

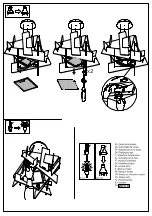
Bulb replacement (look for the 

 symbol in the figures)

Warning: do not handle the bulbs until the electricity supply has been 
switched off and they have cooled.

Important: use new bulbs according to that indicated on the hood 
nameplate.

Use  bulbs  with  an  aluminium  reflector  to  replace  halogen  bulbs.  Do  not  use 
dichroic bulbs - risk of overheating.
On cooker hoods equipped with tungsten lamps, the lights should only be used 
during  operation  of  the  motor.  They  should  not  be  left  on  permanently  and 
used as a light source.

Legal information
The manufacturer:
- Declares that this product meets all basic requirements regarding low-voltage 
electrical equipment established in Directive 2006/95/EC of 12 December 2006 
and electro-magnetic compatibility established in Directive 2004/108/EC of 15 
December 2004.
- Is not responsible for any failure to observe the instructions given in this manual 
and current safety regulations for the correct use of the equipment.
- R eserves the right to make any modifications to the equipment or this manual 
without prior notice.

Contact  our  official  distributor  should  you  require  technical  assistance  or 
additional information on our products.

EN

Содержание NODOR ISLA ARTICA

Страница 1: ...25 8 14 ...

Страница 2: ......

Страница 3: ......

Страница 4: ......

Страница 5: ......

Страница 6: ......

Страница 7: ......

Страница 8: ......

Страница 9: ......

Страница 10: ......

Страница 11: ......

Страница 12: ......

Страница 13: ...Installasjons bruks og vedlikeholdsmanual for dekorative hetter NK AR المزخرفة الشفاطات وصيانة واستخدام لتركيب كتيب ...

Страница 14: ...2 ...

Страница 15: ...3 ...

Страница 16: ...4 2 4 1 3 2 4 1 3 P2 P3 ...

Страница 17: ...5 2 2 3 4 5 1 P5 P6 2 2 2 1 2 3 2 4 P4 ...

Страница 18: ...6 ...

Страница 19: ... Indicador digital fig P3 1 Encendido y apagado de la iluminación 2 Encendido y apagado del extractor 3 Disminuir la velocidad del extractor 4 Panel indicador de la velocidad del extractor 5 Aumentar velocidad del extractor 6 Activar la velocidad turbo del extractor 7 Activar y desactivar la temporización del extractor Temporización el extractor funciona 5 min a la velocidad en curso y 5 min más e...

Страница 20: ...nkt Nach 15 Minuten schaltet das Gebläse ab und die Beleuchtung erlischt Ausschalten des Timers Drücken Sie ein Mal auf die gewählte Taste für die Gebläsestufe 4 Stufen Bedienfeld Digitale Anzeige Abb P3 1 Ein Ausschalten der Beleuchtung 2 Ein Ausschalten des Gebläses 3 Gebläsestufe herabsetzen 4 Anzeige der Gebläsestufe 5 Gebläsestufe erhöhen 6 Turbo Gebläsestufe aktivieren 7 Timer des Gebläses a...

Страница 21: ...teur s arrête et l éclairage s éteint Pour annuler la minuterie appuyez une fois sur la touche de la vitesse choisie Pupitre à quatre vitesses Afficheur numérique illustration P3 1 Marche arrêt de l éclairage 2 Marche arrêt d extraction 3 Réduire la vitesse d extraction 4 Pupitre indicateur de la vitesse d extraction 5 Augmenter la vitesse d extraction 6 Activer la vitesse turbo d extraction 7 Act...

Страница 22: ...ng on and off 2 Extractor fan on and off 3 Decrease extractor fan speed 4 Extractor fan speed display panel 5 Increase extractor fan speed 6 Enable extractor fan turbo speed 7 Enable and disable extractor fan timer Timer the extractor fan works for 5 min at the current speed and another 5 min at each of the lower speeds until it stops and the lighting switches off Five button panel Fig P4 1 Extrac...

Страница 23: ...nto dell illuminazione 2 Accensione e spegnimento dell estrattore 3 Diminuire la velocità dell estrattore 4 Pannello indicatore della velocità dell estrattore 5 Aumentare la velocità dell estrattore 6 Attivare la velocità turbo dell estrattore 7 Attivare e disattivare la temporizzazione dell estrattore Temporizzazione l estrattore funziona per 5 min alla velocità in corso e per altri 5 min in ognu...

Страница 24: ...rukknop van de gekozen snelheid Paneel met vier snelheden Digitale indicator fig P3 1 Aan en uitzetten van de verlichting 2 Aan en uitzetten van de afzuigkap 3 Snelheid van de afzuigkap verlagen 4 Indicatorpaneel van de snelheid van de afzuigkap 5 Snelheid van de afzuigkap verhogen 6 Turbosnelheid van de afzuigkap activeren 7 Tijdsinstelling van de afzuigkap activeren en deactiveren Tijdsinstellin...

Страница 25: ... velocidades Indicador digital Fig P3 1 Activação e desactivação da iluminação 2 Activação e desactivação do extractor 3 Diminuir a velocidade do extractor 4 Painel indicador da velocidade do extractor 5 Aumentar a velocidade do extractor 6 Activar a velocidade turbo do extractor 7 Activar e desactivar a temporização do extractor Temporização o extractor funciona durante 5 min à velocidade em curs...

Страница 26: ... for emhættens ventilator 3 Mindsk emhætteventilatorens hastighed 4 Panel til visning af emhætteventilatorens hastighed 5 Øg emhætteventilatorens hastighed 6 Slå turbohastighed for emhætteventilator til 7 Slå emhætteventilatorens timer til og fra Timer Emhætteventilatoren kører i 5 minutter ved den aktuelle hastighed og derefter 5 minutter ved hver af de lavere hastigheder indtil den stopper og ly...

Страница 27: ...timen nopeuden vähentäminen 4 Liesituulettimen nopeuden näyttöpaneeli 5 Liesituulettimen nopeuden lisääminen 6 Liesituulettimen turbonopeuden aktivointi 7 Liesituulettimen ajastimen aktivointi ja deaktivointi Ajastin liesituuletin käy 5 min valitulla nopeudella ja 5 min kullakin alemmalla nopeudella kunnes se sammuu ja valaistus kytkeytyy pois päältä Viisipainikkeinen paneeli kuva P4 1 Merkkivalol...

Страница 28: ...heter Digital displayer Bild P3 1 Ljus på och av 2 Utsugningsfläkt på och av 3 Minska utsugningsfläktens hastighet 4 Utsugningsfläktens dsiplayerpanel för hastighet 5 Öka utsugningsfläktens hastighet 6 Aktivera utsugningsfläktens turbohastighet 7 Aktivera och avaktivera utsugningsfläktens timer Timer utsugningsfläkten arbetar i 5 minuter i nuvarande hastighet och i ytterligare 5 minuter på varje l...

Страница 29: ...ykk en gang på den valgte hastighetsknappen Panel med fire hastigheter Digitalt display fig P3 1 Lys på og av 2 Kjøkkenvifte på og av 3 Senk kjøkkenviftens hastighet 4 Displaypanel for kjøkkenviftehastighet 5 Øk kjøkkenviftens hastighet 6 Aktiver turbohastighet for kjøkkenvifte 7 Aktiver og deaktiver timer for kjøkkenvifte Timer kjøkkenviften går i 5 minutter på gjeldende hastighet og nye 5 minutt...

Страница 30: ...η της ταχύτητας του μοτέρ 6 Ενεργοποίηση της ταχύτητας τούρμπο του μοτέρ 7 Ενεργοποίηση και απενεργοποίηση της παράτασης λειτουργίας του μοτέρ Παράταση λειτουργίας το μοτέρ λειτουργεί για 5 λεπτά με την επιλεγμένη ταχύτητα και για 5 λεπτά ακόμη με κάθε μία από τις χαμηλότερες ταχύτητες μέχρις ότου παύσει να λειτουργεί και ο φωτισμός σβήσει Πίνακας πέντε πλήκτρων σχ P4 1 Λυχνία ελέγχου λειτουργίας ...

Страница 31: ...ифровой дисплей рис P3 1 Включение и выключение освещения 2 Включение и выключение вытяжного вентилятора 3 Уменьшение скорости вытяжного вентилятора 4 Панель дисплея скорости вытяжного вентилятора 5 Увеличение скорости вытяжного вентилятора 6 Включение повышенной скорости вытяжного вентилятора 7 Включение и выключение таймера вытяжного вентилятора Таймер вытяжной вентилятор работает 5 минут на тек...

Страница 32: ...rędkościami wyświetlacz cyfrowy rys P3 1 Włącznik i wyłącznik oświetlenia 2 Włącznik i wyłącznik oświetlenia 3 Zmniejsza prędkość obrotową wentylatora 4 Panel wyświetlacza prędkości wentylatora 5 Zwiększa prędkość obrotową wentylatora 6 Włącza prędkość turbo wentylatora 7 Włącza i wyłącza zegar wentylatora okapu Zegar wentylator okapu pracuje 5 minut z bieżącą prędkością i kolejno po 5 minut z każ...

Страница 33: ...1 Világítás be kikapcsoló 2 Elszívóventilátor be kikapcsoló 3 Elszívóventilátor sebességének csökkentése 4 Elszívóventilátor sebességkijelző panelje 5 Elszívóventilátor sebességének növelése 6 Elszívóventilátor turbó sebességre kapcsolása 7 Elszívóventilátor időzítésének be kikapcsolása Időzítés Az elszívóventilátor 5 percig az aktuális sebességfokozaton működik majd további 5 percig az alacsonyab...

Страница 34: ...数字显示屏 图示 P3 1 照明灯开关键 2 风机开关键 3 风机减速键 4 风机转速显示屏 5 风机加速键 6 风机涡轮加速键 7 风机定时器开关键 定时器 风机会先以当前风速工作 5 分钟 再逐渐降至每一低速档分别 工作 5 分钟 直到自动停止工作 照明灯自动关闭 五键式控制面板 图示 P4 1 风机操作控制指示灯 2 照明灯开关键 3 风机关闭键 4 风机转速 按键 风速 1 2 和 3 触摸式控制面板 图示 P5 1 滤油网清洁警告显示屏 按键 在需要更换滤油网时发出警告 清 洁或更换滤油网后 按下按键关闭警告 2 风机定时器开关键 3 照明灯开关键 按住照明灯开关键可调节照明灯亮度 4 风机开关键 5 风机转速 按键 风速 1 2 和 3 4 定时器 风机会先以当前风速工作 5 分钟 再逐渐降至每一低速档分别 工作 5 分钟 直到自动停止工作 滑动触摸式控制面板 图示 P6 1 ...

Страница 35: ...لمستخرج مروحة وإغالق تشغيل 3 3 األستخراج مروحة سرعة قلل 4 4 األستخراج مروحة سرعة عرض لوحة 5 5 األستخراج مروحة سرعة زود 6 6 المستخرج لمروحة القصوى السرعة بتمكين قم 7 7 المستخرج مروحة وقت ضابط وتعطيل بتمكين قم كل على أخرى دقائق 5 و الحالية السرعة على دقائق 5 لمدة المستخرج مروحة تعمل المؤقت األضاءة وتطفئ تتوقف حتى أقل سرعة P4 الشكل ازرار خمس ذات لوحة 1 1 المستخرج بمروحة الخاص التشغيل تحكم إرشاد ضوء 2...

Страница 36: ...l Ter 2 08570 TORELLÓ Barcelona SPAIN Tel 34 938 594 100 Fax 34 938 594 101 www cnagroup es e mail cna cnagroup es Atención al Cliente 902 410 450 info cnagroup es SAT Central Portugal 214 349 771 service junis pt 60812050 14 10 2013 ...

Страница 37: ...15107006 RECAMBIO MANDO DISTANCIA ISLA DEIMOS ...

Страница 38: ...own to adjust the lighting intensity Enable and disable extractor fan timer Timer the extractor fan works for 5 min at the current speed and another 5 min at each of the lower speeds until it stops and the lighting switches off IT Italiano Accensione e spegnimento dell estrattore Diminuire la velocità dell estrattore Aumentare la velocità dell estrattore Accensione e spegnimento dell illuminazione...

Страница 39: ...ου μοτέρ Μείωση της ταχύτητας του μοτέρ Αύξηση της ταχύτητας του μοτέρ Άναμμα και σβήσιμο του φωτισμού Κρατήστε πατημένο για να ρυθμίσετε την ένταση του φωτισμού Ενεργοποίηση και απενεργοποίηση της παράτασης λειτουργίας του μοτέρ Παράταση λειτουργίας το μοτέρ λειτουργεί για 5 λεπτά με την επιλεγμένη ταχύτητα και για 5 λεπτά ακόμη με κάθε μία από τις χαμηλότερες ταχύτητες μέχρις ότου παύσει να λειτ...

Страница 40: ...RODOMÉSTICOS S L C Ter 2 08570 TORELLÓ Barcelona SPAIN T Tel 34 938 594 100 Fax 34 938 594 101 www cnagroup es e mail cna cnagroup es Atención al Cliente 902 410 450 info cnagroup es SAT Central Portugal 214 349 771 service junis pt ...

Отзывы: