28
Test Procedures
EXCEL SYSTEM TROUBLESHOOTING:
WITH ERIC CHARGING
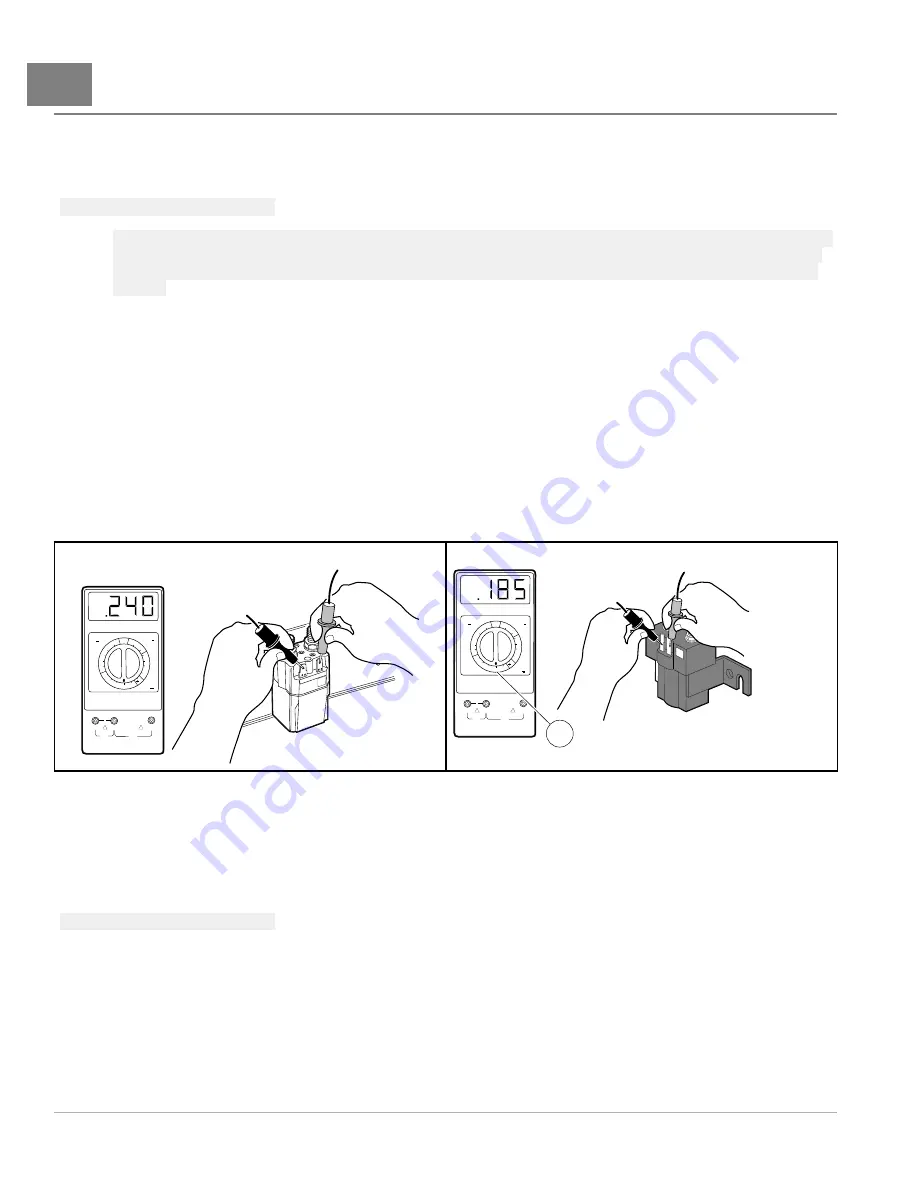
TEST PROCEDURE 7 – Solenoid Activating Coil
See General Warnings on page 1-2.
NOTE:
This is a resistance test.
Be aware that one of two different solenoids may be found on the vehicle. Visually, the production solenoid is
smaller than the service replacement. On the labels, the larger service replacement solenoid has SOL0605
and the smaller production solenoid has SOL5006. Internally, specifications and test results differ between
the two.
1.
If necessary, see Testing Basics on page 28-16.
2.
Disconnect the batteries and discharge the controller.
See Disconnecting the Batteries – Electric Vehicles
3.
Access the solenoid by removing the electronics module cover.
See Electronics Module Cover on page 29-5.
4.
Remove the two small wire terminals from the solenoid.
5.
Place red (+) probe of the multimeter on the positive (+) solenoid terminal. Place the black (–) probe on the
other small solenoid terminal.
– A reading of 200 to 250 ohms should be obtained for factory-installed solenoids
. If
not, replace the solenoid.
– A reading of 180 to 190 ohms should be obtained for service replacement solenoids
. If not, replace the solenoid.
+
2m
20
m
200
m
2k
200
200
200
200
20
2
200
m
500
20k
200k
2000
k
1000
OFF
WAVETEK
5XL
V
V
V
A
!
!
COM
200nA
MAX
1000 ---
750V
FUSED
+
2m
20
m
200
m
2k
200
200
200
200
20
2
200
m
500
20k
200k
2000
k
1000
OFF
WAVETEK
5XL
V
V
V
A
!
!
COM
200nA
MAX
1000 ---
750V
FUSED
1
Figure 28-11
Activating Coil Test – Factory-installed
Solenoid
2500-20000-10283
Figure 28-12
Activating Coil Test – Service Replacement
Solenoid
TEST PROCEDURE 8 – Pre-Charge Resistor
See General Warnings on page 1-2.
NOTE:
This is a resistance test.
1.
If necessary, see Testing Basics on page 28-16.
2.
Disconnect the batteries and discharge the controller.
See Disconnecting the Batteries – Electric Vehicles
3.
Access the solenoid by removing the access panel in the rear body.
4.
Measure resistance between the two large posts of the solenoid. The reading should be approx. 250 Ohms. If
not, replace the pre-charge resistor using most of the steps found in
Solenoid Removal on page 29-13
5.
Place the Tow/Run switch in the TOW position and connect the batteries.
See Connecting the Batteries –
Electric Vehicles on page 1-4.
Page 28-24
2014 Precedent
®
Golf Car Maintenance and Service Manual
Содержание Precedent 2014
Страница 2: ......
Страница 4: ......
Страница 24: ......
Страница 28: ......
Страница 38: ......
Страница 66: ......
Страница 104: ......
Страница 108: ...8 Tires WHEELS AND TIRES 680 Figure 8 2 Inflate Tire Page 8 4 2014 Precedent Golf Car Maintenance and Service Manual ...
Страница 116: ......
Страница 152: ......
Страница 234: ......
Страница 252: ......
Страница 264: ......
Страница 298: ......
Страница 332: ......
Страница 394: ......
Страница 412: ......
Страница 438: ......
Страница 444: ......
Страница 508: ......
Страница 534: ......
Страница 543: ......
Страница 544: ......
Страница 545: ......
Страница 547: ......
Страница 548: ......


