


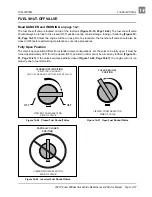


FUEL SYSTEM
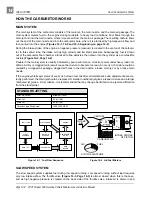
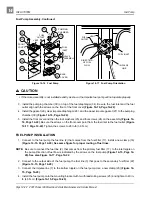
Choke and Air Intake System
2001 Pioneer 900 Gasoline Vehicle Maintenance and Service Manual Page 14-15
14
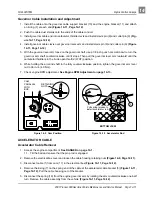
3. Check the hex nut on the cable at the back of the choke lever assembly. If it is loose, tighten it until the
lock washer beside it collapses completely.
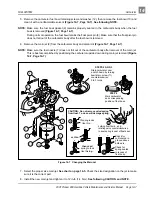
4. Attach choke cable to choke lever (6) on air box. Install screw (16) to secure cable to air box and tighten
to 18 in-lb (2.0 N·m) (Figure 14-14, Page 14-17).
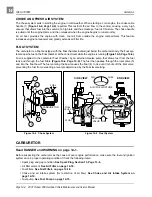
AIR BOX REMOVAL
1. Access the engine compartment. See DANGER on page 14-1.
1.1. Tilt the bed and ensure that the prop rod is engaged.
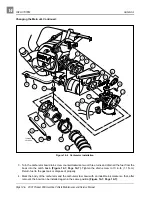
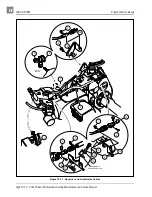
2. Remove the air intake box from the vehicle by removing intake hose (15) and three screws (22) and
washers (21) that mount the intake box to the vehicle (Figure 14-14, Page 14-17).
AIR BOX INSTALLATION
NOTE: The intake duct must be in place before the air box can be installed.
1. Check to be sure the intake seal (13) is seated correctly (Figure 14-14, Page 14-17). The seal fits tightly
onto the bottom side of the air box. If seal is not in place, moisture will enter the air intake system.
2. Place the air box assembly into vehicle and install three flat washers (21) and screws (22) from under-
side of air box mounting plate into air box (Figure 14-14, Page 14-17). Tighten to 33 in-lb (3.7 N·m).
3. Place hose onto air box and secure with wire clamp.
4. Attach the choke cable to the air box top. See Choke Cable Installation on page 14-14.
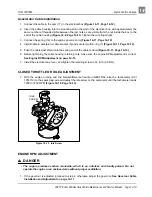
5. Test choke for proper operation.
INTAKE DUCT REMOVAL
1. Remove the front body. See Front Body Removal, Section 4, Page 4-4.
2. Remove the front left wheel. See Section 8 – Wheels and Tires.
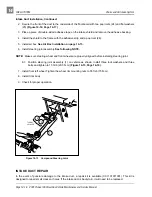
3. Remove the steering joint assembly (Figure 14-13, Page 14-16).
4. Roll the floor mat from underneath the dashboard and drill out the pop rivet (28) that secures the air
intake shield (26) to the floorboard (Figure 14-14, Page 14-17).
5. Using a putty knife, gently pry the adhesive strip that holds the shield to the vehicle frame and remove
the shield from the frame.
6. Drill out the two pop rivets (24) securing the intake duct to the floorboard (Figure 14-14, Page 14-17).
7. Remove three screws (22) and flat washers (21) from the bottom of the air box assembly (Figure 14-
8. Lift air box assembly off the intake duct. Be careful that the intake seal on the bottom of the air box
assembly is not dislodged in the process.
9. Pull the intake duct forward and out of the vehicle.
INTAKE DUCT INSTALLATION
The intake duct assembly is installed from the front of the vehicle.
1. Slide the intake duct between the round crossmember and the floorboard, moving it to the rear along
the underside of the floorboard. Insert the end of the intake duct through the slot in the front of the air
box mounting plate.
Содержание Pioneer 900
Страница 1: ......
Страница 2: ......
Страница 22: ...3...
Страница 88: ...7...
Страница 92: ...8...
Страница 100: ...9...
Страница 108: ...10...
Страница 188: ...12...
Страница 268: ...14...
Страница 272: ...15...
Страница 316: ...16...
Страница 332: ...17...
Страница 341: ......
Страница 342: ......
Страница 343: ......