


ELECTRICAL COMPONENTS: FE400, KEY-START ENGINE
Starter/Generator (Model 114-01-4005)
Page 12-16
2006-2010 Turf/Carryall 272/472 and XRT 1200/1200 SE Maintenance and Service Manual
12
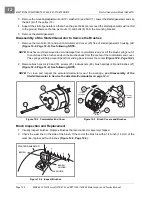
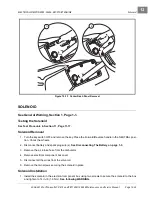
Field Coil Assembly
1. Replace entire field coil housing assembly if coils, pole shoes or terminals are damaged.
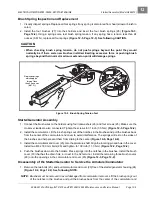
Visual Inspection of Armature
Obvious defects can be seen by examining the armature. If an armature has frayed or charred insulation, bro-
ken wires or thrown solder, it is obvious without testing that it should be replaced. Faults seen during the
visual inspection can aid in diagnosing the original cause of the failure. Items to look for are listed below.
•
Burned, charred, or cracked insulation
•
Improperly cured varnish
•
Thrown solder
•
Flared armature windings
•
Worn, burned, or glazed commutator
•
Loose or raised commutator bars
•
Bruised or damaged armature core laminations
•
Worn armature bearing or shaft
•
Dirty or oily commutator
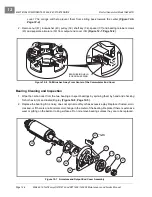
Commutator Cleaning and Inspection
1. Clean the carbon dust, dirt and oil from the commutator. Visually inspect the commutator for worn,
burned or glazed areas. Check for loose or raised commutator bars. Slight roughness of the commutator
can be polished away with 400 grit (or finer) sandpaper.
See following CAUTION.
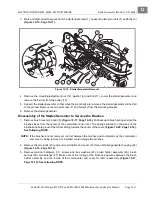
Figure 12-24 Field Coil Assembly
7
2
2
5
4
3
1
6
7
Содержание CARRYALL 272
Страница 2: ......
Страница 14: ......
Страница 18: ...1...
Страница 52: ...5...
Страница 90: ...6...
Страница 110: ...7...
Страница 112: ...8...
Страница 128: ...10...
Страница 170: ...11...
Страница 224: ...13...
Страница 284: ...16...
Страница 302: ...17...
Страница 308: ......
Страница 309: ...Club Car R NOTES...
Страница 310: ...Club Car R NOTES...
Страница 311: ......


