

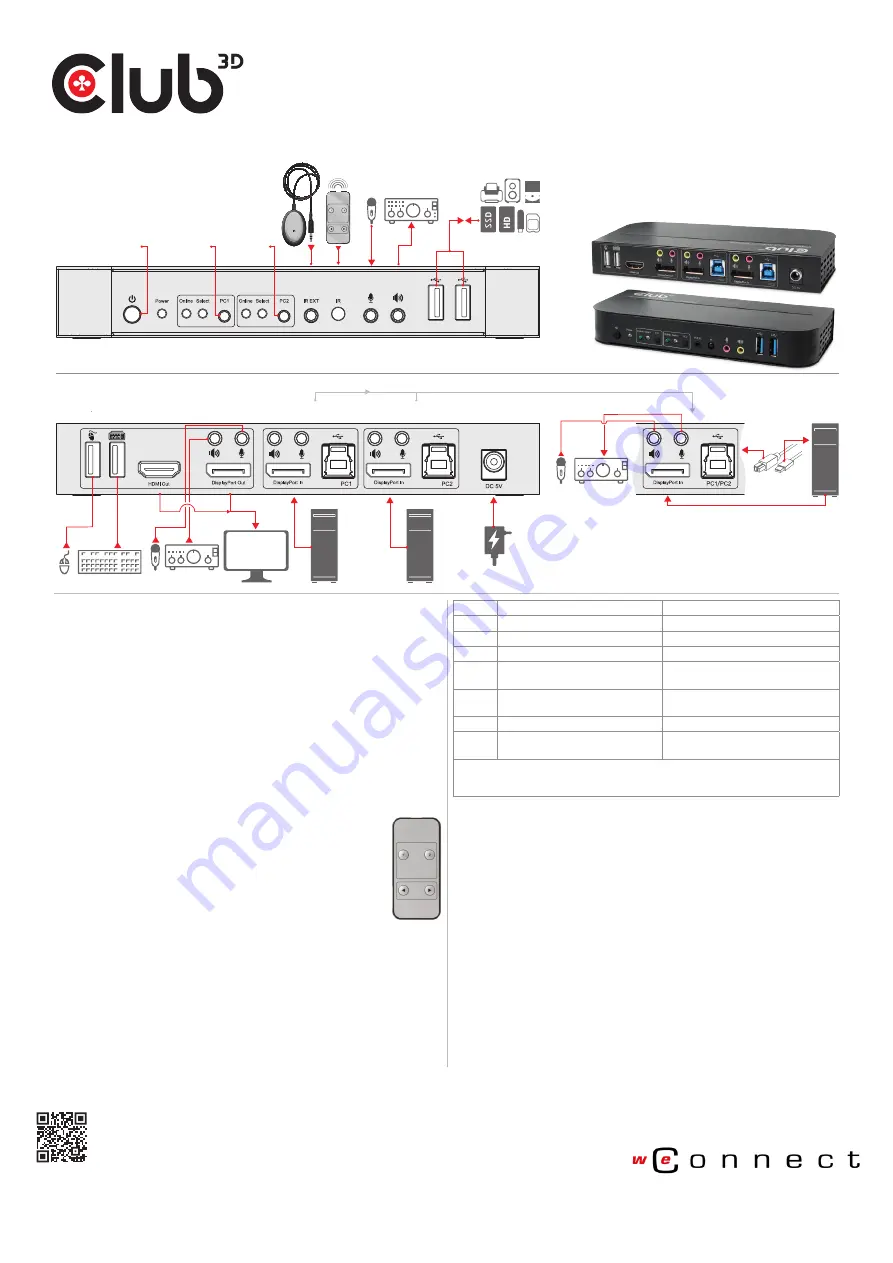
Power
Button
Power
Indicator
Input Selection
Input selection
button PC2
Input selection
button PC1
Power On/Off
button
MIC
input
Stereo
output
Mic
Amplifier
USB Gen1
ports
Connect
IR Extender
For IR
signal
reception
IR Extender
IR
Remote
FRONT
DC 5V in from
Power Supply
USB devices
(Printer, Scanner,
HD/DDS-Disk,eetc.)
PC2
input ports:
DisplayPort™, USB, MIC, Stereo
PC1
input ports:
DisplayPort™, USB, MIC, Stereo
Output ports:
UBS-A Mouse + Keyboard
Mouse
Keyboard
Output port:
DisplayPort™, MIC, Stereo
DisplayPort™
or
HDMI™
Display
Power from
AC/DC adapter
PC
Mic
Amplifier
PC
BACK
Input ports: PC1 / PC2
DisplayPort™, USB, MIC, Stereo
PC
Mic
Amplifier
USB-B to
USB-A Cable
1
Connect PCs to USB-B ports of the unit with USB cables;
Respectively connect MIC and stereo ports of the PCs to those(above the “Display-
Port™ In”) of the unit with 3.5mm audio cables; Connect PCs to “DisplayPort™ In”
ports of the unit with DisplayPort™ cables.
2
Connect keyboard and mouse to the USB-A ports on the back panel of the unit; Re-
spectively connect microphones and amplifiers to the mic and stereo ports(on the
front panel/above “DisplayPort™ Out”) of the unit with 3.5mm audio cables; Con-
nect a display to “DisplayPort™ Out” of the unit with a
max 2m/78.74" DisplayPort™
cable
. (Or connect a display to “ HDMI™ Out” of the unit with an HDMI™ cable)
Note:
When either “DisplayPort™ Out” or “HDMI™ Out” is connected, video is output
by the connected port automatically; When two of them are conncected, video
is output by DisplayPort™.
3
Power the unit with DC 5V and press the power button, the “Power” indicator lights
up.The USB-B ports are connected normally and the “Online” indicators light up.
“Select” lights up to indicate the current selected PC.
4
Press the buttons on the front panel of the unit to select input, the corresponding
“Select” lights up. After selection, the display shows corresponding image and the
selected PC can be controlled by a set of keyboard and mouse.
5
Remote control works the same as manual buttons.
1,2: For input selection. 1 specifies PC1 and 2 specifies PC2.
• , • : For loop switching. Order: PC1•PC2•PC1•….
6
For external function, connect printer/scanner/U-disk to the USB-A
ports on the front panel of the unit.
Special Function Operation:
1
Mouse traversal function:
Place the mouse on the far right side of the display and continue to
slide to the right for 2 seconds, the unit automatically switches to the next port.
Switching order is : PC1•PC2•PC1•…;
2
USB-B detection switching function:
2.1
When the unit detects that a PC is connected to the USB-B
port of the unit, the unit immediately switches to this PC and
the corresponding “Online” and “Select” indicators light up.
(For example: When PC1 is connected already, PC2 is connected to the unit
through USB-B port, then the unit immediately switches to PC2.
2.2
When the current selected PC is powered off or the USB cable is dialed out,
the unit automatically switches to the next PC with the power on and the USB
port connected.
3
Hotkey function (It doesn’t work on functional keyboard and only the 2 USB-A
ports on the back panel can get access to this function.)
1
“++” means to press 2 times in rapid succession. For example: “Scroll Lock ++
Scroll Lock + 1” means to press the Scroll Lcok button twice in rapid succession and
then press number “1” button. The detection between each hotkey code times out
for 5 seconds. For example, if the Scroll Lock button is pressed for the first time,
and then the Scroll Lock button is pressed after more than 5 seconds, the hotkey
combination is invalid;
2
“N” here indicates the number of the PC. For example, to switch to PC2, the hot-
key combination is “Scroll Lock ++ Scroll Lock + 2”;
3
Turn on this function, then DisplayPort™, MIC and the speaker will enter the auto-
matic switching mode without USB. Press (except the space bar) any key to exit
to the port before the automatic switching, press the space bar to stay at the
currently switched port. When switching automatically, the “Select” LED flashes
at the same time.
4
“N” here indicates the number of switching interval which can be 5 (seconds) to
999 (seconds);
5
“1” means on, “0” means off;
6
This mode only has relation to the hotkey function of Number 4 and Number 6.
The IR
Remote
Control
Number Hotkey Combination
Function Description
1
Scroll Lock++
1
Scroll Lock +
•
or
•
Switch to the next port
2
Scroll Lock++ Scroll Lock +
•
or
•
Switch to the previous port
3
Scroll Lock++ Scroll Lock + [N
2
]
Switch to PC N
4
Scroll Lock++ Scroll Lock + S
3
Automatic switching function
(Default: 15 seconds)
5
Scroll Lock++ Scroll Lock
+I+[N
4
]+[Enter]
Set the automatic switching interval
(5~999 seconds)
6
Scroll Lock++ Scroll Lock + B+ [1/0]
5
Buzzer on/off (Default: on)
7
Scroll Lock++ Scroll Lock + F + L + A
+ S + H + [Enter]
All resume hotkey default 1 mode
6
Note:
1. Hotkeys are not case-sensitive;
2. Buzzer sounds when switching between PC1 and PC2.
C S V-7 2 1 0 Q U I C K I N S TA L L AT I O N G U I D E
CSV-7210 QIG 03-2022
DisplayPort™/HDMI™ KVM Switch For Dual DisplayPort™ 4K 60Hz
Disclaimer:
While we endeavor to provide the most accurate, up-to-date information available, the content on this document may be out of date or include omissions, inaccuracies or other errors. Therefore Club 3D does not accept any rights claimed on the content of this document.
Please refer to a full overview of our Legacy Terms and Conditions on www.club-3d.com. All other brand names are trademarks or registered trademarks and are the property of their respective owners. All content is subject to change without prior notice.
Copyright © 2022, Club 3D B.V.
www.club-3d.com
2/2
CSV-7210: CONNECTION DIAGRAM


