CloudWalker CLOUD 43SF Скачать руководство пользователя страница 5

TF

7

USB2

USB1

8

Pb 

Pr 

YPBPR IN 

3

LINE OUT

CVBS 

AV IN 

RJ 45

9

HDMI1

HDMI2

4

2

1

CLOUD TV 43SU

COAX

5

HDMI3

4

RF IN

6

Pb 

Pr 

YPBPR IN 

COAX

LINE OUT

9

TF

7

USB2

USB1

8

3

5

VGA

LINE IN

HDMI1

HDMI2

RF IN

CVBS 

AV IN 

RJ 45

11

10

4

2

1

6

5

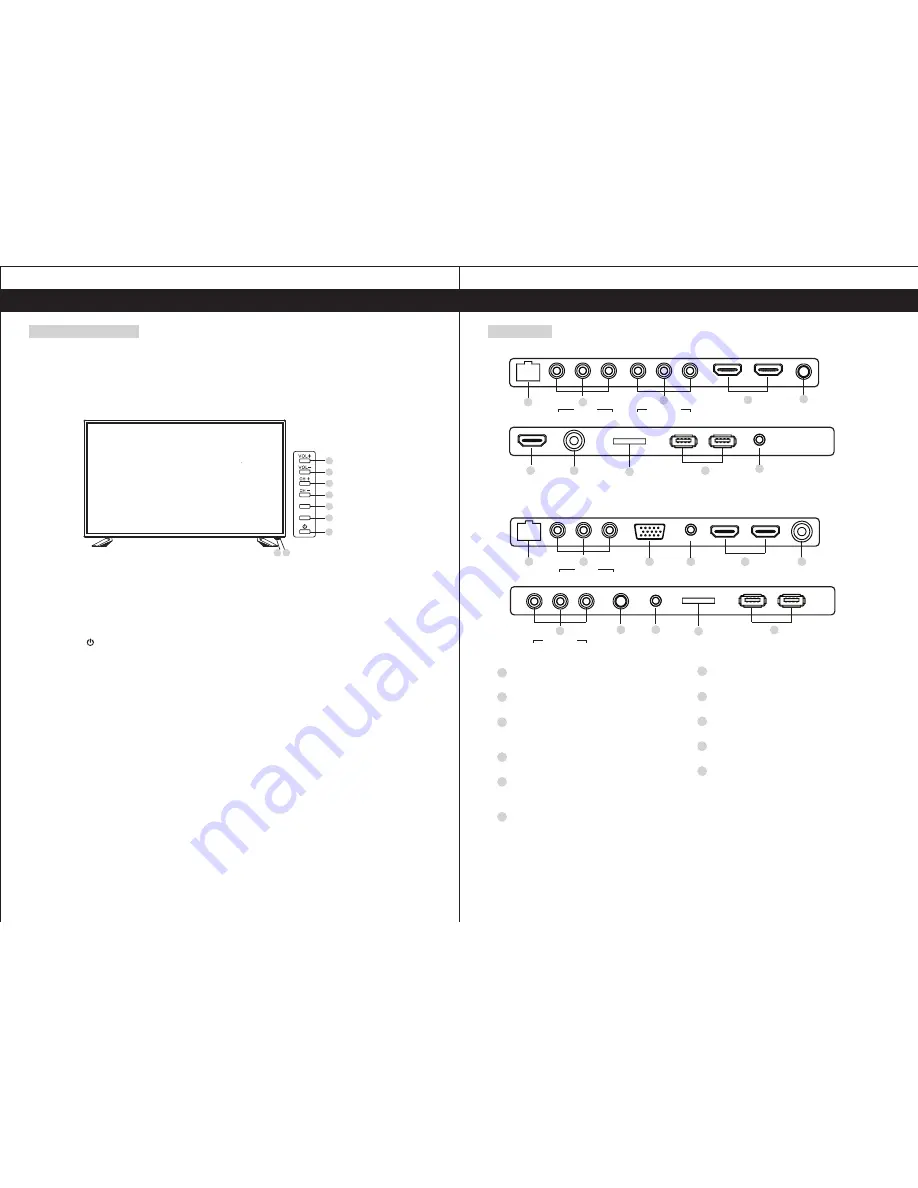
Functional Overview

Front and Side Panel

1. Power Light

    On Standby Mode, the light turns red.

2. Infrared Remote Sensor

    Receives the signals from the remote control.

3.     POWER

    Press to turn TV on or turn to standby mode.

4. SOURCE

    Press to select TV or all video input modes.

5. MENU

    Press to display  the setup menu on the TV screen.

6-7. CH+, CH-

       Press to select desired channels, or press to select or adjust a menu item.

8-9. VOL+, VOL-

       Press to adjust the volume level, or press to select or adjust a menu item.

CLOUD TV 43SU

CLOUD TV 43SF

6

Rear Panel

Functional Overview

CLOUD TV 43SF

8

9

6

7

5

4

3

SOURCE

MENU

1

2

RJ45 Ethernet

Connect to the Internet.

AV IN

Video and Audio(L/R)input terminal 

YPBPR Input terminals

Connect  to  equipment  with  component 
video output.

HDMI1/HDM2/HDM3 Input terminal

Connect to equipment with HDMI output.

COAX IN

Connection  for  Digital  Coaxial  for  Audio 
Amplifier.

RF IN (Antenna lnput terminal)

Connect  to  equipment  with  antenna 
output or wall antenna socket.

1

4

3

6

5

2

7

TF (Micro SD)

Insert a Micro SD card.    

USB

Connect your external storage devices.

LINE OUT terminal

Connect to a Audio Amplifier.

VGA(PC IN) Input terminal

Connect to PC.

LINE IN Input terminal

Connect  to  equipment  using  HDMI-DVI 
connection or PC with audio output.

8

10

11

9

Содержание CLOUD 43SF

Страница 1: ...details mentioned below for your CloudWalker LED TV We d like to hear from you www cloudwalker tv Head Office CloudWalker Streaming Technologies Pvt Ltd A 503 Business Suite 9 S V Road Santacruz West...

Страница 2: ...he remote control To obtain the best performance and safety please read this manual carefully Please keep this manual for future reference Important Safety Instructions Supplied Accessories Preparatio...

Страница 3: ...power lines or circuits When installing an outside antenna system extreme care should be taken to keep from touching such power lines or circuits as contact with them might be fatal 14 Overloading Do...

Страница 4: ...surface leaving a space of at least 10cm around the set and 30cm from the top of the set to the wall Connect the antenna cable into the antenna input terminal at the rear panel wall antenna socket Con...

Страница 5: ...tem 8 9 VOL VOL Press to adjust the volume level or press to select or adjust a menu item CLOUD TV 43SU CLOUD TV 43SF 6 Rear Panel Functional Overview CLOUD TV 43SF 8 9 6 7 5 4 3 SOURCE MENU 1 2 RJ45...

Страница 6: ...connect it to the HDMI terminal using a HDMI DVI cable In case of using the HDMI DVI cable connect analog audio signal to RGB HDMI Audio Input terminal Please refer to the user manual of t he external...

Страница 7: ...the batteries from the remote control as damage may result due to electrolyte leakage from the batteries Installing The Remote Control Batteries 1 The batteries shall not be exposed to excessive heat...

Страница 8: ...and Digital Content on the same screen Click All Apps to access your apps To make an app shortcut click on Add icon HOME Search for your favourite videos online and enjoy watching them on your TV CDE...

Страница 9: ...ect Insert the Ethernet cable and enable Auto get IP to connect Time Press the to select the Time to set Auto Attach Get the current time and date automatically 24 Hours Select the 12 hours or 24 hour...

Страница 10: ...Operation 16 Menu Operation Language Setting Select current display language Input Method Select the Input method System Upgrade Upgrade to the newest system version System Recovery Recovery system t...

Страница 11: ...My Media Multimedia Play your movies music and photos directly on the TV from your external storage devices Music Photo Videos Click Video from Multimedia and use the navigation keys on your remote t...

Страница 12: ...ynamic Standard Mild User Brightness Adjust darkness of black sections in the picture Color Adjust the color intensity of the picture Sharpness Object edges are enhanced for picture detail 19 Menu Ope...

Страница 13: ...commercial breaks or channel changes Press Enter button to enter the sub title and press to sdjust SPDIF Select to OFF RAW PCM Digital Interface Surround Select to ON OFF Surround Hue Adjust the hue R...

Страница 14: ...List the programs Auto Scan Press to select Auto Tuning then press OK to start auto search If you want to stop searching press EXIT to stop searching Auto Scan will search for available channels and...

Страница 15: ...s TV Settings Press to delete the channel Press to enter the rename state then select the word you want to change and to select word Press the to select Channel List Press to Edit the Channel List Pre...

Страница 16: ...n Set the background color to blue or black when no input signal HDMI CEC Setup Set the CEC ON OFF Reset Recall the default setting H P HDMI CEC Setup DMI CEC Setup ress to select Reset ress to reset...

Страница 17: ...29 Specifications 30 Specifications 10 8...

Страница 18: ......

Отзывы: