CLIPS TECH NB-K2 Скачать руководство пользователя страница 4

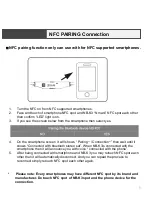
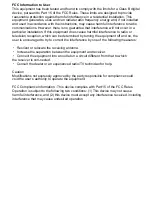
How to Set Pairing  Mode (Initial registering of the device)

Every Bluetooth enabled device must be initiated by the customer. This means a 

pairing

procedure with the host device or smartphone is required.  This requires a 

PIN number or auto-pairing  before the  first time use of the product.  Please refer to 
this Quick Start Guide for pairing with smartphones.
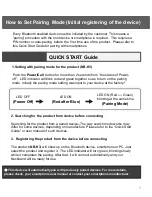
LED OFF

(Power Off)

LED ON

(Red after Blue)

LED ON (Red 

Green)

blinking at the same time

(Pairing Mode)

2. Searching for the product from device before connecting

Searching for the product from a paired device--The way search mode works may 
differ for some devices, depending on manufacture. Please refer to the “Quick Start 
Guide” or user manual of such devices.

3.  Registering the product from the device before connecting

The product (

NB-K3

) will show up on the Bluetooth device, smartphone or PC. Just 

select the product and register it.  The LED indicator will turn green, blinking slowly 
while it completes the pairing. After that, it will connect automatically and your 
Neckband will be ready for use.

4

QUICK START Guide

1.Setting with pairing mode for the product (NB-K3)                                    

Push the 

Power/Call

button for more than 2 seconds from “the status of Power-

off”.   LED indicator will blink red and green together so as to turn on the pairing 
mode. Initially the pairing mode setting was input to your device at the factory.

*

This device will automatically pair with previously paired devices. For more details,           

please check  your smartphone user manual or contact your smartphone manufacturer.

Содержание NB-K2

Страница 1: ...n to connect Clips Message Reader Package Contents This package contains the products listed below Please check the packaging contents before use NB K3 1pc USB ChargingCable 1pc User Manual 1pc This f...

Страница 2: ...angeable with other chargers as it may cause damage if used with other products Caution LED turns green when device is fully charged Description CHARGE Before Use You MUST charge the device before usi...

Страница 3: ...sh the Volume Control button just once quickly Make a Call Push the on and off Power Call button approximately 1 second starts dialing the last dialed number Answer a Call Push the Power Call button o...

Страница 4: ...uick Start Guide or user manual of such devices 3 Registering the product from the device before connecting The product NB K3 will show up on the Bluetooth device smartphone or PC Just select the prod...

Страница 5: ...Red Blue alternately blinking when pairing Blue indicator blinking slowly indicates pairing is completed 5 PAIRING Connection...

Страница 6: ...Pairing Connection then wait until it shows Connected with bluetooth stereo set When NB K3is connected with the smartphone then it will announce you with voice connected with the phone 5 After being...

Страница 7: ...red after blue and turn off the LED indicator to Power OFF Make a call using smartphones NOTE The operation might be different for your smartphone or device as interactions may vary depending on the...

Страница 8: ...B K2 supports apt X codec for Android by aptX which is highly optimized for Hi Fi audio in Bluetooth Technology Ending a Call Push on and off the Power Call button for 1 second while communication Rej...

Страница 9: ...cond smartphone power on the first smartphone then select the NB K3 from the Bluetooth menu so as to connect with first smartphone 7 NB K3 will connect automatically every time the power is on NOTE Wh...

Страница 10: ...ct is powered on and paired with smartphone First alarm will vibrate when the phone is away from the product approximately 10m within maximum 20 seconds Distance will vary by its wireless environment...

Страница 11: ...en LED will light up when charging Do not use while charging 5 Do not use until the unit has been fully charged Charging will take approximately 2 hours to complete If the LED indicator does not turn...

Страница 12: ...torage Temperature 10 50 Humidity 0 80 without frozen Input Voltage DC 5V Battery Type Lithium Polymer Dimension 141mm x 158mm Weight Approx 27g NOTE The appearance and specifications may be changed w...

Страница 13: ...oduct failure and or a fire hazard Such damage is not covered by the warranty Put SAFETY FIRST Do not impact or drop this product It may cause damage or failure Do not clean this product with water al...

Страница 14: ...be determined by turning the equipment off and on the user is encouraged to try to correct the interference by one of the following measures Reorient or relocate the receiving antenna Increase the sep...

Отзывы: