background image


1.6. Setup 

The Video Door Phone can be incorporated into existing Climax security system as an 
accessory  device.  To use  the  VDP,  a  Climax  IP  based  security  system  alarm  panel  is 
required.   

In order to incorporate the Video Door Phone into existing Climax security system, the 
Control Panel of the security system must be registered into Climax Home Portal Server 
first with a functional user account. 

A smartphone with 

Vesta Home 5 TW / Vesta Home 5 US 

or

 Vesta Home 5 EU

 app 

installed is required to perform setup. Search for the app in Google Play or Apple App 
Store, type 

Vesta Home 5 TW/US/EU

 on the search bar according to your server, then 

download the application. Refer to Climax Home Portal Server user guide for detail. 


1.  Open  Vesta  Home  5  app  and  enter  your  existing  user  account  &  password  of  the 

Control Panel you wish to use for further setup. 

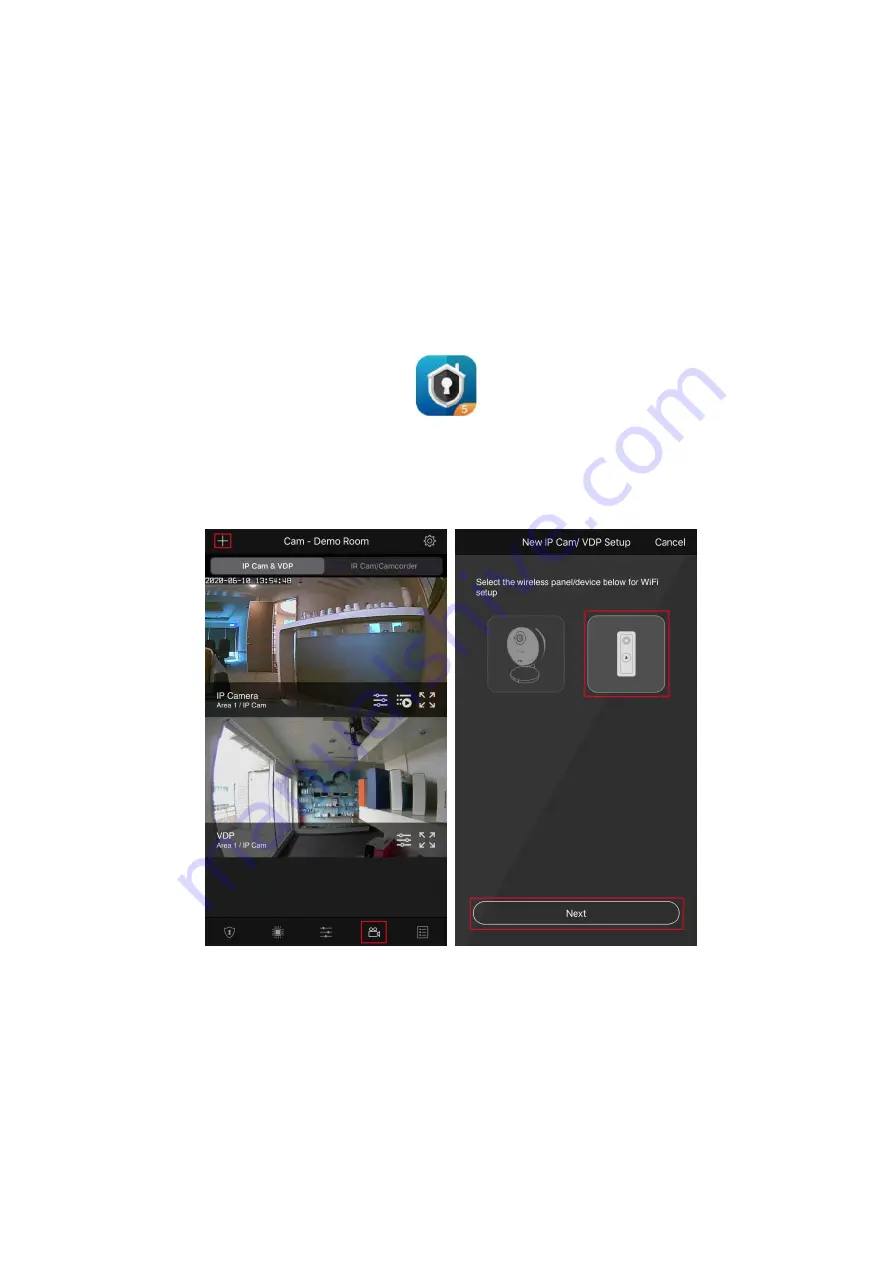
2.  Tap the Camera icon in the navigation bar and the + icon on top left corner to add the 

VDP into your existing system. Select the VDP icon and tap 

“Next”. 


3.  Power up the Video Doorbell by applying AC power. The device will first warm up for 

about 30 seconds, and its Blue LED will begin to flash. 

Flashing LED indicates the Video Doorbell does not have a working Wi-Fi setting yet. 
It will enter Wi-Fi setup mode (AP mode) automatically upon power-up. 

4.  Select  the  route  to  set  up  your  Wi-Fi  network  and  follow  on-screen  instructions. 

Please note if the VDP has already been set up to another Wi-Fi network, be sure to 
reset the device first before adding it into your existing alarm system. 

4.1. Manual: Use your VDP as an AP. Connect to your Wi-Fi. Make sure your 

smart

phone’s Wi-Fi is enabled. Follow on-screen instructions and wait for your 

VDP to connect to your Wi-Fi network. After successfully joining to your Wi-Fi 

Содержание VDP-3

Страница 1: ...VDP 3 Video Door Phone User Manual June 10 2020...

Страница 2: ...___________________________6 2 OPERATION ____________________________________________________________________________ 9 2 1 WEB BROWSER ACCESS _________________________________________________________...

Страница 3: ...te video streaming access two way communication via Wi Fi network The Video Door Phone functions as a part of Climax alarm system by connecting to a Climax security system Control Panel Setup and remo...

Страница 4: ...t Please note the torque on the screw should be less than 24 5 Nm 2 5 kg m 9 Reserved 10 Reserved 1 2 The Power Supply The VDP uses 12 24V DC AC power as its power source Turn off mains power first Lo...

Страница 5: ...t Note It takes about 1 minute for VDP to connect to Wi Fi after power on Before the Wi Fi connection is established the Red LED may flash momentarily 1 4 Equipment required The following equipment is...

Страница 6: ...12 24V DC AC Power Input and save the screws for later use Step 6 Connect wires to the inputs on the rear side of the back cover as shown in Figure 1 It is recommended to use wire with a diameter les...

Страница 7: ...count password of the Control Panel you wish to use for further setup 2 Tap the Camera icon in the navigation bar and the icon on top left corner to add the VDP into your existing system Select the VD...

Страница 8: ...pleted re login to the app and start using your VDP 4 2 QR Code Enter your SSID information to generate QR Code for VDP to scan The QR Code includes information about the Wi Fi network and the Control...

Страница 9: ...s successful When the LED stops flashing tap Done to complete the setup After VDP successfully joins to your Wi Fi network the app will proceed to learn the VDP into the Control Panel When learning is...

Страница 10: ...l using a web browser VDP is located under the Camera page and has the same function of a Climax IP Camera Two way voice and doorbell functions are not enabled for web browser access To uses these fun...

Страница 11: ...ideo settings such as brightness saturation and contrast Video Adjustment now allows for top bottom flip video option thus enabling users to flip video without needing to physically move the Security...

Страница 12: ...p WiFi function for existing model tap the icon and follow the step by step instructions To enlarge to full screen view tap the icon for different function settings The left hand menu allows you to sw...

Страница 13: ...Panel Home Portal Server account s push notification setting must be enabled To access miscellaneous page log in your application and tap the icon at top right corner and tap Notification The Notifica...

Страница 14: ...ortal Server to record a video Whenever an alarm is activated by the Control Panel the VDP will record a video immediately Picture Press the function button in front of VDP to take a picture Press the...

Страница 15: ...accessed by pressing the icon at top right corner Account List available for Master account The account list page allows secondary user configuration Under this page click the icon to add secondary u...

Страница 16: ...o bar to display the Account User info page You can edit your registered information in this page 3 3 Video Setting Video Setting options are only available when VDP is included in a security system T...

Страница 17: ...eo Adjustment Click icon to adjust video settings Video Adjustment now allows for top bottom flip video option thus enabling users to flip video without needing to physically move the Security Camera...

Страница 18: ...ection allows the user to add motion detection setup Users can then set up Region 1 and Region 2 and sensitivity levels for each region If any movement is detected when the system is armed a video wil...

Страница 19: ...when included in security system and accessed on the Home Portal Server web UI s Edit Device page Setting The setting page is used to set VDP zone number device name and time zone setting Please refer...

Страница 20: ...s video clips previously taken by VDP for download Click the download link icon to down the file into your computer Video Setting Video Record Length Total Time The total time of each recorded video c...

Страница 21: ...function is enabled a video will be recorded when the Function Button is pressed Video Stream Quality Set the quality of the video FPS Set the FPS of the video Motion JPEG Quality Set the quality of t...

Отзывы: