background image

System Startup 1 - 3

Quick Start Guide

1

System Startup

1.

Remove all packing materials, and place the computer on a stable surface.

2.

Securely attach any peripherals you want to use with the notebook (e.g. keyboard and mouse) to their ports.

3.

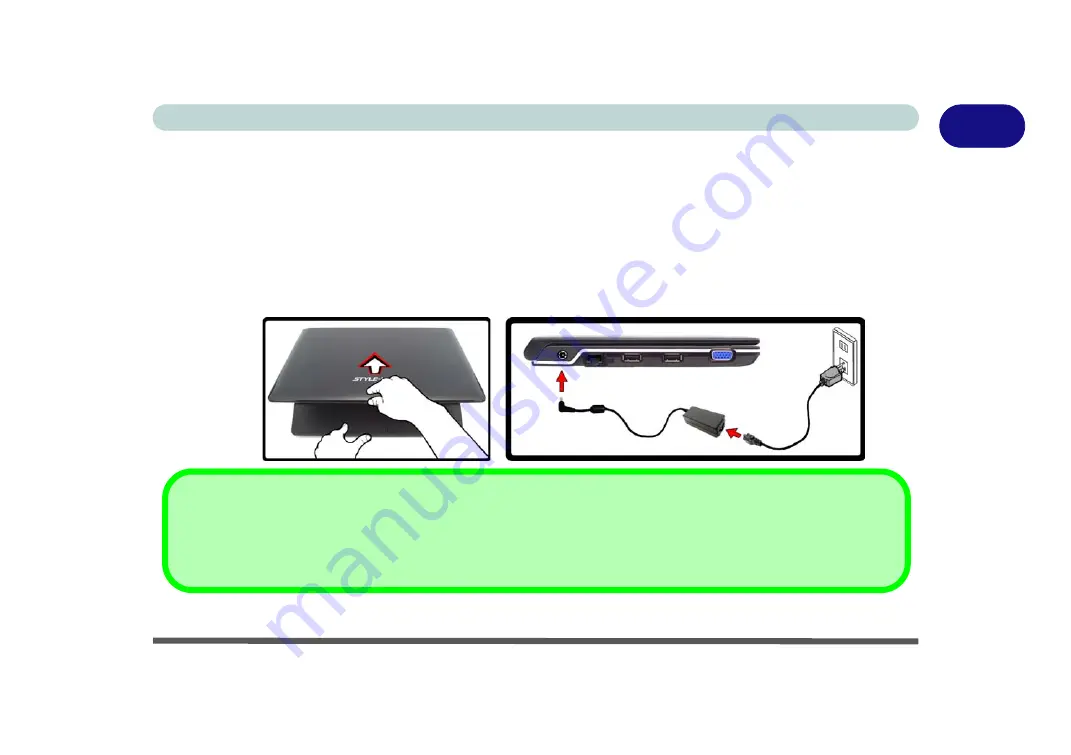
Attach the AC/DC adapter to the DC-In jack on the left of the computer, then plug the AC power cord into an 
outlet, and connect the AC power cord to the AC/DC adapter.

4.

Use one hand to carefully raise the lid/LCD to a comfortable viewing angle, while using the other hand (as illustrated 
in 

Figure 1 - 1

 below) to support the base of the computer (

Note

Never

 lift the computer by the lid/LCD).

5.

Press the power button to turn the computer “on”.

Figure 1 - 1 - Opening the Lid/LCD/Computer with AC/DC Adapter Plugged-In

Shutdown

Note that you should always shut your computer down by choosing the 

Turn Off Computer

 command from the 

Start

menu in 

Windows

. This will help prevent hard disk or system problems.

Содержание M815P

Страница 1: ......

Страница 2: ......

Страница 3: ...publication This publication and any accompanying software may not in whole or in part be reproduced translated trans mitted or reduced to any machine readable form without prior consent from the vend...

Страница 4: ...use harmful interference to radio communications However there is no guarantee that interference will not occur in a particular installation If this equipment does cause harmful interference to radio...

Страница 5: ...environment This device was tested for typical laptop operations with the device contacted directly to the human body to the back side of the notebook computer To maintain compliance with FCC RF expo...

Страница 6: ...R Test Table Table I 1 Operating Systems Supported Max SAR Test Table Band Position SAR 1g W kg GSM850 Body 0 cm Gap 0 071 GSM1900 Body 0 cm Gap 0 031 WCDMA Band V Body 0 cm Gap 0 032 WCDMA Band II Bo...

Страница 7: ...lephone line other than a cordless type during an electrical storm There may be a remote risk of electrical shock from lightning 3 Do not use the telephone to report a gas leak in the vicinity of the...

Страница 8: ...d of heating ele ment This is an electrical appliance If water or any other liquid gets into it the computer could be badly dam aged Do not expose the computer to any shock or vibration Do not place i...

Страница 9: ...and don t forget to save your work Remember to periodically save your data as data may be lost if the battery is depleted 5 Take care when using peripheral devices Do not turn off the power until you...

Страница 10: ...ctrician install one When you want to unplug the power cord be sure to disconnect it by the plug head not by its wire Make sure the socket and any extension cord s you use can support the total curren...

Страница 11: ...e or qual ified service personnel Keep children away from and promptly dispose of a damaged battery Always dispose of batteries carefully Batteries may explode or leak if exposed to fire or improperly...

Страница 12: ...n refer servicing to qualified service personnel under any of the following conditions When the power cord or AC DC adapter is damaged or frayed If the computer has been exposed to rain or other liqui...

Страница 13: ...the notebook in its carrying bag and secure it with the bag s straps 7 If you re taking any peripherals e g a printer mouse or digital camera pack them and those devices adapters and or cables 8 Antic...

Страница 14: ...ata Pass your computer and disks around the devices Ask security officials to hand inspect them you may be asked to turn it on Note Some airports also scan luggage with these devices Fly safely Most a...

Страница 15: ...rms wrists and hands in a relaxed position Your knees should be slightly higher than your hips Place your feet flat on the floor or on a footrest if necessary Use a chair with a back and adjust it to...

Страница 16: ...rectly in front of you at a comfortable viewing distance Adjust the display viewing angle to find the best position LCD Screen Care To prevent image persistence on LCD monitors caused by the continuou...

Страница 17: ...computers or do not have an advanced knowledge of them then the information contained in this Quick Start Guide should be enough to get you up and running Keep this manual nearby and refer to it to l...

Страница 18: ...Supported Operating System Version Note Windows 7 32 bit Version Only In order to run Windows 7 without limitations or decreased performance your computer requires a minimum 1GB of system memory RAM...

Страница 19: ...the AC power cord to the AC DC adapter 4 Use one hand to carefully raise the lid LCD to a comfortable viewing angle while using the other hand as illustrated in Figure 1 1 below to support the base of...

Страница 20: ...1 5 7 3 Wireless Device Operation Aboard Aircraft The use of any portable elec tronic transmission devices aboard aircraft is usually pro hibited Make sure the mod ule s are OFF if you are using the c...

Страница 21: ...ations allow the number keys to be used with Alt to pro duce special characters These special characters can only be produced by us ing the numeric keypad Regular num ber keys in the upper row of the...

Страница 22: ...ion Keys Function Fn Play Pause in Audio Video Programs Fn F7 Display Toggle Fn 3 75G Module Power Toggle Fn F8 F9 Brightness Decrease Increase Fn F1 TouchPad Toggle Fn F10 PC Camera Power Toggle Fn F...

Страница 23: ...2 7 in 1 Card Reader 3 Microphone In Jack 4 Headphone Out Jack 5 Battery 7 in 1 Card Reader The card reader allows you to use the most popular digital storage card formats MMC MultiMedia Card SD Secu...

Страница 24: ...ors Icon Color Description Orange DC Power is Plugged In Green The Computer is On Blinking Green The Computer is in Sleep Mode Orange The Battery is Charging Green The Battery is Fully Charged Blinkin...

Страница 25: ...ts 5 External Monitor Port 6 Hard Disk Drive Bay 7 Vent Fan Intake Outlet 1 2 3 5 4 4 6 7 External Optical CD DVD Device Drives To install applications and drivers etc you will need to attach an exter...

Страница 26: ...in any way may violate your warranty 1 2 2 3 3 75G HSPA Module USIM Card The 3 75G HSPA module s USIM card location is located under the bat tery compartment See page 1 11 for instructions on installi...

Страница 27: ...y your service provider and then run the Mobile Partner ap plication See Mobile Partner on page 2 3 for instructions on installing the program etc 1 Turn off the computer and turn it over and then rem...

Страница 28: ...s if you want to customize the appearance of the Start menu In many instances throughout this manual you will see an instruction to open the Control Panel The Control Panel is accessed from the Start...

Страница 29: ...select Screen resolution see right 5 Use the dropbox to select the screen Resolution Figure 1 9 on page 1 14 6 Click Advanced settings Figure 1 9 on page 1 14 to bring up the Advanced properties tabs...

Страница 30: ...1 14 Video Features Quick Start Guide 1 Screen Resolution Intel GMA Control Panel Figure 1 9 Screen Resolution Intel GMA Driver for Mobile Control Panel 1 2 3 4...

Страница 31: ...figure the options for the power button sleep button computer lid when closed display and sleep mode from the left menu Note that the Power saver plan may have an affect on computer performance Click...

Страница 32: ...Quick Start Guide 1 16 1...

Страница 33: ...l 3 75G HSPA High Speed Packet Access module in your purchase option you will have the appropriate application Mobile Partner provided for your particular module Follow the instructions on page 1 11 t...

Страница 34: ...Key Indicators on page 1 6 to toggle power to the 3 75G HSPA module Note that exiting the application does NOT turn off the 3 75G HSPA module Mobile Partner See Mobile Partner Application Installatio...

Страница 35: ...anual disc into your exter nal optical device drive 3 Click Option Drivers button 4 Click 3 Install 3G Driver Yes and then click Next 5 Choose the language you prefer and click OK 6 Click I Agree butt...

Страница 36: ...nu Start Programs All Programs Mobile Partner or by double clicking the Mobile Partner icon on the desktop 3 If you have not created a profile click Tools and select Options and then click Profile Man...

Страница 37: ...om the Start menu Start Programs All Programs Mobile Partner or by double clicking the Mobile Partner icon on the desktop 3 The software will run and you can select the Profile Name from the menu 4 Cl...

Страница 38: ...he taskbar to display the connection information 7 You can then access the internet download e mail etc as per any internet connection 8 While you are connected the indicators in the Mobile Partner wi...

Страница 39: ...click the Disconnect icon or right click the taskbar icon and select Disconnect 10 The program will disconnect from the service provider 11 The module will still be on and you will need to press the F...

Страница 40: ...module pay careful attention to this aboard aircraft see Wireless Device Operation Aboard Aircraft on page 2 3 14 If the module is on and the computer enters a power saving state then the power statu...

Страница 41: ...nbox or SIM USIM Card folder and select any message to read it 4 Right click the message and choose an option to reply forward or delete the message Creating and Sending SMS Messages 1 Click the Text...

Страница 42: ...3 75G HSPA Module 2 10 2...

Страница 43: ...rmation The specifications listed in this Appendix are correct at the time of going to press Certain items particularly processor types speeds and CD DVD device types may be changed updated or delayed...

Страница 44: ...ystem memory where needed BIOS One 8Mb SPI Flash ROM Phoenix BIOS Storage One Changeable 2 5 9 5 mm h SATA Serial Hard Disk Drive Note It is recommended that HDDs of a speed of 5400 RPM are used DO NO...

Страница 45: ...in 1 Card Reader MS MS Pro SD Mini SD MMC RS MMC MS Duo Note MS Duo Mini SD RS MMC Cards require a PC adapter Slot Mini Card Slot for 3 75G HSPA Module with USB Interface Power Management Wake On LAN...

Страница 46: ...Specifications A 4 A...

Отзывы: