background image

9

S

URFACE MOUNT INSTALLATION INSTRUCTIONS*

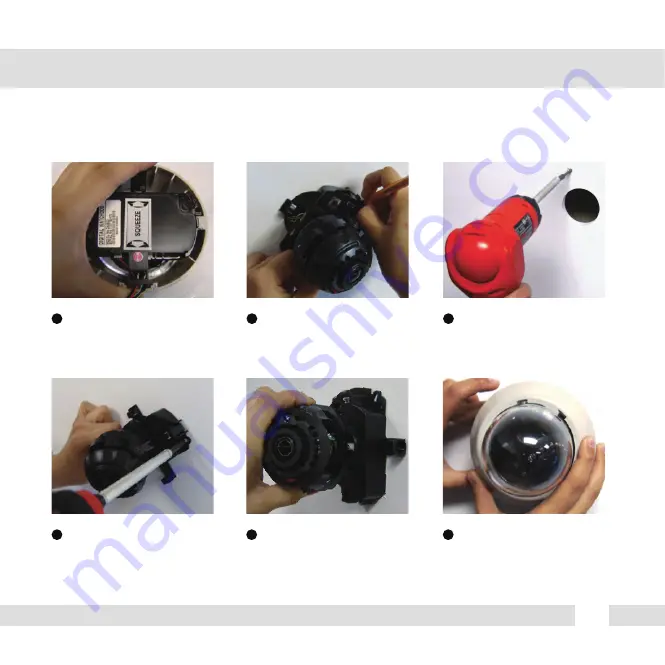
Squeeze the sides of the 
camera and separate the 
camera module from the 
dome cover.


Use the camera’s mounting 
template or your camera to 
mark the holes as required. 
    

Drill holes into the drywall and 
insert the drywall mounts into 
the holes. 

Pull wires through and make 
connections. Then, mount the 
camera to the wall using the 
included machine screws.

1

2

3

4


Adjust the camera lens 
position by using the 3-Axis 
Gimbal.

Snap the dome cover over 
the camera module.  

2

3

Содержание AID-2301 IR

Страница 1: ...ABOUT MANUAL Before installing and using the camera please read this manual carefully Be sure to keep it handy for future reference Megapixel HD SDI Indoor Dome Camera CLEBO HD AID 2301 IR 05212012...

Страница 2: ...mperature Be careful when installing near the ceiling of kitchen or a boiler room as the temperature may rise to high levels Cleaning To remove dirt from the case moisten a soft cloth with a soft dete...

Страница 3: ...lossary Troubleshooting Specifications Features Parts and Descriptions Dimensions Included Accessories Easy Installations Mounting on Electrical Junction Box Connecting to Monitors 4 5 6 7 8 10 11 12...

Страница 4: ...Range IR with Intelligent Camera Sync CLEBO HD AID 2301 IR Electronic Day and Night CLEBO HD AID 2301 True Day and Night CLEBO HD AID 2301 IR AGC BLC AWB 3D DNR 3D Digital Noise Reduction D Zoom 1 112...

Страница 5: ...9 5 6 1 8 4 1 Lens 3 RS485 Alarm 2 Power input Connctor 12VDC Voltage Yellow 485 Black 485 White Alarm 1 Red Alarm 2 4 BNC HD SDI 5 Bubble Camera Control Board 7 6 Upper Case 8 2nd Video Connector 9...

Страница 6: ...6 DIMENSIONS IN MILLIMETERS INCHES 89 108 Surface Mount Indoor TOP VIEW 40 5 56 3 96 8 108 4 25 3 81 1 59 2 21 4 25 3 50...

Страница 7: ...7 INSTALLATION Included with Value Line Vandal Dome Camera 1 User Manual 2 Mounting Template 3 Second Video Jack 4 Four 4 Screw and Four 4 Dry Wall Anchors 1 2 3 4...

Страница 8: ...8 EASY INSTALLATION...

Страница 9: ...template or your camera to mark the holes as required Drill holes into the drywall and insert the drywall mounts into the holes Pull wires through and make connections Then mount the camera to the wa...

Страница 10: ...e pilot holes required Drill holes into the drywall and insert the drywall mounts Secure the wall mount to the wall using the mounting screws Attach the base of the camera to the wall mount with the s...

Страница 11: ...MOUNTING ON ELECTRICAL JUNCTION BOX NOTE Screws required for electrical junction boxes are not supplied These screws are readily available at an electrical supply store Philips 8 32 x 0 75 2S NO IR I...

Страница 12: ...12 CONNECTING TO MONITORS...

Страница 13: ...lens will start zoom in If pushing the OSD joystick to DOWN the lens will start zoom out If you keep pushing the joystick zoom in out will be continuously operated When you find the right angle take...

Страница 14: ...14 ADJUSTING THE 3 AXIS GIMBAL The Gimbal mechanism yields maximum rotation and placement as show below 1 Rotation 360 3 Panning 360 NO IR IR NO IR IR 2 Tilting 90 NO IR 4 Tilting 82 IR...

Страница 15: ...0 OPTIC ZOOM TELE WIDE FOCUS MODE MANUAL AUTO FOCUSING FAR NEAR TIMER OFF 1 10min TDN SYNC OFF ON RETURN CHROMA 0 20 SHARPNESS 0 10 MIRROR ON OFF FLIP ON OFF E Edge ON OFF HLMASK ON OFF CONTRAST LOW N...

Страница 16: ...DATEL PELCO D NADATEL BAUDRATE RETURN 9600 is the default There are 2 choices 9600 and 2400bps 9600 2400bps TITLE After setting the camera ID you also can make the title for each camera ID no Title is...

Страница 17: ...OFF If better sensitivity is required choose x2 3 or 4 OFF x2 x3 x4 AGC Auto Gain Control Auto Gain Control automatically adjusts the video gain to enhance picture brightness in low light conditions...

Страница 18: ...MODE TIMER TDN SYNC RETURN DC LENS DEBLUR120 If DC or Manual mode is selected some menu can t be controlled OPTIC ZOOM FOCUS MODE TIMER TDN SYNC It offers full range of eletric shutter speed from 1 3...

Страница 19: ...is case TIMER menu will be changed to FOCUSING and you can adjust the focus Far Near OFF is default If ON is seleced the camera will adjust the focus when every Day and Night filter change is operated...

Страница 20: ...of Color temperature is high White Balance is automatically adjusted in the condition of Color temperature is low AUTO_H AUTO_L White Balance is fixed with current setting PRESET White Balance is manu...

Страница 21: ...GRN MAG RED BLU BLK WHT YEL 0 4 30 different privacy masking zones are available ZONE NO Zone Display ON OFF ZONE OP X Position 0 57 X POS Y Position 0 31 Y POS X Size 0 60 X SIZ Y Size 0 34 Y SIZ Pr...

Страница 22: ...OFF FLIP OFF is the default ON OFF E Edge It s a function of edge enhancement ON OFF HLMASK It s to mask the high lux areas OFF is the default If ON is selected you can adjust the masking level and c...

Страница 23: ...Level is 50 180 You can adjust the amount of Blue color Level is 50 180 Color 1 is the default If the color reproduction on the monitor is not satisfied try other modes Color 2 or 3 There are total 3...

Страница 24: ...WDR It s to set up the dynamic range The higher number means wider dynamic range The default is 5 Backlight compensation prevents subjects in defined areas of the scene from appearing too dark when b...

Страница 25: ...LED mode is supported for using external LED light seperately LED BW to C It is to adjust the light level at shich camera switches from night BW to day Color mode High number means the higher light le...

Страница 26: ...he default 60 50FPS 30 25FPS LANGUAGE It provides 3 different language English Germany China ENG GER CHN FACTORY SET NO is the default If yes is selected osd menu setting is initiallized YES NO FREQ I...

Страница 27: ...lists Check the coaxial cable and make sure it is connected securely Check the osd menu setup of the camera Check the power supply and make sure the camera has the proper voltage and current Check the...

Страница 28: ...TDN B W Shutter speed 1 30s 1 25s S N ratio 50dB or more AGC OFF Frame Ratio NTSC 30fps PAL 25fps Sync System Internal Voltage range DC12V only 10V 16V Power consumption LED OFF 2 0W LED ON 3 5W Oper...

Отзывы: