


Page 12
Using The Flexicaster
See figures 4 and 5 for Flexicaster MS7-FC and MS20-FC
1.
Level the Flexicaster base by adjusting the feet so that the bubble is exactly central.
2.
Insert the desired length tray into the Flexicaster such that one end of the tray is pushed up and seals
against the silicone mat of the permanent end of the Flexicaster.
3.
Position the movable end of the Flexicaster so that the silicone mat is pushed against the other end of the
tray.
4.
Turn the cam so that the silicone mat tightly seals against the side of the tray. Pour in the agarose carefully
so as not to generate bubbles. Any bubbles that do occur can be smoothed to the edge of the gel and
dispersed using a pipette tip.
5.
Allow the agarose to set, ensuring that the gel remains undisturbed.
6.
Carefully remove the gel casting gates and comb and transfer the gel including tray to the main tank.
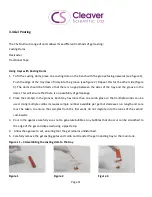
Figure 4 MS7-FC
Figure 5 MS20-FC
Using Traditional tape method
1.
Autoclave or plastic backed general tape should be used. A length 5cm longer than the width of each end
of the tray should be cut. One length should be placed over one end of the tray and stuck m1cm in from
the tray edge. This should then be folded and the edges sealed securely. Repeat for the other end and
place onto a level surface for gel pouring.
2.
Place the comb(s) in the grooves. Each tray has more than one comb grove so that multiple combs can be
used. Using multiple combs increases sample number available per gel but decreases run length and care


