background image

7

S

IT

T

IN

G

 H
E

IG

H

T

8 | INSTALL GROMMETS

Insert wire management grommet.  

Содержание THREE60

Страница 1: ...THREE60 CONFERENCE TABLE Section S1 S2 S3 General Installation Guide ...

Страница 2: ......

Страница 3: ...TABLE OF CONTENTS SECTIONS S1 Sitting Height 1 S2 Standing Height 9 S3 Optional Power 15 ...

Страница 4: ...S1 SITTING HEIGHT OVERVIEW THREE60 Conference Table Quantities are for a 48 x 216 table parts may vary depending on project but install steps will remain the same 1 ...

Страница 5: ... CODE QTY DESCRIPTION GCNAB 2 Angled Sleigh Leg CNS48144 1 Trapezoid Surface 2 In Surface Grommet CNCGB 2 Center Grommet Spacers 2 In Surface Grommet CNCBV2 4 Cabinet Base BFB1 6 Flat Bracket GCNABCOV 4 Covered Leg If applicable ...

Страница 6: ...down on floor a cushioned area is preferred Measure 12 from surface edge and center align to determine leg placement NOTE Same process for square ended table 2 SECURE ANGLED SLEIGH LEGS Follow measurements and insert screws per leg through the metal plate and into the laminate surface 12 ...

Страница 7: ...4 SITTING HEIGHT 3 MEASURE FOR CABINET BASE OR COVERED LEG Place cabinet base or covered leg centered under the table grommet cutouts 5 91 9 45 9 45 5 12 ...

Страница 8: ...D LEG Insert 4 screws per base through the laminate top into the bottom of the surface 5 ATTACH HARDWARE TO SURFACE EDGE Insert 2 wooden dowels attach 2 flat brackets and connect 4 sets of joint fasteners to one side of each surface edge Surface Edge ...

Страница 9: ...ece over so that it is standing on a leg cabinet base Align the open holes on the surface edge with the wooden dowels and the threaded rods on the other surface edge 7 FULLY SECURE HARDWARE Turn to Tighten Hold Still 1 Set Hardware 2 Tighten Hardware ...

Страница 10: ...7 SITTING HEIGHT 8 INSTALL GROMMETS Insert wire management grommet ...

Страница 11: ...8 END OF SITTING HEIGHT ...

Страница 12: ...S2 STANDING HEIGHT OVERVIEW THREE60 Conference Table All parts listed are for a single standing height table additional parts will be needed for additional standing height table 9 ...

Страница 13: ...10 STANDING HEIGHT CODE QTY DESCRIPTION GCNABSH 2 Standing Height Angled Sleigh Leg CNS4896 1 Main Surface 1 In Surface Grommet GCNABSHLE 2 Support Brace BFB1 2 Flat Brackets PARTS LIST ...

Страница 14: ... 12 from surface edge and center align to determine leg placement Attach 2 flat brackets on the center seam of the table NOTE Leg placement may need to be adjusted based on surface size 2 INSTALL ANGLED SLEIGH LEGS Follow measurements and insert 15 screws per leg through the metal plate and into the laminate surface 12 ...

Страница 15: ...12 STANDING HEIGHT 3 INSTALL SUPPORT BRACE 4 FLIP AND INSERT GROMMET Insert wire management grommet Note See page 13 for optional covered sleigh leg See page 15 for power module install ...

Страница 16: ...ING HEIGHT OPTIONAL COVERED SLEIGH LEG All steps for installation are the same However leg will be aligned with the grommet cutout on the table NOTE Covered sleigh leg is optional for wire management 9 45 5 12 ...

Страница 17: ...14 END OF STANDING HEIGHT ...

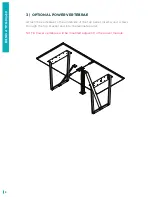
Страница 18: ...S3 OPTIONAL POWER OVERVIEW THREE60 Conference Table 15 ...

Страница 19: ...16 OPTIONAL POWER CODE QTY DESCRIPTION BPCONF2V2 or BPCONF3 1 In Surface Power Module JC1 5 J Clips VB24 1 Cable Vertebrae PARTS LIST ...

Страница 20: ...17 OPTIONAL POWER 1 ATTACH METAL CLIPS AND INSERT INTO SURFACE Attach 2 metal clips to the back of the module base then insert into the pre cut holes in the surface ...

Страница 21: ...PTIONAL POWER 2 SECURE MODULE INTO PLACE Insert the plastic clamps into the holes on the bottom of the module Rotate and then push against the surface to clamp the module into place 1 Clamp 2 Rotate 3 Push ...

Страница 22: ... 3 OPTIONAL POWER VERTEBRAE Attach the vertebrae to the underside of the top panel Insert wood screws through the top bracket and into the laminate panel NOTE Power vertebrae will be mounted adjacent to the power module ...

Страница 23: ...20 END OF OPTIONAL POWER ...

Страница 24: ...1 866 304 7197 inspire mycleardesign com mycleardesign com 2022 Clear Design Version 22 1 5 ...

Отзывы: