1)
Prepare the floor surface by sweeping
or vacuuming before using the scrubber.
2
) Make sure all the switches are
OFF.
3)
Select the proper floor brushes or pad
drivers and floor pads for the cleaning
operations.
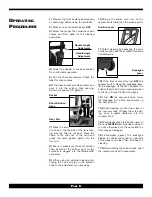
Handle Height
Adjustment
Handle Angle
Adjustment
4)
Adjust the handle to the best position
for comfortable operation.
5)
Add the chemical required. Check the
label for dilution rates.
6)
Fill a clean bucket with clean water, and
pour it into the solution tank opening,
maximum capacity 3.5 gallons.
Gasket
Short Solution
Hose
Rear Rim
7)
Place the solu-
tion hose to the far side of the tank mak-
ing sure the hose is not bent. Place the
dome to the rear rim of the tank and
press the dome gasket gently into the
front rim.
8)
Check to make sure the short solution
hose located at the bottom right on the
scrubber is plugged into the female QDC
connector.
9)
When using an external cleaning tool
unplug the hoe and plug in the solution
hose to the attachment you are using.
10)
Plug-in the power cord, turn on the
vacuum switch,and then the brush switch.
Solution Lever
11)
Start cleaning by squeezing the solu-
tion lever and push the scrubber forwards
or backwards.
Squeegee
Lever
12)
If the floor is very dirty, turn
OFF
the
vacuum switch. Using the squeegee lever,
lift the squeegee off the floor. Squeeze the
solution lever to add more cleaning solution
to the floor. Scrub the floor thoroughly.
13)
Turn
ON
the vacuum switch, lower
the squeegee to the floor, and vacuum up
the dirty solution.
14)
While cleaning, monitor foam level in
the recovery tank. If heavy foam is build-
ing, pour a quality defoamer into the
recovery tank.
15)
Periodically check the solution level in
the tank.
NEVER
allow brushes or pads to
run dry, otherwise both the pump and the
floor may be damaged.
16)
Periodically inspect the squeegee
blades for obstructions (sand, cigarette
butts, paper etc) clear, then continue the
cleaning.
17)
Before refilling the solution tank, flush
the recovery tank with clean water.
O
PERATING
P
ROCEDURES
P
AGE
6


