background image

BLX-200W Manual  Page 8 of 9

Updated: 02/11/21

USER MANUAL: BLX-200W

READ ALL INSTRUCTIONS BEFORE OPERATING EQUIPMENT

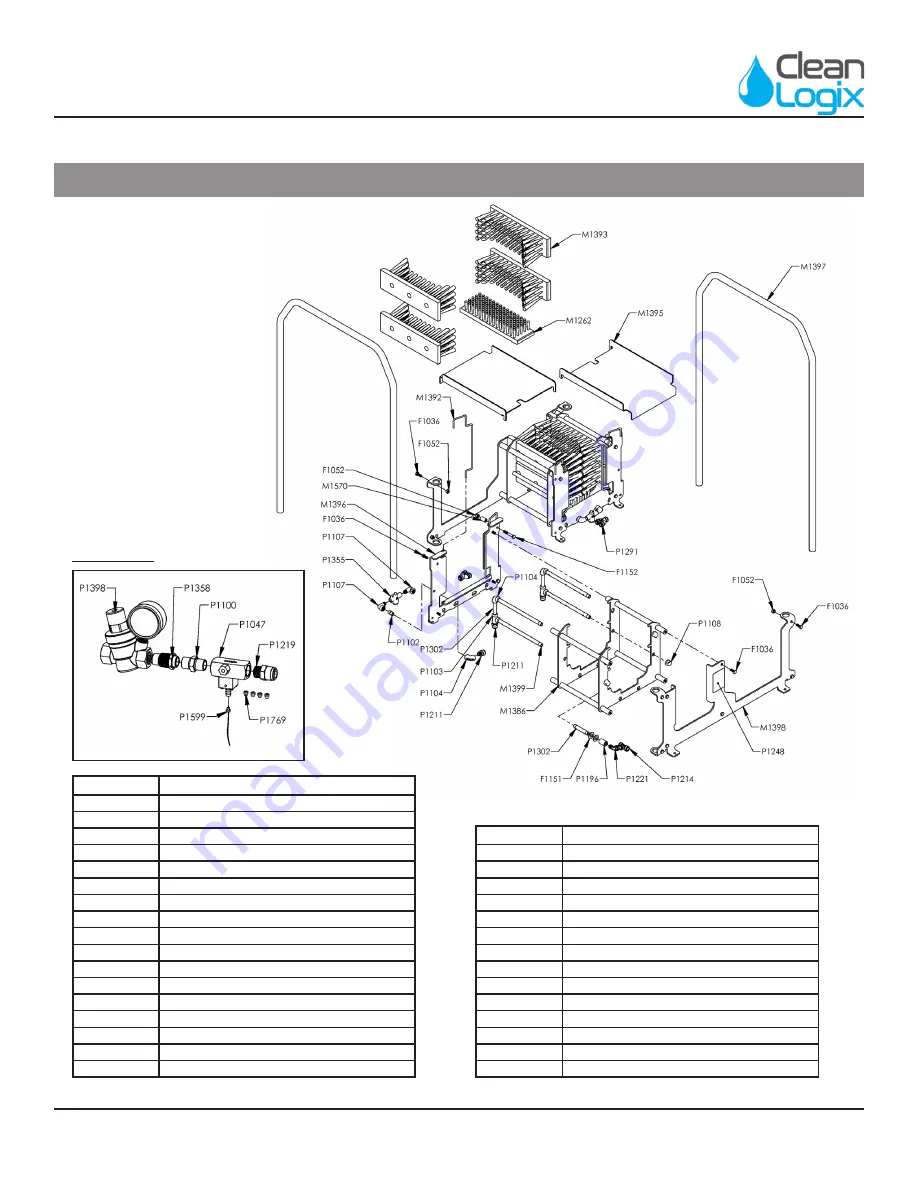
Appendix A - Parts Callout

Part No.

Description

F1036

BOLT HHC 5/16-18 X 3/4 SS

F1052

NUT NYLOCK 5/16-18 SS

F1151

WASHER 37/64 X 1-1/16 X 1/16 SS

F1152

BOLT HHC 5/16-18 X 2 SS

M1262

BRUSH FIXED 10-1/2 X 3

M1388

BRUSH BOX WLDMNT

M1392

BRUSH CLIP

M1393

FIXED SIDE BRUSH

M1395

FOOT PLATE BLX-200

M1396

FRONT PLATE BLX MANUAL

M1397

HANDRAIL BLX-200

M1398

REAR PLATE BLX-200

M1399

SPRAY BAR BLX MANUAL

M1407

SPACER BLX-200

P1047

VENTURI INJECTOR 3/8 SS

P1100

PIPE HEX NIPPLE 3/8 SS

P1102

PIPE NIPPLE 1/4 CLOSE SS

Part No.

Description

P1108

PIPE CAP 1/4" SS

P1196

PIPE COUPLER 1/4"

P1211

QUICK FIT 1/4 NPT X 3/8 TUBE

P1214

QUICK FIT 3/8" T JOINT POLYPRO

P1219

QUICK FIT 3/8 NPT X 3/8 TUBE

P1221

QUICK FIT ELBOW 1/4" NPT x 3/8" TUBE

P1248

LABEL SLIP HAZARD

P1291

QUICK FIT Y 3/8"

P1302

PIPE NIPPLE 1/4 X 3 SS

P1338

METERING TIP, LOW FLOW 100- 15KU

P1355

VALVE PUSHBUTTON SS

P1358

PIPE BUSHING 1/2 X 3/8 SS

P1398

PRESSURE REGULATOR WATER 1/2" SS

P1599

METERING TIP, CAPILLARY TUBE

Venturi Kit:

Содержание BLX-200W

Страница 1: ...USER MANUAL English Original Instructions Updated 02 11 21 MODEL BLX 200W Dual Manual BootScrubber Wet ...

Страница 2: ...ntact of cleaning agent with skin and eyes If contact occurs see MSDS sheet for further first aid measures 2 Follow safety instructions of chemical manufacturer MSDS 3 Always follow plant and OSHA guidelines about the use of hygiene equipment 4 All personnel using this unit must be familiar with the information contained in this manual Follow all installation and maintenance instructions 5 Always ...

Страница 3: ...ed location use a level to make sure the unit is stable and level in all directions Figure 3 1 Make sure the location is a flat surface 4 Using the 4 mounting brackets located at each corner securely fasten the unit to the floor with appropriate hardware for the given material i e concrete anchors and bolts as shown in Figure 3 2 5 Dosing of sanitizing chemicals into water supply can be accomplish...

Страница 4: ...andrail disconnected 1 Place handrail through the mounting brackets on each side of the unit Figure 4 1 2 Using two 1 2 wrenches tighten the bolt through the locknut until the bolt bottoms out against the handrail to secure in place Figure 4 2 3 Repeat for remaining bolts to secure the handrail 8 bolts total Installation continued Fig 4 1 Installing Handrail Fig 4 2 Handrail stablization bolts ...

Страница 5: ... plate line up with the holes on the unit as shown in Figure 5 1 Installation continued Fig 5 1 Inserting Foot Plate Plumbing 1 Connect the water regulator on the Venturi to the water supply line regulator thread 1 2 2 Using 3 8 OD polyethylene tubing or similar connect the sanitizer solution to be used to the Venturi s hose barb as shown below NOTE A back flow preventer must be installed in the w...

Страница 6: ...3 Once unlocked the brushes can be removed for cleaning by slipping them out from their holders Plumbing continued 3 Using the push to connect fitting connect the Venturi system to the BLX s water line located under the unit near one of the foot plates Figure 6 1 4 Test the system by stepping on the footplate to engage the unit and begin spraying 5 Adjust the solution output as necessary using the...

Страница 7: ...an remove it and walk through to the second scrubber and repeat the process with the other boot 5 If boots are extremely dirty it may be necessary to scrub them multiple times Cleaning and Wash Down 1 Shut off water supply to unit and depressurize water lines 2 Remove the Foot Plates and brushes from the unit 3 Brushes and Foot Plates can be washed individually in a COP tank or wash machine 4 The ...

Страница 8: ...NDRAIL BLX 200 M1398 REAR PLATE BLX 200 M1399 SPRAY BAR BLX MANUAL M1407 SPACER BLX 200 P1047 VENTURI INJECTOR 3 8 SS P1100 PIPE HEX NIPPLE 3 8 SS P1102 PIPE NIPPLE 1 4 CLOSE SS Part No Description P1108 PIPE CAP 1 4 SS P1196 PIPE COUPLER 1 4 P1211 QUICK FIT 1 4 NPT X 3 8 TUBE P1214 QUICK FIT 3 8 T JOINT POLYPRO P1219 QUICK FIT 3 8 NPT X 3 8 TUBE P1221 QUICK FIT ELBOW 1 4 NPT x 3 8 TUBE P1248 LABE...

Страница 9: ...BLX 200W Manual Page 9 of 9 Updated 02 11 21 USER MANUAL BLX 200W READ ALL INSTRUCTIONS BEFORE OPERATING EQUIPMENT General Installation Operation Appendix Appendix B Dimensions ...

Отзывы: