Clavia Nord Wave 2 Скачать руководство пользователя страница 17


4. Panel RefeRence  | 17

Morphable Parameters

Osc Mod env Dec/Rel

filter env attack

Delay feedback

Osc Mod env amount

filter env Decay

Delay Dry/Wet

Osc Semitones

filter env Sustain

Reverb Dry/Wet

Osc fine Tune

filter env Release

Osc ctrl

filter frequency


Double-clicking a Morph button activates morph latch mode, 
allowing for assigning morphs without keeping that button pressed 
down. Press 

EXIT

 to leave latch mode. 

IMPUlSe MORPH

The 

IMPULSE MORPH

 feature allows for instantly 

changing one or more parameters at the press of 
a button, for dramatic or subtle changes in sound. 
apart from all parameters that are available as 
morph destinations for the continuous morphs 
described above, the Impulse Morph can change 

various button controlled parameters, such as filter Type, or turning the 
arpeggiator/Gate on or off.

To set up an Impulse Morph, press down the Impulse Morph button and 
turn a parameter knob or press the button for the parameter that should 
be morphed. 

SET

 (Shift+Impulse Morph) activates a “latch” mode, useful 

for setting morphs without keeping the button pressed down. Press 

SHIFT/EXIT

 to leave the Set mode.

To 

CLEAR

 an Impulse Morph, press Shift and hold down the Impulse 

Morph button for a longer time.

Impulse Morphable Parameters

Glide

amp env Release

arp/Gate Run

arp/Gate Rate 

filter env attack

arp/Gate Mode

arp/Gate Range/env

filter env Decay

arp/Gate Direction

lfO Rate

filter env Sustain

lfO Waveform

lfO amount

filter env Release

lfO Destination

Osc Mod env attack

filter frequency

Osc Mod env Dest

Osc Mod env Dec/Rel

filter Resonance

Osc Unison

Osc Mod env amount

filter env amount

KB Track

Osc Semitones

effects Rate

filter Type

Osc fine Tune

effects amount

filter Drive

Osc ctrl

Drive amount

effect Type

layer level

Delay Rate/Time

Delay fB effect Type

layer Pan 

Delay feedback

Delay fB effect Deep 

amp env attack

Delay Dry/Wet

Delay fB filter Type

amp env Decay

Reverb Dry/Wet

Reverb Bright/Dark

amp env Sustain

Octave Shift

Reverb Size

VIBRaTO

The 

DLY1

DLY2

 and 

DLY3

 settings add a delayed vi-

brato, their respective delay times being 0.5, 1.0 and 
1.5 seconds.

When 

WHEEL

 is selected, the depth of the vibrato is 

controlled by the Modulation Wheel and incoming MIDI 
cc#1.

When set to 

AT

 the vibrato is controlled by keyboard aftertouch.

VIBRaTO RaTe anD DePTH

The rate of the Vibrato and depth for the Vibrato Dly (Delay) mode can 
be set by pressing 

RATE

 (Shift+Vibrato selector) and selecting the de-

sired values from the display. These values are stored with the program.

The Vibrato rate and depth can also be set in the Sound Menu. See 
page 32 for more details.

VOIce MODe

In both 

MONO

 and 

LEGATO 

mode only 

one note is played at a time, just like on a 
traditional monophonic synthesizer. The 
main difference between the two modes is 
in how the modulation and amplifier enve-

lopes act when one is 

playing

 legato, i.e. with overlapping key presses: 

In Mono mode both envelopes restart from the point in the attack phase 
where the level is equal to the previous note, 

if

 the decay or release 

phase has been entered. In legato mode the envelopes do 

not

 move 

to the attack phase once the decay point has been reached, as long as 
one is 

playing

 legato. 


M

An exception to the behaviour in Mono mode is that the oscillator 
modulation envelope is always reset to its start position when its 
release time is set to infinity (max position).

another difference is that in legato mode, glide is active only when you 

play

 legato. I.e. a new key needs to be pressed 

before

 the previous key 

is released to get the glide effect.

When none of the Mono and legato leDs are lit, the Synth section is in 
its default polyphonic mode.

GlIDe

The 

GLIDE

 function makes the pitch “glide” from one note to the next 

when playing (traditionally referred to as 

portamento

) and is available in 

legato and Mono mode only.
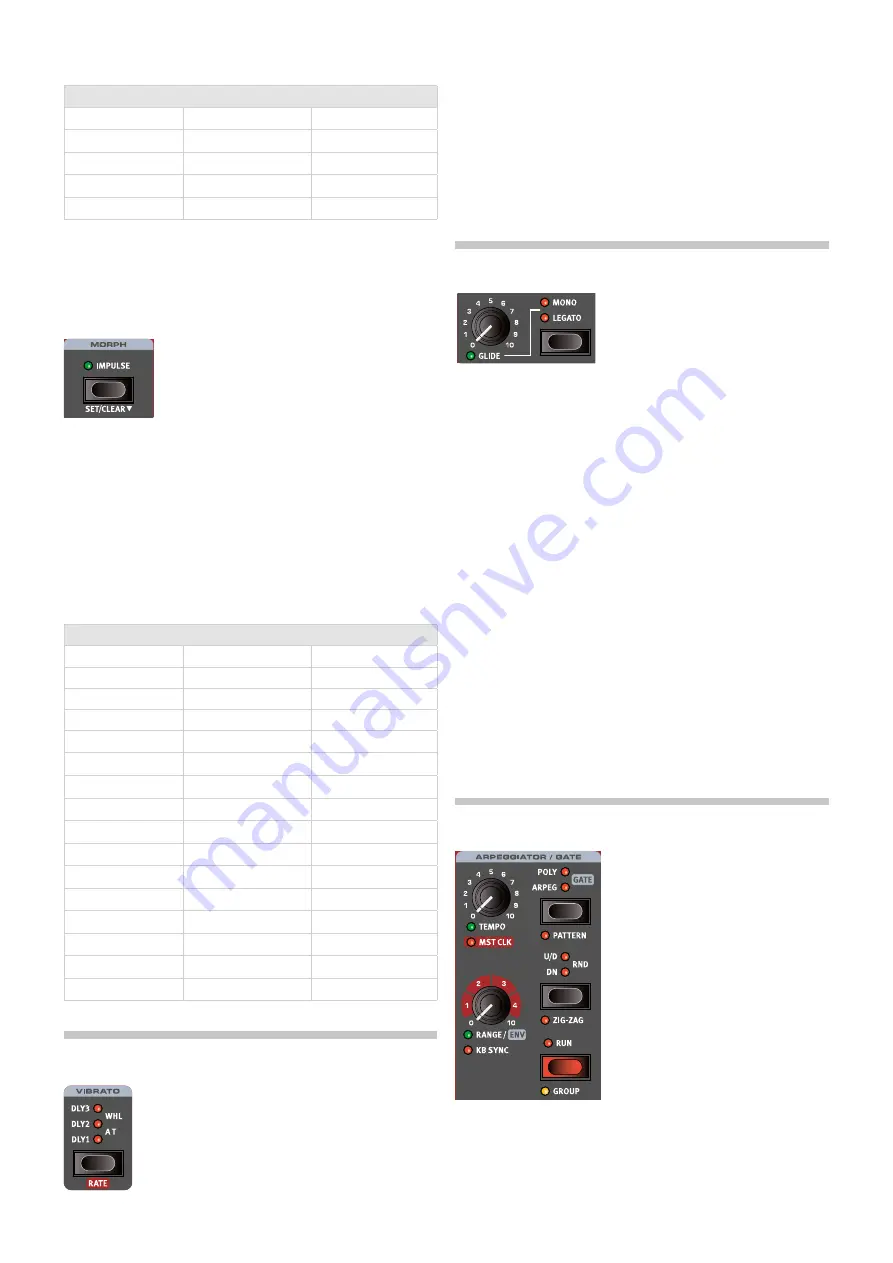
aRPeGGIaTOR/GaTe

The arpeggiator/Gate section is turned on by pressing its 

RUN

 button. 

activating 

GROUP

 (Shift + Run) allows multiple layers to share the same 

settings. Read more about Group on page 23.

There are three available modes for the arpeggiator/Gate section on the 
nord Wave 2:

Содержание Nord Wave 2

Страница 1: ...USER MANUAL Nord Wave 2 English OS version 1 0x Edition E Part number 50502 Copyright Clavia DMI AB Edition E...

Страница 2: ...flash with the arrowhead symbol within an equilateral triangle is intended to alert the user to the presence of uninsulated voltage within the products en closure that may be of sufficient magnitude t...

Страница 3: ...uttons 14 Value dial 14 List options 15 Numeric 15 Abc 15 Category 15 Live Mode 15 Layer Init 15 Layer Swap 15 Program Buttons 15 What is a program 15 System Sound MIDI Menus 15 Organize 16 Enter the...

Страница 4: ...channels 30 Program Change operations 30 other Message types 30 Control Change messages 30 Pedal Control Change 30 Volume 30 Pan CC 30 MIDI Local 30 MIDI Clock 30 USB MIDI 30 Panic 30 6 MENUS 31 Soft...

Страница 5: ...use the different features in a musical context READING THE MANUAL IN PDF FORMAT This manual is available as a digital PDF file It can be downloaded free of charge from the Nord Wave 2 section on our...

Страница 6: ...yer by pressing DISABLE Shift KB Hold OCTAVE SHIFT allows for shifting a layer up or down in one octave steps When the GLOBAL option is turned on Shift Octave Down the octave shift is performed on all...

Страница 7: ...ovide both subtle over drive for warming up a sound or extreme distortion if desired The Delay effect can go anywhere from expressively vintage to modern and atmospheric sounding with its Analog mode...

Страница 8: ...controlling the Pan setting for each layer Hold the MONITOR button found in the Program section and turn a knob to view the stored setting of a parameter in the display without changing it BUTTONS Se...

Страница 9: ...T and turning the WAVEFORM dial Use Shift again to EXIT the list view Note that changing any parameter on the Nord Wave 2 panel causes an E to appear next to the current program number in the display...

Страница 10: ...s left of split points 1 2 3 Layer B is always right of split point 1 and left of 2 3 Layer C is always right of split points 1 2 and left of 3 Layer D is always right of split point 1 2 3 Here is to...

Страница 11: ...sure the new layer is initialized by pressing LAYER INIT Shift Live Mode and Ok using the display soft button 4 Set the new layer to SAMPLES in the Oscillator section and select the Mellotron Flute s...

Страница 12: ...and notice how the Gate becomes softer at 0 setting and very hard at the maximum Env amount MASTER CLOCK Set up an arpeggio according to the previous section and let s try the Master Clock feature to...

Страница 13: ...f the ABC button moves the cursor to the next position The dial or PAGE 3 4buttons can be used to move the cursor freely The Ins soft button is used for inserting a blank space at the current position...

Страница 14: ...ays reset after lifting all keys and then playing the keyboard again Soft When set to Soft the Master Clock is only reset if waiting longer than one quarter note in relation to the current tempo to pl...

Страница 15: ...or selection is not reset LAYER SWAP From the Layer Init screen use the PAGE 4 button to access the Layer Swap function From here any layer can load the contents of another layer in the loaded program...

Страница 16: ...the button corresponding to the layer morph pattern or program the settings should be pasted into Layers and morphs can either be pasted within the program they were copied from or into any other prog...

Страница 17: ...Octave Shift Reverb Size VIBRATO The DLY1 DLY2 and DLY3 settings add a delayed vi brato their respective delay times being 0 5 1 0 and 1 5 seconds When WHEEL is selected the depth of the vibrato is c...

Страница 18: ...nced to the Master Clock in the entire program Note that you can choose which layer or layers should reset the Master Clock when played For instance an arpeggio sound on the left side of a split could...

Страница 19: ...istinct tremolos etc Sawtooth Used for linear ramp type modulations Inverted Sawtooth Inverted linear ramp S H Stepped Random Recreates a stepped random modulation OSC MOD ENV The PITCH Semitones or O...

Страница 20: ...lators which can be added to the basic sound for those fat classic synthesizer sounds Note that using Unison does not reduce the po lyphony A UNISON setting of 1 equals a classic dual oscillator de tu...

Страница 21: ...king it softer than the White Noise option Red A noise signal with more energy in the low frequencies and more dampened high frequencies than the Pink Noise option WAVETABLE These waveforms have been...

Страница 22: ...PLE PRESETS AND RAW SAMP Samples from the Nord Sample Library come with preset filter and Amp Envelope settings in order to make them instantly playable M Preset filter settings are applied using an a...

Страница 23: ...d without keeping the Multi Edit button pressed down Exit the sticky Multi Edit mode either by pressing Multi Edit Shift Solo again or by pressing Shift Exit KB SPLIT The Nord Wave 2 has 3 split point...

Страница 24: ...e sound level of the transient decreases gradually between the 0 and 2 settings of the knob The 2 setting of the knob corresponds to 0 Attack in non Transient mode DECAY Decay is the time it takes for...

Страница 25: ...han the LP24 setting A 12 dB filter is also known as a 2 pole filter The LP24 setting with an attenuation slope of 24 dB octave is a more classic synth filter It cuts out frequencies rather drasticall...

Страница 26: ...his ringing occurs depends on the Frequency value When the LP HP filter setting is used the RES knob instead controls the high pass cut off frequency as indicated by the FREQ HP text KB TRACK The reas...

Страница 27: ...AS PHASER The Phaser PHAS effect produces a characteristic sweeping sound which is created by splitting the audio signal into two paths One path passes through a filter that alters the phase The amoun...

Страница 28: ...ilter removing low frequency con tent This can be useful for making long delay tails sound less muddy The BP setting adds a Band Pass filter which dampens both high and low frequencies making for a fa...

Страница 29: ...dividual sound sources from a sequencer E A Layer does not have to be active in a Program to receive MIDI it will always respond to incoming MIDI on its MIDI Channel This makes it possible to control...

Страница 30: ...ge 0 124 0 127 0 4 M A Program Change message that reaches the Nord Wave 2 unaccompanied by Bank Select messages will take effect in the currently focused Program bank exiting Live mode if active In t...

Страница 31: ...to select the type of pedal connected to the SUSTAIN PEDAL jack in case the functionality of the pedal is reversed when the pedal is up sustain is on and vice versa The Auto setting can automati cally...

Страница 32: ...ntrol of the entire Wave 2 When set to Off the text Send on Lay er Channel is displayed indicating that the Layer Channels in this mode can be used for sending MIDI Range 1 16 Off Default 1 3 MIDI LAY...

Страница 33: ...rograms from the Nord Wave 2 to a computer Uploading bundles containing programs and their associated sample files Performing backups of the entire instrument Restoring the entire instrument to a prev...

Страница 34: ...sampled song intro to a single key the Nord Sample Editor 3 opens up many possibilities together with the Nord Wave 2 Here are some of the key features Intuitive user interface Drag and drop single o...

Страница 35: ...MIDI IN The 5 pin MIDI In connection is used for receiving MIDI data sent from external devices such as controller keyboards sequencers or computers MIDI OUT The 5 pin MIDI Out connection will send M...

Страница 36: ...evel 15 Layer A Pan 16 Layer B Pan 17 Layer C Pan 18 Layer D Pan 19 Amp Env Attack 82 Amp Env Attack Transient 81 Amp Env Decay 83 Amp Env Sustain 84 Amp Env Release 85 Amp Env Velocity 86 Filter Env...

Страница 37: ...Pedal 31 G Gain Ctrl Pedal 31 Gate 18 Getting started 8 Glide 17 Global MIDI Channel 29 Global Transpose 32 Group 23 H Harmonic FM 21 Headphones 35 HP Delay 28 HP High Pass 25 I Impulse Morph 17 Inhar...

Страница 38: ...20 Shift Pattern 18 Skip Atk 20 Soft buttons 31 Solo Layer 23 Sound Menu 31 Split Menu 23 Split Position 23 Store 13 Store As 13 Subdivision Mst Clk 14 Sustain Amp Env 24 Sustain Pedal 31 Swap Organiz...

Страница 39: ...to be the source of interference to radio or television reception which can be determined by turning the equipment off and on the user is encouraged to try to correct the interference by one or more o...

Страница 40: ......

Отзывы: