background image

Use the Model selector buttons to select one of the samples that are 
included in the Electro 4 HP/SW from the factory . 

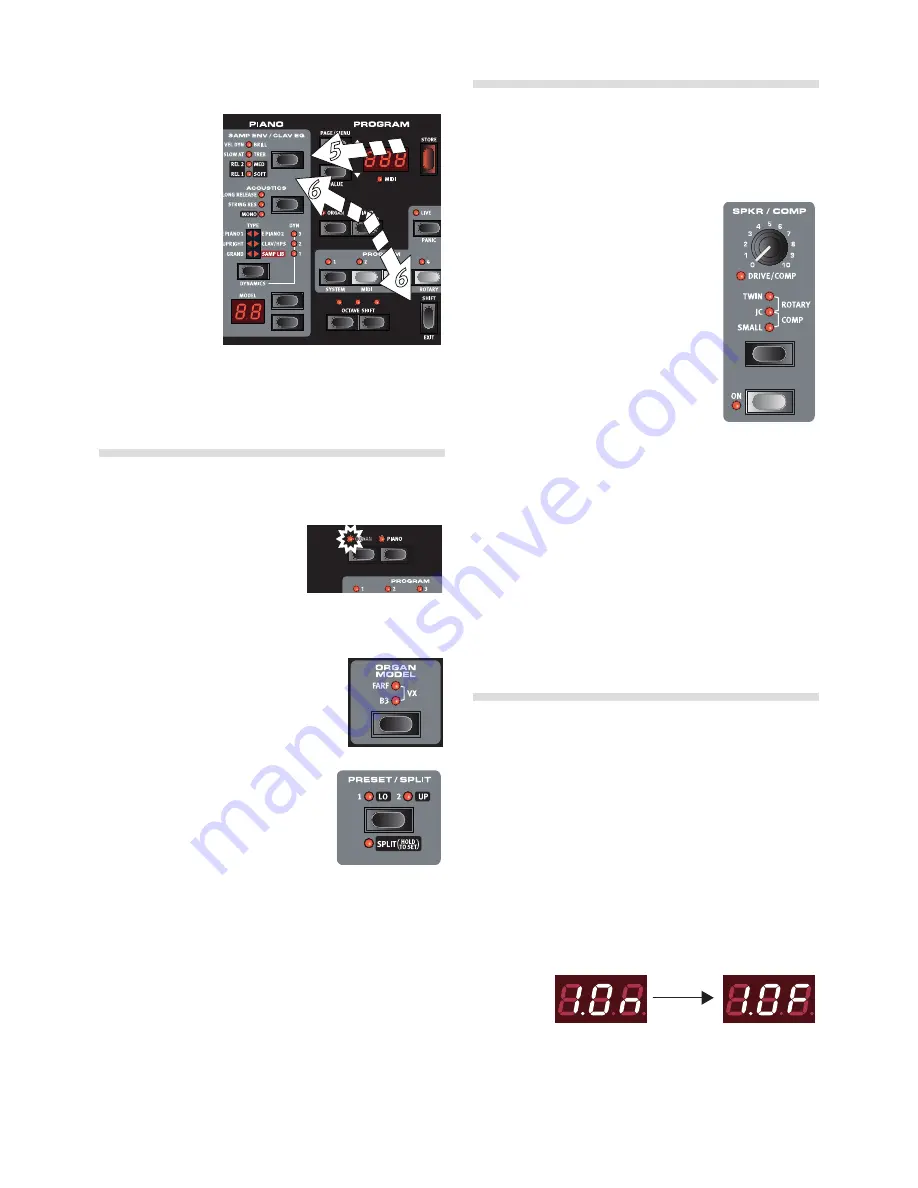
Press the Samp 
Env button 
repeatedly .

This will cycle through 
the four options for 
the sample’s attack 
and velocity settings .

Press and hold 
Shift and the 
Samp Env but-
ton .

This allows you to 
select one of the four 
available release time settings .


M

This button doubles as the Clavinet EQ selector, when the Clavinet 
type is active.

Using the Organ

Press the Organ instrument selector above the program 1 - 4 
buttons . 

This activates the Organ section .

Press the Organ Model selector 
on the left side of the panel, below the master level knob, 
repeatedly to cycle through the three organs – the B3, Vox and 
Farfisa emulations . 

The settings for the three organ instruments 
are made using the drawbars . The Farfisa uses 
these in a switching mode, with only two set-
tings (on or off) for each .


Press the Preset/Split button to light up 
the “2/Up” LED and make a setting with 
the drawbar buttons .

Press the Preset/ Split button to light 
up the “1/Lo” LED . This activates the 
second preset, which allows you to keep 
two different drawbar settings for an organ sound available from 
the panel at any time . The settings of both Presets 1 and 2 are 
stored in the Electro 4 HP/SW’s program memory .

Hold Shift and press the Preset/Split button .

This activates the organ split mode, the Split LED will light up . The 
keyboard will be split at C4 . C4 . The lower half will use the Preset 1/Lo 
setting; the upper half will use the Preset 2/Up setting .

If you press and hold both the Shift and the Preset/Split buttons 
for a couple of seconds, the Split LED will begin to flash and you 
can press a key on the keyboard to set a new split point as long 
as these buttons are held down . The key you press will be the first 
upper manual key .

The Rotary effect

The rotary effect adds some great sonic drama to the organs, but can 
of course be used with any other sound as well . The Electro 4 HP/SW 
rotary has three available speeds: fast, slow and stop . Stop does not 
disengage the effect; it only stops the rotating speakers . 

Make sure that the Speaker/Comp effect is 
activated and select the Rotary by pressing 
the effect selector until both the upper 
LEDs are lit .

The drive knob now controls the overdrive of the 
rotary amplifier .

Press the Slow/Stop button in the Rotary 
Speed section to the left on the panel, to 
cycle between the Fast and Slow speeds 
of the rotary . 

The rotors will speed up and slow down, pro-
ducing a nice swirly effect without the negative 
side effects that for example ingestion of certain 
mushrooms might induce .

Press the Stop mode button to activate this one-speed mode .

The Stop Mode LED will be lit .

Press repeatedly on the Slow/Stop button to cycle between Fast 
and Stop .

The rotary will now emulate the functionality of an early, one speed 
original rotary speaker that had only the fast and the stopped rotary 
speed options .


If you connect a foot switch to the rotor pedal input, you can 
control the rotary speed with this pedal.

Memory Protection

When the Nord Electro 4 HP/SW is shipped from factory, the memory 
protect is turned on to prevent you (or your cat) from accidentally 
overwriting any of the original programs . Before you can store any of 
your own programs, this memory protect feature has to be turned off 
by toggling a setting located in the System menu .

Hold Shift and press the Program 1 button to enter the System 
Menu .

The very first item in the System Menu is the Memory Protection . 
Use the Down button to get to the first item if this isn’t already 
active . 

Hold Shift and press the Down button to switch from the On 
setting to the Of setting . 

Press Program 1 to exit the system menu . The memory protection 
will now remain in the Off setting until you change it again .


cHaPtEr 4 GEttiNG StartEd 

|  9

Содержание Nord Electro 4 SW

Страница 1: ...User Manual Nord Electro 4 HP Nord Electro 4 SW OS Version 1 1x Part No 50385 Copyright Clavia DMI AB Print Edition F...

Страница 2: ...flash with the arrowhead symbol within an equilateral triangle is intended to alert the user to the presence of uninsulated voltage within the products en closure that may be of sufficient magnitude t...

Страница 3: ...EQ 15 Effect 1 15 Effect 2 16 Speaker Comp 16 Delay Reverb 16 Feedback 16 Ping Pong 16 Tempo Tap 16 Gain 16 6 The Menus System Menu 17 1 Memory Protect On Off 17 2 Output Routing 17 3 Transpose 17 4 F...

Страница 4: ...Electro 4 HP SW in the very first few pages of this manual After that follows the reference section where all the functions are explained in detail Disclaimer All trademarks and brand names mentioned...

Страница 5: ...re conveniently printed to the right on the panel The menus are de scribed in the Menu chapter that begins on page 17 Knobs buttons Knobs The knobs control the continuously variable pa rameters in the...

Страница 6: ...ear at the Electro 4 HP SW s left and right output jacks MIDI Connections MIDI Out MIDI connection used for sending keyboard and panel generated MIDI data from the Nord Electro 4 HP SW to other equipm...

Страница 7: ...nnected to the sustain pedal input to control sustain for piano sounds and rotary speed selection for organ sounds page 17 Control Pedal stereo connector for a pedal of the potentiometer type also kno...

Страница 8: ...he next electric piano You can of course organize the programs in any order you want Such a process can be done quite easily by using the drag and drop features in the Nord Sound Manager Edit a progra...

Страница 9: ...manual key The Rotary effect The rotary effect adds some great sonic drama to the organs but can of course be used with any other sound as well The Electro 4 HP SW rotary has three available speeds fa...

Страница 10: ...range Each instrument has a finite note range read more about this on page 15 This means that upper keys may become silent if you transpose upwards Adding effects 1 Select the program number 1 1 whic...

Страница 11: ...eel Mode on page 19 These will dramatically change the sound of the B3 model from squeaky clean to a battered old work horse The VX model The original instrument is probably the most famous of all the...

Страница 12: ...e Split function is active The Percussion is a single triggered non legato effect It is only present when you hit the keys when no other note is sounding In other words if you play a note or a chord a...

Страница 13: ...lly simulated in the Nord Electro 4 HP SW which means that you get all the possible original Clavinet D6 sound varia tions plus an additional four by selecting different pick up and filter combination...

Страница 14: ...Rotary menus The 128 programs in the Electro 4 HP SW are organized in 32 pages with 4 programs in each page Up Down buttons The Up Down buttons to the left of the display have several functions in th...

Страница 15: ...instrument not being used as the active in the program This allows you to quickly change from for example a piano performance with some effects turned on to an organ performance with another set of e...

Страница 16: ...natural sound reflections in various acoustic environments You can choose between five reverb types with various lengths and densities indicated by the three LEDs that light up one or two at a time Th...

Страница 17: ...t to use it for sustain with piano sounds and as a Rotor Speed switch with organ sounds In this case select rt rotor toggle with the Up Down buttons If you re using two separate sustain pedals one in...

Страница 18: ...e on the DIN connectors or the USB MIDI functionality Range P DIN MIDI ports U USB MIDI default 3 MIDI Channel This sets the MIDI Channel that the Nord Electro 4 HP SW transmits and responds to Range...

Страница 19: ...ll be muted when the percus sion is activated to mimic the behavior of an original organ Range C Cancel nO Normal default Rotary Menu 1 Rotary Model There is one rotary model available with two separa...

Страница 20: ...The Nord Sound Manager is compatible with computers running Mac OSX 10 4 or later Windows XP Windows 7 and Windows Vista If you run the Nord Sound Manager on a Windows computer you also need a Clavia...

Страница 21: ...a sequencer Connections 1 Connect the MIDI Out on the Nord Electro 4 HP SW to the MIDI In on your sequencer 2 Connect the MIDI Out from your sequencer to the MIDI In on the Nord Electro 4 HP SW Local...

Страница 22: ...ssion on the transmitting device If the dump contained all Programs All it will replace all programs cur rently stored in the Nord Electro 4 HP SW If the dump contained only a single program it will b...

Страница 23: ...ey s Touch Channel X X X X Pitch Bender X X Control Change O O Program Change True O 0 127 O 0 127 System Exclusive O O System Song Pos Common Song Sel Tune X X X X X X System Clock Realtime Commands...

Страница 24: ...onitor In 6 Mono 13 O Octave Shift 10 15 Organ Model 11 Organ section 11 Organ Trig 18 Output Routing 17 P Perc Drawbar 9 Cancel 19 Perc Norm Level 19 Perc Slow Decay 19 Perc Soft Level 19 Percussion...

Страница 25: ...he source of interference to radio or television reception which can be determined by turning the equipment off and on the user is encouraged to try to correct the interference by one or more of the f...

Страница 26: ......

Отзывы: