background image

ENGLISH

37

FUNCTIONS

N/P

This DVD receiver supports video outputs of various 
systems, including Auto, NTSC and PAL.
If the wrong system has been selected, the picture 
begins to fl icker and loses colour. If this should happen, 
press the N/P button (during stop mode) on the remote 
control and select the correct system (NTSC for North 
America, PAL for Europe). For further information on the 
output format, please see the operating instructions of 
your television set.

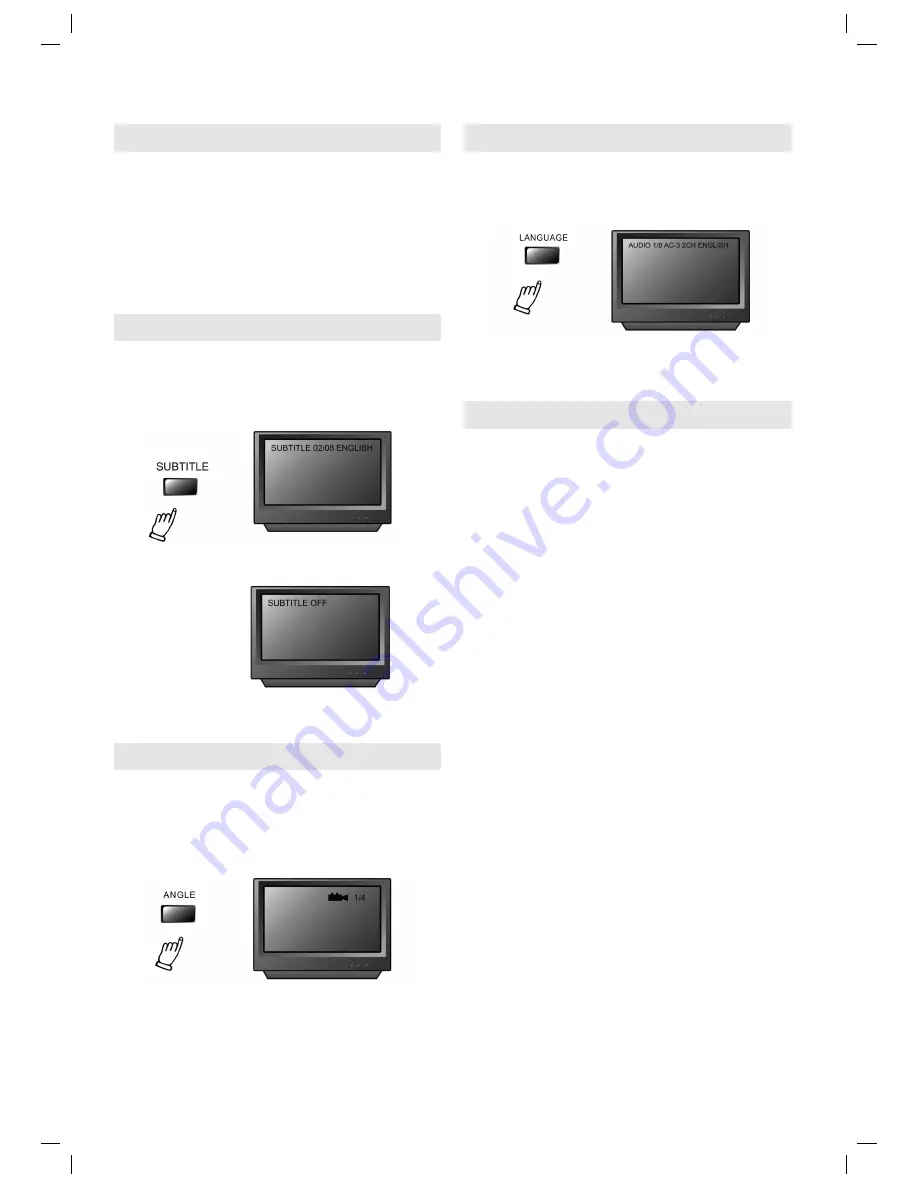
Subtitles

With this device it is possible to display up to 32 different 
subtitle languages (depending on the disc that has been 
inserted).
1. Press the SUBTITLE button repeatedly until the desi-
red language appears.

2. In order to switch off the subtitles, press the SUBTIT-
LE button repeatedly until the subtitles disappear.

Note:
The inserted disc must also have the subtitle function.

Camera Perspectives

It is possible to set various camera perspectives.
1. Press the ANGLE button on the remote control. Pres-
sing the ANGLE button repeatedly changes the camera 
perspective each time.
2. The ANGLE button only works if the viewing angle 
symbol lights up in the display.

Note:
The inserted discs must be able to display different 
camera perspectives.

Languages

It is possible to show fi lms in eight different languages 
(depending on the disc that has been inserted).
1. Press the LANGUAGE button repeatedly until the 
desired language appears.

Note:
The inserted disc must have been recorded in the desi-
red language.

Selecting Titles

DVDs are normally subdivided into titles, which in turn 
are split into chapters. This device is able to select a 
certain title for playback. If the DVD has been recorded 
with a title menu, a specifi c title can be selected using 
this function or the number buttons.

Title Menu Function
1.   Press the TITLE button. A title menu appears on the 

television screen.

2.   Press the corresponding scroll button to select the 

desired title. A title can also be selected using the 
number buttons by pressing the corresponding title 
number.

3.   Press the ENTER button. Playback begins from 

chapter 1 of the selected title.

Note:
Some discs do not have this function. If necessary, 
follow the instructions on the screen. Only the basic pro-
cedure is described in these instructions. The procedure 
may vary depending on the content of the DVD. If you 
play back a VCD 2.0 the function of the TITLE button, for 
example, is to return the device to the menu.

DVD625_GB   37

09.07.2004, 14:17:46 Uhr

Содержание DVD 625

Страница 1: ...DVD Player Bedienungsanleitung Garantie Instruction Manual Guarantee DVD 625 5 05 DVD625_D 1 09 07 2004 14 19 12 Uhr ...

Страница 2: ... 5 Beschreibung der Bedienelemente 6 Vorderansicht 6 Rückansicht 6 Beschreibung der Fernbedienung 7 Fernbedienung 8 Anschlüsse 9 11 Grundlegende Arbeitsschritte 12 DVD Betrieb 13 14 Funktionen 14 17 System Setup Funktionseinstellungen 17 20 Sprachen Setup 17 Video Setup 18 Audio Setup 19 Rating Lese Einstellung 20 MP3 Funktion 21 JPEG Dateien 21 Möglichkeiten zur Fehlerbehebung 22 Technische Daten...

Страница 3: ...etem Gehäuse ist der Laserstrahl sichtbar Schauen sie nie direkt in den Laserstrahl Es dürfen nur die hier aufgeführten Einstellungen und Vorgehensweisen angewandt werden da es sonst zu einer gefährlichen Strahlungsbelastung kommen kann Lesen Sie die Bedienungsanleitung sorgfältig durch um die ordnungsgemäße Benutzung des Gerätes sicherzu stellen Heben Sie die Bedienungsanweisung auf jeden Fall au...

Страница 4: ...Steckdose und Geräteausgang finden Stromversorgung Das Gerät darf nur mit der auf dem Markierungsschild angegebenen Stromquelle betrieben werden Sollten Sie sich nicht sicher sein welche Stromversorgung Sie zu Hause haben können Sie sich an den Händler oder die örtliche Stromversorgungsfirma wenden Für Geräte die mit Batterie oder einer anderen Energiequelle betrieben werden finden Sie Hinweise in...

Страница 5: ...önnen Sie bequem verschiedene DVDs CDs und MP3 Discs genießen Analoger Audioausgang Dieser Anschluss dient zum Anschluss an einen externen Verstärker Laserkopf Überspannungsschutzsystem Um die Lebensdauer des Laserkopfes zu verlängern be inhaltet das Gerät ein einzigartiges Laserkopf Überspan nungsschutzsystem das einen konstanten Laserstrom sicherstellt ANMERKUNGEN ZU DISCS Im folgenden werden wi...

Страница 6: ... COAXIAL DIGITAL AUDIO OUTPUT 4 VIDEO OUTPUT 5 S VIDEO OUTPUT 6 OPTICAL OUTPUT 7 SCART OUTPUT Vorderseite Funktionen 1 POWER Netzschalter 2 CD Fach 3 SENSOR 4 Display 5 OPEN CLOSE 6 PLAY 7 PAUSE 8 STOP BESCHREIBUNG DER BEDIENELEMENTE 5 05 DVD625_D 6 09 07 2004 14 19 16 Uhr ...

Страница 7: ... STEP Taste 20 MUTE Taste 21 DISPLAY Taste 22 OPEN CLOSE Taste 23 Zahlentasten 0 9 und 10 Taste 24 TIME Taste 25 REPEAT Taste 26 ENTER Taste 27 VOL Taste 28 Pfeiltasten und 29 L R Taste 30 RESUME Taste 31 A B Taste 32 MENU Taste 33 REV Taste 34 FWD Taste 35 PLAY Taste 36 MODE Taste 37 RETURN Taste 1 2 3 4 5 6 8 7 26 8 9 10 11 12 13 14 15 16 17 18 19 20 29 30 31 32 33 34 35 37 36 28 27 28 25 24 23 ...

Страница 8: ...ca 7 m vom Sensor in einem Winkel von 30 bedient werden Anmerkungen Der Sensor darf weder direktem Sonnenlicht noch starker Beleuchtung ausgesetzt sein Dies könnte zu Fehlfunktionen des Gerätes führen Falls andere Fernbedienungen in der Nähe benutzt werden oder die Fernbedienung in der Nähe von Geräten die Infrarot Strahlen nutzen eingesetzt wird können Störungen auftreten Es sollte vermieden werd...

Страница 9: ...ngeschlossen werden Die rote Buchse mit R gekennzeichnet dient zum Anschluss des rechten Kanals Die weiße Buchse mit L gekennzeichnet dient zum Anschluss des linken Kanals Die gelbe Buchse ist für den Videoanschluss vorgesehen Überprüfen Sie ob alle Anschlüsse fest sind Unkorrekte Anschlüssen können Geräusche Störungen oder sogar Schäden am Gerät verursa chen Das AV Kabel darf nicht mit anderen Ka...

Страница 10: ...r mit analogem Zweikanalaudioeingang Hinweis 1 Schließen Sie den Fernseher über den AV Eingang an den DVD Player an 2 Schließen Sie den Verstärker über den AUDIO Eingang an den DVD Player an ANSCHLÜSSE 5 05 DVD625_D 10 09 07 2004 14 19 19 Uhr ...

Страница 11: ...ingang Hinweis 1 Wählen Sie den digitalen Audioausgang koaxial 2 Setzen Sie den Audioausgang des Players auf RAW oder PCM Modus 3 Schließen Sie den Verstärker über den Digital Eingang an den DVD Player an ANTENNENANSCHLÜSSE 5 05 DVD625_D 11 09 07 2004 14 19 19 Uhr ...

Страница 12: ...für den Player aus Schritt 1 Drücken Sie POWER Auf dem Bildschirm erscheint das DVD Logo Schritt 2 Drücken Sie OPEN CLOSE Wenn das Lauf werk offen ist legen Sie eine CD DVD mit dem Label nach oben in das Laufwerk Drücken Sie OPEN CLOSE erneut um es zu schließen Schritt 3 Drücken Sie PLAY Der Player beginnt auto matisch die CD DVD zu überprüfen und zu lesen und beginnt mit der Wiedergabe GRUNDLEGEN...

Страница 13: ... die OPEN CLOSE Taste erneut um das Ladefach zu schließen Nach Schließen des Ladefachs erscheint in der oberen linken Ecke des Bildschirms der Disc Typ 5 Sobald die Disc gelesen wurde beginnt das Gerät mit der Wiedergabe Bei der Wiedergabe einer DVD er scheint der DVD Titel bzw das Menü CD Tracks werden nacheinander wiedergegeben Anmerkung Die Disc kann beschädigt werden wenn sie nicht richtig im ...

Страница 14: ...tet auch die Möglichkeit Discs in Zeitlupe wiederzugeben Durch wiederholtes Drücken der SLOW Taste wird die Wiedergabe Geschwindigkeit um 1 2 1 4 1 6 1 8 langsamer Drücken Sie die PLAY Taste um zur normalen Wiedergabe zurückzukehren Bildschirmanzeige Während der Wiedergabe einer Disc kann der Status verschiedener Funktionen wie z B Titel Tracknummer sowie verschiedene Spielzeiten abgerufen werden ...

Страница 15: ...ng Die eingelegte Discs muss über die Kameraperspekti ven Funktion verfügen Sprachen Es besteht die Möglichkeit Filme in 8 verschiedenen Sprachen abhängig von der eingelegten Disc zu zeigen 1 Drücken Sie die LANGUAGE Taste so oft bis die gewünschte Sprache erscheint Anmerkung Die eingelegte Disc muss über die Sprachen Funktion verfügen Titel auswählen DVD Discs sind normalerweise in Titel untertei...

Страница 16: ... einer DVD einen Abschnitt zwischen zwei be stimmten Punkten A und B nochmals wiederzugeben 1 Drücken Sie die A B Taste während der Wiedergabe der Disc um Punkt A Anfangspunkt festzulegen 2 Drücken Sie die A B Taste erneut während der Wiedergabe der Disc um Punkt B Endpunkt festzu legen Der Abschnitt zwischen A und B wird nochmals wiedergegeben 3 Drücken Sie die A B Taste ein drittes Mal um die Ei...

Страница 17: ...f dem Bildschirm Mit Hilfe der Pfeiltasten und den numerischen Tasten können Sie die gewünschten Tracks eingeben Wenn Sie danach mit den Pfeiltasten Abspielen oder Alles löschen markie ren können Sie mit der ENTER Taste die entsprechende Funktion anwählen FUNKTIONEN SYSTEM SETUP FUNKTIONSEINSTELLUNGEN Sobald Sie SETUP im Stopp Modus drücken erscheint auf dem Fernsehbildschirm das folgende Setup Me...

Страница 18: ...t TV Shape und drücken Sie EN TER oder um das TV Format TV Shape Untermenü anzuzeigen Drücken Sie um Ihr Auswahl zu ändern A Drücken Sie zur Bestätigung ENTER B Drücken Sie SETUP um das Setup Menü zu verlas sen 4 3PS Pan Scan bezieht sich auf eine Bildwieder gabe die teilweise unvollständig ist Mit Pan Scan wird der gesamte Bildschirm ausgefüllt 4 3LB Letter Box bezieht sich auf eine Bildwieder ga...

Страница 19: ...men lesen Sie Bitte unter Fehlerbehebung Kein Bild nach Audio Setup Mit Hilfe des Audio Menüs können Sie die analogen und digitalen Audioausgänge einstellen um externe an den Player angeschlossene Geräte anzusprechen Z B wenn Sie den Player an einen Fernseher anschließen nutzen Sie die Stereoausgänge Um einen Stereosound zu erhalten stellen Sie Zweikanal ein Sie können das Audioformat für alle fol...

Страница 20: ... das Sperr Symbol Sie können kein Rating auswählen bis Sie das korrekte Passwort mit Hilfe der 0 9 Tasten ausgewählt haben D Passwort auswählen E Mit Hilfe der 0 9 Tasten können Sie ein 4 stelliges Passwort auswählen Drücken Sie anschließend die ENTER Taste Sobald das Sperr Symbol verschwin det wurde das richtige Passwort eingegeben F Drücken Sie SETUP zum Speichern und Verlassen des Menüs Nicht a...

Страница 21: ...en Sie um zwischen dem Verzeichnisfenster und dem Filefenster zu wechseln Hinweis Während der MP3 Wiedergabe ist ein Vor wärts und Rückwärtsscannen nicht möglich JPEG DATEIEN JPEG ist das am meisten verbreitete Formatnorm zur Komprimierung von Standbilddateien Selbst wenn die Bilder 15 20fach komprimiert sind haben sie noch eine gute Wiedergabequalität Fast alle Bildverarbeitungs Softwareprogramme...

Страница 22: ...h liegt 4 Überprüfen Sie ob die Kindersicherungsfunktion Parental lock eingeschaltet ist 5 Überprüfen Sie ob die Disc für einen Einsatz in Ihrer Region bestimmt ist Fernbedienung funktioniert nicht 1 Überprüfen Sie die Batterien und tauschen Sie sie ggf aus 2 Überprüfen Sie ob sich keine Gegenstände zwischen dem Fernsensor der sich an der Frontseite des Gerätes befindet und der Fernbedienung befin...

Страница 23: ...e bitte das komplette Gerät in der Originalverpackung zusammen mit dem Kassenbon an Ihren Händler Schäden an Zubehörteilen führen nicht automatisch zum kostenlosen Umtausch des kompletten Gerätes Wenden Sie sich in diesem Fall bitte an unsere Hotline Glasbruchschäden bzw Brüche von Kunststoffteilen sind grundsätzlich kostenpflichtig Sowohl Defekte an Verbrauchszubehör bzw Verschleiß teilen z B Mot...

Страница 24: ...Storage 27 Description of the Controls 28 Front View 28 Rear View 28 Description of the Remote Control 29 Remote Control 30 Connecting Devices 31 33 Fundamental Steps 34 DVD Operation 35 36 Functions 36 39 System Setup Function Settings 39 42 Language Setup 39 Video Setup 40 Audio Setup 41 Rating Read Settings 42 MP3 Function 43 JPEG Files 43 Troubleshooting Possibilities 44 Technical Data 45 Guar...

Страница 25: ...e to hazardous laser radiation The laser beam is visible when the housing is open Never look directly into the laser beam Only the settings and procedures described here may be used as otherwise the device may produce hazardous radiation Please read these instructions carefully in order to ensure that you know how to use the device correctly Please keep these instructions in a safe place Contact a...

Страница 26: ...icular attention must be paid to the leads in the vicinity of the plug socket and DVD player output Power Supply The device must only be operated with the power source shown on the marking label If you are not sure what type of power supply you have at home please contact the dealer or your local power supply company For devices operated by battery or another energy source information is to be fou...

Страница 27: ...abling you to enjoy various DVDs CDs and MP3 discs Analogue Audio Output The integrated six channel amplifier means that it is not necessary to connect an external amplifier and allows for simple plug and play installation of the loudspeakers Laser Head Overvoltage Protection System In order to prolong the lifetime of the laser head the de vice contains a unique laser head overvoltage protection s...

Страница 28: ...PUT 3 COAXIAL DIGITAL AUDIO OUTPUT 4 VIDEO OUTPUT 5 S VIDEO OUTPUT 6 OPTICAL OUTPUT 7 SCART OUTPUT Front Functions 1 POWER Mains switch 2 CD tray 3 SENSOR 4 Display 5 OPEN CLOSE 6 PLAY 7 PAUSE 8 STOP DESCRIPTION OF THE CONTROLS DVD625_GB 28 09 07 2004 14 17 42 Uhr ...

Страница 29: ...19 STEP button 20 MUTE button 21 DISPLAY button 22 OPEN CLOSE button 23 Number keys 0 9 and 10 key 24 TIME button 25 REPEAT button 26 ENTER button 27 VOL button 28 Arrow keys and 29 L R button 30 RESUME button 31 A B button 32 MENU button 33 REV button 34 FWD button 35 PLAY button 36 MODE button 37 RETURN button 1 2 3 4 5 6 8 7 26 8 9 10 11 12 13 14 15 16 17 18 19 20 29 30 31 32 33 34 35 37 36 28 ...

Страница 30: ...The remote control can be operated up to approximately 7 m from the sensor at an angle of up to 30 Note The sensor must not be exposed to direct sunlight or strong illumination as this could cause the device to malfunction If other remote controls are used in the same area or the remote control is operated near to devices which use infrared rays interference may occur Please avoid placing objects ...

Страница 31: ...should the device be connected to the power supply The red socket marked with an R is used for connecting the right hand channel The white socket marked with an L is used to connect the left hand channel The yellow socket is for the video connec tion Check that all connections are tight Incorrect connections may cause noise interference or even damage to the device The AV cable must not be connect...

Страница 32: ...ENGLISH 32 Note 1 Connect the television set to the DVD player via the AV input 2 Connect the amplifier to the DVD player via the AUDIO input CONNECTIONS DVD625_GB 32 09 07 2004 14 17 43 Uhr ...

Страница 33: ...h Digital Audio Input Note 1 Select the digital audio output coaxial 2 Set the audio output of the player to RAW or PCM mode 3 Connect the amplifier to the DVD player via the digital input AERIAL CONNECTIONS DVD625_GB 33 09 07 2004 14 17 44 Uhr ...

Страница 34: ...hannel for the DVD player on the television set Step 1 Press POWER The DVD logo appears on the screen Step 2 Press OPEN CLOSE When the drive is open insert a CD DVD with the label facing upwards into the drive Press OPEN CLOSE again to close it Step 3 Press PLAY The player automatically begins to check and read the CD DVD and then begins playback FUNDAMENTAL STEPS DVD625_GB 34 09 07 2004 14 17 44 ...

Страница 35: ...s 4 Press the OPEN CLOSE button again to close the drawer Once the drawer has closed the type of disc appears in the top left hand corner of the screen 5 As soon as the disc has been read the device begins playback During playback of a DVD the DVD title and the menu appear CD tracks are played back one after the other Note The disc may be damaged if it is not positioned cor rectly in the drawer Th...

Страница 36: ... discs in slow motion When the SLOW button is pressed repeatedly the playback speed is reduced to 1 2 1 4 1 6 and 1 8 Press the PLAY button to return to normal playback Onscreen Display While a disc is being played back the status of various functions such as the title track number and different playing times can be called up 1 If the DISPLAY button is pressed once the title chap ter and time that...

Страница 37: ...lay Note The inserted discs must be able to display different camera perspectives Languages It is possible to show films in eight different languages depending on the disc that has been inserted 1 Press the LANGUAGE button repeatedly until the desired language appears Note The inserted disc must have been recorded in the desi red language Selecting Titles DVDs are normally subdivided into titles w...

Страница 38: ...B repeat function makes it possible to repeat play back of a section of a DVD between two certain points A and B 1 Press the A B button while the disc is being played back in order to define point A starting point 2 Press the A B button again while the disc is being played back to define point B end point The section between A and B is played back again 3 Press the A B button a third time to delet...

Страница 39: ...OG button in stop mode the program menu appears on the screen Using the arrow keys and the number keys you can now put in the desi red tracks If you then use the arrow keys to mark Play or Delete All you can select the corresponding function with the ENTER button FUNCTIONS SYSTEM SETUP FUNCTION SETTINGS If the SETUP button is pressed during stop mode the following setup menu appears on the televis...

Страница 40: ...o display the TV Shape submenu Press to change your selection A Press ENTER to confirm B Press SETUP to leave the setup menu 4 3 Pan Scan refers to a type of picture display which is partially incomplete With Pan Scan the entire screen is filled out 4 3LB Letter Box refers to a type of picture display where black stripes appear at the top and bottom of the picture 16 9 The picture fills the screen...

Страница 41: ...g Audio Setup With the help of the audio menu you can set the ana logue and digital audio outputs according to the auxiliary devices connected to the player If you have connected the player to the television set via a stereo audio socket for example you should set Dolby Digital and other settings to 2 channel in order to obtain optimum stereo sound You can set the audio format for each of the foll...

Страница 42: ...set the block symbol appears It is not possible to select a rating until you have selected the correct password using the 0 9 buttons D Select password E Using the 0 9 buttons you can enter a 4 figure password Then press the ENTER button When the block symbol disappears the correct password has been entered F Press SETUP to store and leave the menu Not all DVDs are categorised according to this sy...

Страница 43: ...the cursor Press to alternate between the directory window and the file window Note Forward and reverse scanning is not possible during MP3 playback JPEG FILES JPEG is the most common format standard for compres sing fixed image files Even if the images are compressed 15 20 times their quality is still good Almost all image processing software programs support JPEG It is the ideal format for image...

Страница 44: ...Check whether the disc is placed correctly in the drawer 4 Check whether the parental lock function is switched on 5 Check whether the disc is designated for use in your region Remote control does not work 1 Check the batteries and replace them if necessary 2 Check whether any objects are located between the remote sensor located on the front of the device and the remote control 3 The remote contr...

Страница 45: ...e to any right to a new guarantee Proof of the guarantee is provided by the proof of purchase Without proof of purchase no free replacement or repair will be carried out For repairs or replacement during the life of the guaran tee return the device in its original packing together with the proof of purchase to your dealer Damage to accessories does not mean automatic free replacement of the whole ...

Страница 46: ...DVD625_GB 46 09 07 2004 14 17 52 Uhr ...

Страница 47: ...DVD625_GB 47 09 07 2004 14 17 53 Uhr ...

Страница 48: ...Stünings Medien Krefeld 06 04 D 47906 Kempen Germany Industriering Ost 40 Internet http www clatronic de email info clatronic de 5 05 DVD625_D 48 09 07 2004 14 19 29 Uhr ...

Отзывы: