E
n
g
lis
h
GREAT BRITAIN
For consumer contact, please visit www.clasohlson.co.uk and click on customer service.
V
er
. 20
1008
Universal Charger
Art.no. 18-8120 Model UNI-200-UK
38-1764
UNI-200
Please read the entire instruction manual before use and save it for
future reference. We reserve the right for any errors in text or images
and for making any necessary technical changes to this document. If
you should have any questions concerning technical problems please
contact our Customer Services.
Safety
1. This charger is designed specifically for rechargeable lithium-ion
and lithium polymer batteries.
2. If the rechargeable battery is not going to be used for a long time, it
should be fully charged before storage. The battery should be fully
charged every six months for it to maintain optimum performance.
3. Remove the battery from the charger when charging is completed
and unplug the charger from the wall outlet.
Product description
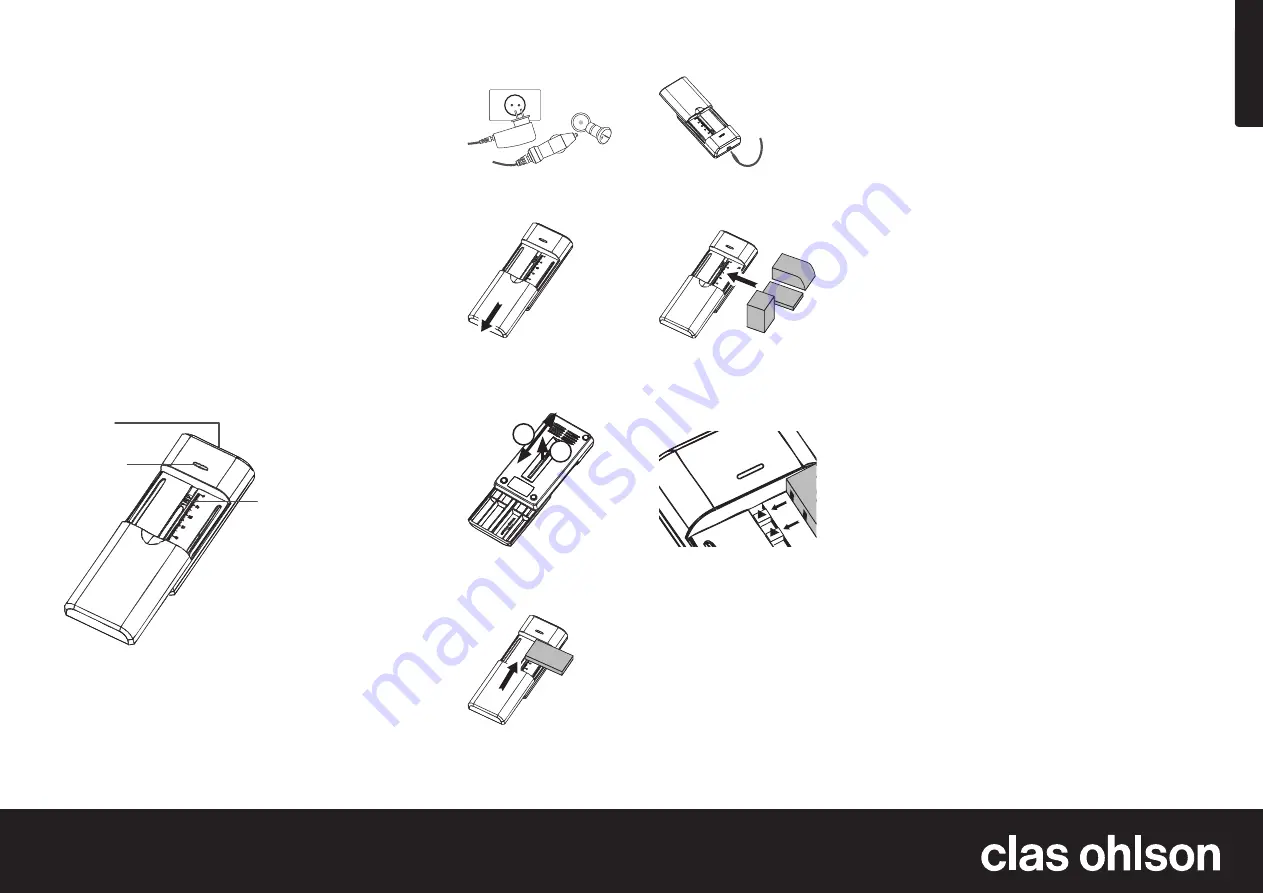
Use
5. Adjust the charging contact pins to fit the positive and negative
terminals of the battery by sliding the two black plastic contact
adjusters on the back of the charger up or down accordingly.
1. Plug the adaptor in to the wall
outlet (or 12 V car lighter socket).
2. Plug the lead into the
charger’s outlet.
3. Slide the spring-loaded cover
of the charger down.
4. Insert the batteries so that the
positive and negative terminals
are facing down towards the
scale on the charger.
6. Release the cover to
hold the battery
in place.
7. If the positive and negative terminals are not clearly marked on the
battery, it is best to try the two outermost terminals first. The failsafe
reverse-polarity protection feature will ensure that the charger does
not damage the battery. When the LED indicator emits a steady red
light, the battery is connected correctly and charging normally.
8. When the LED changes to a green light, the battery is fully charged.
Care and maintenance
Wipe the product using a dry cloth when necessary.
Troubleshooting guide
1. If the LED charging indicator does not come on it means that the
positive and negative terminals of battery are not correctly aligned
with the charging contact pins. If the green LED comes on straight
away it likely that one of the charger’s contact pins is connected to
the battery’s T-terminal (which does not charge it). Try moving one
of the charger’s contact pins to one of the other battery terminals
to start the charging process. The LED emits a red light when the
battery is charging normally.
2. If the fully charged battery is not removed from the charger, the
charger automatically detects the voltage. If the battery’s voltage
should drop, the charger will automatically start charging it again.
3. If the charging indicator goes out during charging, there is a
bad connection between the charging contacts and the battery
terminals. In this case, the charging contacts need to be adjusted.
See point 5 for details about adjusting the charging contacts.
Disposal
Follow local ordinances when disposing of this product. If you are un-
sure of how to dispose of this product, please contact your municipality.
Specifications
Power supply
DC 12 V 400 mA
Charging current for 3.7 V batteries
DC 4.2 V 600 mA
Charging current for 7.4 V batteries
DC 8.4 V 600 mA
Operating temperature
0–45 °C
• Compatible with all rechargeable 3.7 V and 7.4 V batteries.
Compatible with nearly all rechargeable lithium-ion and lithium-
polymer batteries currently used in digital cameras, camcorders
and handheld computers.
• Smart, automatic positive/negative polarity selection.
• Several failsafe features to ensure that the charger does not
damage the battery.
• LED indication of charge status.
• Compact and elegant design, includes 100–240 V AC adaptor and
12 V cigarette lighter lead, making it perfect for travelling.
Outlet
LED
indicator
Terminals
1
2


