background image

5

E

n

g

li

s

h

4.2 Connecting the mouse

2

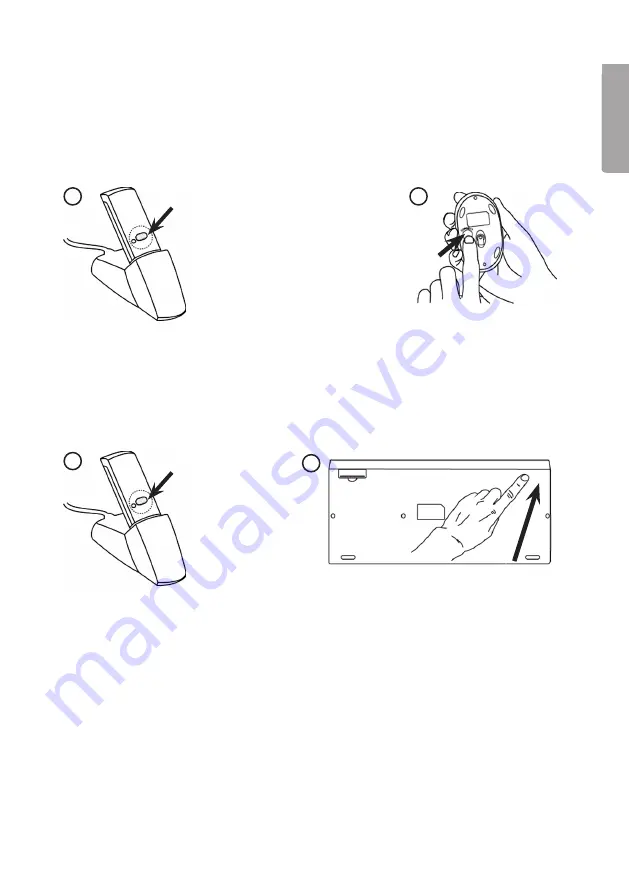
1.  Push the [CONNECT] button on the receiver to create a link to the mouse.  

The green LED on the receiver should start to flash.

2.  Press the [CONNECT] button on the bottom of the mouse to complete 

the connection process, the mouse is now ready for use.  


4.3 Connecting the keyboard

1.  Push the [CONNECT] button on the receiver to create a link to the mouse.  

The green LED on the receiver should start to flash.

2.  Then press the [CONNECT] button on the bottom of the mouse to complete  

the connection process, the mouse is now ready for use. 
 

N.B:


If the batteries for the keyboard or mouse are removed or need to be switched they 
have to be connected again to the receiver according to step 1–4 in the instructions.

4.4 Troubleshooting

The mouse/keyboard does not work even though it has been connected

1.  Remove the receiver from the USB port and insert it again. 

Repeat the connection process, following the instructions above.

2.  Try connecting the devices to another USB port or another computer.
3.  The optical sensor might not work as well on certain surfaces such as glass 

or mirrors. The optical sensor does, however, work on most surfaces.

1

1

2

Содержание GK-670MD

Страница 1: ...Sve n ska Norsk Suomi Wireless mini keyboard with mouse Tr dl st minitangentbord och mus Tr dl st minitastatur og mus Langaton minin pp imist ja hiiri Art no Model 18 8029 GK 670MD 38 2844 GK 670MD V...

Страница 2: ......

Страница 3: ...eys keyboard Supports Windows 2000 ME XP and VISTA 2 Contents Wireless mini keyboard Wireless optical mouse USB wireless receiver Table stand for the receiver Instruction manual CD ROM software disc P...

Страница 4: ...nstalled 4 1 Connect the receiver 1 Connect the receiver or its extension cable to a vacant USB port on your laptop or PC Tip If there are no available USB ports an external USB hub not included can b...

Страница 5: ...m of the mouse to complete the connection process the mouse is now ready for use N B If the batteries for the keyboard or mouse are removed or need to be switched they have to be connected again to th...

Страница 6: ...ware has been uninstalled before installing the new software 2 Insert the supplied CD into the computer s CD ROM drive 3 The installation guide automatically starts and the start image is displayed Cl...

Страница 7: ...ernatives to install drivers for both the mouse and the keyboard Then click Next c Click on Next to install the programme in the suggested folder or Browse to chose another folder for the installation...

Страница 8: ...8 E ngl i sh e Click on Next to confirm your selection and continue the installation f Click on Finish to complete the installation and close the installation programme...

Страница 9: ...Assignments Select the buttons for each function from the drop down list Double Click Speed Increases decreases the speed of the double click function Double click on Test to test the setting Button C...

Страница 10: ...leave a trail behind the pointer d Wheel Reverse scrolling direction Reverse scrolling direction Scroll lines a time Enter the number of lines to be scrolled on each step of the scroll wheel Scroll on...

Страница 11: ...commands that you can assign to Luckyjump Click on the scroll wheel to view the menu box then click on the desired function NetJump combines commonly used commands for net browsing e mails etc You can...

Страница 12: ...properties of the keyboard can now be altered using the following five tabs a Speed Repeat delay Sets the time for delay when a key is pressed down Repeat rate Sets the repeat rate when a key is pres...

Страница 13: ...bar when Caps Lock is activated Show icon when Num Lock is toggled Mark to display an icon in the taskbar when Num Lock is activated Show icon when Scroll Lock is toggled Mark to display an icon in th...

Страница 14: ...e button Altogether 8 functions can be selected Click OK to confirm Exemple If alternative 1 is chosen button 4 will function as Copy and button 5 will be Paste If alternative 20 is chosen button 4 wi...

Страница 15: ...e mouse will come on Deactivating the mouse Press and hold in the red CONNECT button on the bottom of the mouse for 3 seconds to turn it off The red LED on the bottom of the mouse will go off 8 Double...

Страница 16: ...mus Snabbtangenter tangentbord St ds av Windows 2000 ME XP samt VISTA 2 F rpackningen inneh ller Tr dl st minitangentbord Tr dl s optisk mus Mottagare med usb anslutning Bordsst ll f r mottagare Bruks...

Страница 17: ...Ansluta mottagaren 1 Anslut mottagaren eller mottagarens f rl ngningskabel till en ledig usb port p din laptop eller pc Tips Finns inga lediga usb portar p datorn kan en extern usb hubb medf ljer ej...

Страница 18: ...knappen CONNECT p tangentbordets undersida f r att slutf ra anslutningsprocessen tangentbordet r nu klart att anv ndas Obs Om tangentbordets eller musens batterier tas ur eller byts m ste de p nytt an...

Страница 19: ...rivrutiner f r mus och tangentbord innan du installerar den nya programvaran 2 S tt i medf ljande cd skiva i datorns cd l sare 3 Cd skivan startar automatiskt och startbilden visas Klicka p Install Dr...

Страница 20: ...allera drivrutiner f r b de tangentbordet och musen Klicka sedan p Next c Klicka p Next f r att installera programmet i f reslagen katalog eller p Browse f r att v lja en annan katalog f r installatio...

Страница 21: ...21 Sve n ska e V lj Next f r att bekr fta dina val och forts tta installationen f Klicka p Finish f r att slutf ra installationen och st nga installationsprogrammet...

Страница 22: ...dinslisten f r respektive knapp vilken funktion knappen ska ha Double Click Speed Dubbelklickshastighet kar minskar hastigheten f r dubbeklick Dubbelklicka p Test f r att prova dina inst llningar Butt...

Страница 23: ...ydligt n r CTRL trycks in Trails Sp r Markera f r att visa sp r efter mark rens r relser d Wheel Scrollhjul Reverse scrolling direction Byt scrollriktning Scroll lines a time Anger hur m nga rader som...

Страница 24: ...ndon som du kan tilldela LuckyJump Tryck p scrollhjulet f r att visa menyrutan och klicka p nskad funktion NetJump h r grupperar du vanligtvis anv nda kommandon n r du websurfar mailar etc Du v xlar k...

Страница 25: ...gentbordets egenskaper kan nu ndras under programmets f ljande fem flikar a Speed Hastighet Repeat delay St ller in tiden f r f rdr jning n r en tangent h lls intryckt Repeat rate St ller in repetitio...

Страница 26: ...f r att visa en ikon i aktivitetsf ltet n r Caps Lock r aktiverat Show icon when Num Lock is toggled Markera f r att visa en ikon i aktivitetsf ltet n r Num Lock r aktiverat Show icon when Scroll Lock...

Страница 27: ...lagt 8 funktioner kan v ljas Klicka p OK f r att bekr fta Exempel V ljs alternativ 1 f r knapp 4 egenskapen Copy Kopiera och knapp 5 f r egenskapen Paste Klistra in V ljs alternativ 20 f r knapp 4 ege...

Страница 28: ...t nds St nga av musen Tryck och h ll in den r da knappen CONNECT p musens undersida i ca 3 sekunder f r att st nga av musen Den r da lysdioden p musens under sida sl cks 8 Dubbelklick Anv nd knappen...

Страница 29: ...bbelklikk mus Hurtigtaster tastatur St ttes av Windows ME XP 2000 samt VISTA 2 Forpakningen inneholder Tr dl st minitastatur Tr dl s optisk mus Mottaker med USB kontakt Bordstativ for mottaker Bruksan...

Страница 30: ...ren eller mottakerens forlengelseskabel til i en ledig USB port p din laptop eller PC Tips Dersom det ikke er noen ledig USB port kan en ekstern USB hub m kj pes separat brukes 2 Datamaskinen detekter...

Страница 31: ...ECT p tastaturets underside for fullf re tilkoblingsprosessen Tastaturet er n klart til bruk Obs Hvis tastaturets eller musens batterier tas ut eller skiftes m de kobles opp mot mottakeren p nytt som...

Страница 32: ...mus og tastatur f r du installerer den nye programvaren 2 Sett den vedlagte CD platen i datamaskinens CD ROM 3 CD avspillingen starter automatisk og startbildet vises Klikk p Install Driver for start...

Страница 33: ...allere drivere for b de tastatur og mus Klikk deretter p Next c Klikk p Next for installere programmet i den katalogen som blir foresl tt eller p Browse n r du nsker en annen katalog for installasjone...

Страница 34: ...34 Norsk e Velg Next for bekrefte dine valg og fortsette installasjonen f Klikk p Finish for fullf re installasjonen og stenge installasjonsprogrammet...

Страница 35: ...nlisten for respektive knapp hvilken funksjon knappen skal ha Double Click Speed Dobbeltklikkehastighet ker eller reduserer hastigheten ved dobbeltklikking Dobbeltklikk p Test for teste dine innstilli...

Страница 36: ...n r CTRL trykkes inn Trails Spor Marker her dersom du vil at spor etter mark ren skal vises D Wheel Scrollehjul Reverse scrolling direction Skift scrolleretning Scroll lines a time Angir hvor mange ra...

Страница 37: ...ge kommandoene som du kan tildele LuckyJump Trykk p scrollehjulet for f vist menyruten og klikk p nsket funksjon NetJump her grupperer du vanligvis brukte kommandoer n r du surfer p nettet mailer etc...

Страница 38: ...enskaper kan n forandres under programmets f lgende fem flikerna Speed Hastighet Repeat delay Stiller inn tiden for forsinkelse n r en knapp holdes inntrykt Repeat rate Stiller inn repetisjonshastighe...

Страница 39: ...arker for vise et ikon i aktivitetsfeltet n r Caps Lock er aktivert Show icon when Num Lock is toggled Marker for vise et ikon i aktivitetsfeltet n r Num Lock er aktivert Show icon when Scroll Lock is...

Страница 40: ...n Du kan velge til sammen 8 funksjoner Trykk p OK for bekrefte Eksempel Dersom alternativ 1 velges f r knapp 4 egenskapen Copy Kopier og knapp 5 egenskapen Paste Lim inn Velges alternativ 20 f r knapp...

Страница 41: ...u av musen Trykk og hold inne den r de knappen CONNECT p musens underside i ca 3 sekunder for skru av musen Den r de lysdioden p musens under side tennes 8 Dobbelklikk Bruk knappen ved siden av scroll...

Страница 42: ...Matala virrankulutus 8 mA hiiri Kaksoisnapsautuspainike hiiri Pikapainikkeet n pp imist Tuetut j rjestelm t Windows 2000 ME XP sek VISTA 2 Pakkauksen sis lt Langaton minin pp imist Langaton optinen h...

Страница 43: ...n liitt minen 1 Aseta vastaanotin tai vastaanottimen jatkokaapeli tietokoneen tai kannettavan tietokoneen vapaaseen usb porttiin Vihje Jos koneessa ei ole vapaita usb portteja voidaan lis vapaita port...

Страница 44: ...st n pohjassa suorittaaksesi yhteydenmuodostamisen loppuun N pp imist on nyt valmis k ytt varten Huom Mik li n pp imist n tai hiiren paristot poistetaan tai vaihdetaan laitteet tulee liitt uudelleen v...

Страница 45: ...tot ja ajurit ennen kuin asennat uuden ohjelmiston 2 Aseta mukana tuleva cd levy tietokoneen cd asemaan 3 Cd levy k ynnistyy automaattisesti ja n yt lle ilmestyy k ynnistyskuva Aloita asennus napsautt...

Страница 46: ...molemmat ajureiden asennusvaihtoehdot Napsauta sen j lkeen Next c Napsauta Next asentaaksesi ohjelman ehdotettuun kansioon tai Browse asentaaksesi ohjelman johonkin muuhun kansioon d Jatka asennusta n...

Страница 47: ...47 Suomi e Vahvista valintasi ja jatka asennusta valitsemalla Next f Viimeistele asennus ja sulje asennusohjelma napsauttamalla Finish...

Страница 48: ...em ritykset Valitse painikkeiden alasvetovalikoista toiminto jokaiselle painikkeelle Double Click Speed Kaksois napsautusnopeus Lis v henn kaksoisnapsautuksen nopeutta Kokeile asetusta kaksoisnapsautt...

Страница 49: ...s Osoittimen j lki Valitse osoittimen j tt m j lki n yt ll d Wheel Rullan pp in Reverse scrolling direction Vaihda vierityksen suuntaa Scroll lines a time Vierit haluttu m r rivej kerrallaan Scroll on...

Страница 50: ...joita voidaan liitt LuckyJumpiin Paina rullapainiketta n hd ksesi valikkoruudun ja napsauta haluttua toimintoa NetJump yhdist verkkoselailussa s hk postissa jne tavallisimmin k ytetyt k skyt Vaihda k...

Страница 51: ...naisuudet N pp imist n ominaisuuksia voidaan nyt muuttaa ohjelman viidell v lilehdell a Speed Nopeus Repeat delay Aseta viiveen kesto kun n pp int pidet n painettuna Repeat rate Aseta toistonopeus kun...

Страница 52: ...eht v palkissa n kyy kuvake kun Caps Lock on aktivoituna Show icon when Num Lock is toggled Merkitse kun haluat ett teht v palkissa n kyy kuvake kun Num Lock on aktivoituna Show icon when Scroll Lock...

Страница 53: ...toimintoa Vahvista painamalla OK Esimerkki Jos valitset vaihtoehdon 1 on painikkeen 4 toiminto Copy Kopioi ja painikkeen 5 toiminto Paste Liit Jos valitset vaihtoehdon 20 on painikkeen 4 toiminto Vol...

Страница 54: ...merkkivalo hiiren pohjassa syttyy Hiiren sammuttaminen Hiiri sammuu kun painat punaista CONNECT painiketta hiiren pohjassa noin 3 sekunnin ajan Punainen merkkivalo hiiren pohjassa sammuu 8 Kaksoisnaps...

Страница 55: ...board GK 6 Receiver RG 20KM is in compliance with the essential requirements and other relevant provisions of Directive 1999 5 EC Article 3 1a Safety EN 60950 1 EMF SAR 99 519 EC Council Recommendatio...

Страница 56: ...0 E post kundesenter clasohlson no Internett www clasohlson no Post Clas Ohlson AS Postboks 485 Sentrum 0105 OSLO Suomi Asiakaspalvelu Puh 020 111 2222 S hk posti info clasohlson fi Internet www claso...

Отзывы: