background image

5

English

Operating instructions

Before initial use

•  Wash the glass carafe and permanent filter before using the coffee maker for 

the first time.

•  Before using the coffee maker for the first time you should run the machine through 

two to three filtration cycles with the water reservoir filled up to the 5-coffee cup 
mark and without coffee grounds. This should also be done when the coffee 
maker has not been used for a long time, and after descaling.

General

•  The measuring scale on the water reservoir makes it easier for you to fill 

the reservoir with the correct amount of water. Make sure not to exceed 
the maximum water level.

•  If you intend to brew several pots of coffee you should turn it off after every brewed 

pot and let the machine rest for about 5 minutes between brews.

Brewing coffee

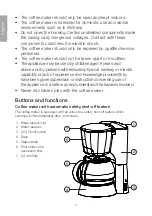
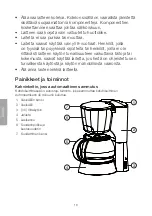
1.  Open the lid and fill the water reservoir with the desired amount of water.
2.  Insert the permanent filter into the filter holder.
3.  Close the filter holder after filling with coffee and make sure that it is locked into 

place.

4.  Put the lid on the carafe and place the carafe onto the base. Make sure the carafe 

lid is correctly in place to prevent the drip-stop mechanism on the filter assembly 
from operating during brewing.

5.  Plug the coffee maker into a convenient wall socket and switch it on using the on/off 

switch on the coffee maker.

6.  Wait until all the water has run through the filter before trying to remove the carafe 

from the hotplate.

The coffee can be kept warm by leaving it on the hotplate. The hotplate will stay warm 
until the machine is turned off. Always turn off the appliance after use and disconnect 
the plug from the wall socket.

Care and maintenance

Cleaning

•  Unplug the coffee maker and let it cool before cleaning it.
•  Use a soft damp cloth to wipe the coffee maker clean.
•  The glass carafe, carafe lid, filter holder and permanent filter can all be machine-washed.

Содержание CM2022L

Страница 1: ...Coffee MAKER Kaffebryggare Kaffetrakter Kahvinkeitin Kaffeemaschine Art no 18 4709 44 2005 1 2 3 Ver 20160404...

Страница 2: ...2...

Страница 3: ...plate on the appliance Never allow the coffee maker to be on for an extended time It is recommended that you use a short cycle time switch between the plug and wall socket to turn the coffee maker off...

Страница 4: ...may be used by children aged 8 years and above and by persons with reduced physical sensory or mental capability or lack of experience and knowledge provided they have been given supervision or instr...

Страница 5: ...with the desired amount of water 2 Insert the permanent filter into the filter holder 3 Close the filter holder after filling with coffee and make sure that it is locked into place 4 Put the lid on t...

Страница 6: ...gh a complete filtering cycle Repeat if necessary Do this descaling process in a well ventilated area and avoid breathing in the fumes 3 To clean the coffee maker after descaling you should run the ma...

Страница 7: ...t aldrig kaffebryggaren vara p slagen under l ngre perioder Anv nd g rna en korttidstimer mellan stickproppen och v gg uttaget ifall du skulle gl mma att st nga av kaffebryggaren Dra eller b r inte ka...

Страница 8: ...ndas av barn fr n 8 r och av personer med n gon form av funktionsneds ttning brist p erfarenhet eller kunskap som skulle kunna ventyra s kerheten om de har f tt instruktioner om hur den p ett s kert...

Страница 9: ...nskad m ngd vatten 2 S tt i det permanenta filtret i filterh llaren 3 St ng filterh llaren n r du har fyllt kaffe i filtret och se till att den l ses p plats 4 S tt aromskyddslocket p kannan och place...

Страница 10: ...ggaren genomf ra en filtreringsomg ng Upprepa vid behov Under avkalkningen b r du v dra rummet och inte andas in ttiks ngorna 3 F r att reng ra kaffebryggaren efter avkalkningen b r du l ta den g ra 2...

Страница 11: ...merkingen p produktet La aldri kaffetrakteren st p i lange perioder av gangen Bruk gjerne en korttidstimer mellom st pselet og str muttaket i tilfelle du skulle glemme skru av kaffetrakteren Ikke dra...

Страница 12: ...p Produktet kan benyttes av barn fra 8 r og av personer med funksjonshemming og manglende erfaring og kunnskap om produktet dersom de har f tt oppl ring om sikker bruk av produktet Det er dog viktig a...

Страница 13: ...permanente filteret i filterholderen 3 Lukk igjen filterholderen n r kaffen er p plass og p se at holderen l ses p plass 4 Sett aromabeskyttelseslokket p kannen og plasser kannen i trakteren Lokket m...

Страница 14: ...skrevet i avsnittet Trakting av kaffe og kj r alt vannet gjennom filteret Gjenta ved behov Dampen fra eddikoppl sningen b r ikke inhaleres S rg for god ventilasjon 3 Etter avkalkingsprosessen b r man...

Страница 15: ...oikea Tarkista verkkovirta laitteen merkkikilvest l j t laitetta p lle pitk ksi aikaa Liit laite lyhytaika ajastimeen sen varalta ett laite unohtuu p lle l ved l k kanna laitetta virtajohdosta l k yt...

Страница 16: ...ajoitteita tai henkil t joilla ei ole riitt v sti laitteen k yt n turvallisuuteen vaikuttavia taitoja tai kokemusta saavat k ytt laitetta jos heit on ohjeistettu sen turvallisesta k yt st ja k yt n ma...

Страница 17: ...suodatinpidikkeeseen 3 Laita suodattimeen kahvia sulje suodatinpidike ja varmista ett se lukittuu 4 Aseta aromikansi kannuun ja laita kannu kahvinkeittimeen Kannu tulee asettaa oikein jotta suodatinp...

Страница 18: ...hdassa Kahvin keitt minen kuvattujen ohjeiden mukaisesti Laita kahvinkeitin p lle Toista k sittely tarvittaessa Varmista tilan riitt v tuuletus l k hengit etikkah yry 3 Puhdista kahvinkeitin kalkinpoi...

Страница 19: ...spannung des Ger tes bereinstimmt Siehe Typenschild des Ger tes Das Ger t nie ber l ngere Zeitr ume eingeschaltet lassen F r extra Sicherheit kann eine Zeitschaltuhr zwischen Steckdose und Stecker ang...

Страница 20: ...mals ver ndern oder demontieren Das Ger t ist nur dann f r Kinder ab 8 Jahren oder Personen mit eingeschr nkten physischen sensorischen oder geistigen F higkeiten bzw mangelnder Erfahrung Wissen geeig...

Страница 21: ...eepulver in den Filter f llen die Filterhalterung schlie en und sicherstellen dass diese einrastet 4 Den Aromaschutzdeckel auf die Kanne setzen und die Kanne in das Ger t stellen Der Deckel muss korre...

Страница 22: ...darf wiederholen W hrend des Entkalkens sollte das Zimmer gel ftet werden Die Essigd mpfe nicht einatmen 3 Um das Ger t nach dem Entkalken zu reinigen 2 3 Filterdurchl ufe mit sauberem Wasser durchf h...

Страница 23: ...23...

Страница 24: ...boks 485 Sentrum 0105 OSLO Suomi Asiakaspalvelu puh 020 111 2222 s hk posti asiakaspalvelu clasohlson fi Internet www clasohlson fi Osoite Clas Ohlson Oy Maistraatinportti 4 A 00240 HELSINKI Great Bri...

Отзывы: