background image

5

English

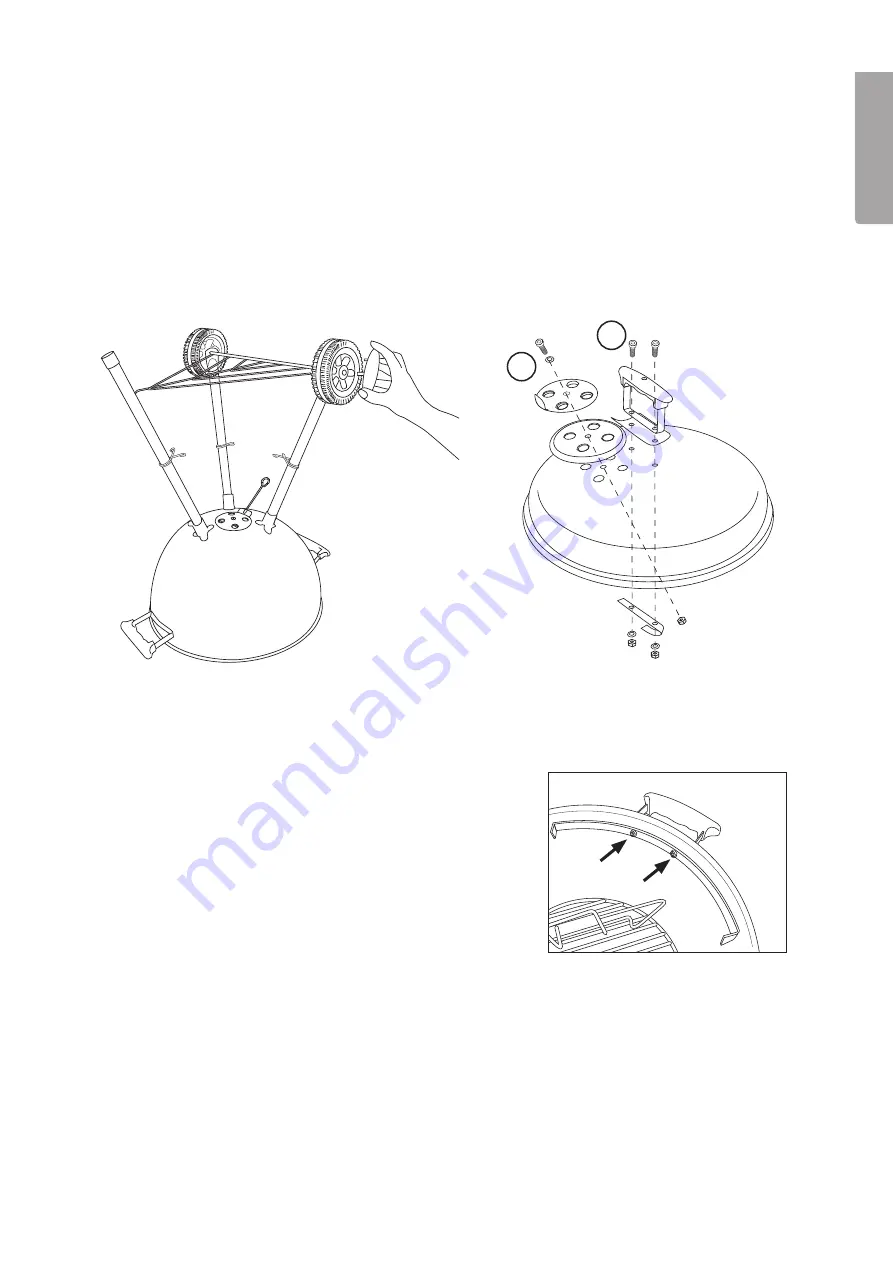
Assembling the legs and wheels

1.  Place the spring clips on each leg. 
2.  Check the grill’s base where the holes for the handles are located. Insert the long leg into the bracket which 

sits in line with the pair of holes for the handle. Then insert the other legs into the remaining brackets as 
shown in the figure. 

3.  First, attach the wire shelf onto the long leg and then attach it to the shorter legs so that the threaded ends 

stick out through the holes in the legs. 

4.  Mount the wheels onto the threaded ends that stick out through the holes on the shorter legs and then 

screw them together using the nuts. Insert the wheel covers. 

Assembling the air vents and handles 

1.  Attach the lower air vent to the bowl as shown in the picture  

on the left above.

2.  Attach the upper air vent to the lid as shown in the picture  

on the right above.

3.  Attach the handles and the grill grate supports to the side and  

the handle and heat deflector to the lid. 

Assembling the remaining parts

1.  Place the lower ash tray onto the spring clips. 
2.  Place the upper ash tray onto the base’s bottom. 
3.  Attach the spacers onto the charcoal grate and then place it above the upper ashtray. When grilling,  

charcoal should be poured between the spacers to concentrate the heat into the centre of the grill so  
as to generate less heat waste to the sides. 

4.  The grill grate is placed above. 

1

2

Содержание 34-8327

Страница 1: ...E ngl i s h Sv e ns ka Nor s k Suo mi D e ut s ch Grill Grilli Kugelgrill Art no 34 8327 Ver 20151001...

Страница 2: ...2...

Страница 3: ...cohol or similar products to light the grill 3 Never spray lighter fluid or similar products onto the glowing coals It can cause flames to explode 4 Do not cover the coals before they begin glowing 5...

Страница 4: ...ll grate 1 pc Charcoal grate 1 pc Upper ash tray 1 pc Base 1 pc Upper air vent 1 set Bottom air vent 1 pc Spring clip 3 pcs Leg long 1 pc Leg short 2 pcs Wire shelf 1 pc Wheels and wheel covers 2 pcs...

Страница 5: ...crew them together using the nuts Insert the wheel covers Assembling the air vents and handles 1 Attach the lower air vent to the bowl as shown in the picture on the left above 2 Attach the upper air...

Страница 6: ...clean the grill grate charcoal grate and the entire grill 2 Rinse completely with water 3 Dry completely with paper towels Do not let the grill air dry 4 Brush vegetable oil onto the metal surfaces t...

Страница 7: ...e produkter f r att t nda grillen 3 Spruta aldrig t ndv tska eller liknande produkter p gl dande kol eftersom det kan flamma upp h ftigt 4 L gg inte p locket f rr n kolen b rjar gl da 5 F rvara inte f...

Страница 8: ...llgaller 1 st Kolgaller 1 st vre askbricka 1 st Fj derkl mma 3 st Underdel 1 st Ben l ngt 1 st Ben kort 2 st Tr dhylla 1 st vre draglucka 1 sats Nedre draglucka 1 st Hjul med hjulsidor 2 st Nedre askb...

Страница 9: ...kruva sedan fast med passande mutter Tryck fast hjulsidorna Montering av dragluckor och handtag vriga delar 1 Placera den nedre askbrickan p fj derkl mmorna 2 Placera den vre askbrickan i botten p und...

Страница 10: ...t vatten med diskmedel f r att reng ra grillgaller kolgaller och grillens in och utsida 2 Sk lj noga med vatten 3 Torka helt torrt med hush llspapper l t inte grillen sj lvtorka 4 Stryk matolja p meta...

Страница 11: ...ptenning av griller Bruk aldri bensin eller liknende produkter for tenne grillen 3 Sprut aldri tennv ske eller lignende produkter p gl dende kull det kan flamme opp kraftig 4 Lokket m ikke legges p f...

Страница 12: ...luke 1 stk Nedre lufteluke 1 stk Fj rklemme 3 stk Ben langt 1 stk Ben kort 2 stk Tr dhylle 1 stk Hjul og hjulsidene 2 stk H ndtak 2 stk Nedre askebrett 1 stk Montering Kontroller at alle deler er med...

Страница 13: ...e beina og skru deretter fast med mutter Trykk hjulsidene fast Montering av ventilluke og h ndtak 1 Monter det nedre spjeldet p underdelen som vist p bildet til venstre ovenfor 2 Monter det vre spjeld...

Страница 14: ...1 Bruk varmt vann med oppvaskmiddel for rengj re grillrist kullgitter og grillens inn og utside 2 Skyll grundig med vann 3 T rk den godt med husholdningspapir la ikke grillen luftt rke 4 Stryk p mato...

Страница 15: ...ini tai muita vastaavia tuotteita 3 l ruiskuta sytytysnestett tai vastaavaa tuotetta hehkuviin hiiliin Ne saattavat leimahtaa voimakkaasti 4 Aseta grillin kansi paikalleen vasta kun hiilet alkavat heh...

Страница 16: ...l 1 kpl Ylempi tuhka astia 1 kpl Pohja 1 kpl Ylempi luukku 1 sarja Alempi luukku 1 kpl Jousikiristin 3 kpl Pitk jalka 1 kpl Lyhyt jalka 2 kpl Ritil hylly 1 kpl Py r t ja py rien sivut 2 kpl Alempi tuh...

Страница 17: ...uvaa ne kiinni sopivilla muttereilla Paina py rien sivut kiinni Luukkujen ja kahvojen asentaminen 1 Asenna alempi vetoluukku alaosaan vasemmalla ylh ll olevan kuvan mukaan 2 Asenna ylempi vetoluukku k...

Страница 18: ...nen puhdistus 1 Puhdista grilliritil hiiliritil ja grillin ulko ja sis puoli l mpim ll vedell ja tiskiaineella 2 Huuhtele hyvin vedell 3 Kuivaa kunnolla talouspaperilla l j t grilli kuivumaan itseksee...

Страница 19: ...ukte auf gl hende Kohlen spr hen da hierdurch eine Stichflamme entstehen kann 4 Den Deckel erst aufsetzen wenn die Kohle zu gl hen beginnt 5 Eine Flasche mit Anz ndfl ssigkeit nicht in der N he des an...

Страница 20: ...k Obere Ascheschale 1 Stck Federklemme 3 Stck Unterteil 1 Stck Bein lang 1 Stck Bein kurz 2 Stck Gitterablage 1 Stck Oberer L ftungs schieber 1 Satz Unterer L ftungsschieber 1 Stck Rad mit Radkappen 2...

Страница 21: ...n passenden Muttern festschrauben Die Radkappen fest andr cken Montage von L ftungsschiebern und Griffen Sonstige Teile 1 Die untere Ascheschale auf den Federklemmen platzieren 2 Die obere Ascheschale...

Страница 22: ...inigung 1 Warmes Wasser mit Sp lmittel zum Reinigen des Grillrosts Kohlenrosts und der Au en und Innenoberfl chen des Grills verwenden 2 Gr ndlich mit Wasser sp len 3 Mit Haushaltspapier komplett abtr...

Страница 23: ...23...

Страница 24: ...boks 485 Sentrum 0105 OSLO Suomi Asiakaspalvelu puh 020 111 2222 s hk posti asiakaspalvelu clasohlson fi Internet www clasohlson fi Osoite Clas Ohlson Oy Maistraatinportti 4 A 00240 HELSINKI Great Bri...

Отзывы: