background image

English

UNITED KINGDOM •


customer service

  e-mail [email protected]  returns address: Clas Ohlson Ltd, The Archway, 7-9 West Street, Reading, Berkshire, RG1 1TT

Ver

. 20201214

Folding Side Screen

Art. no  31-6199
  

Please read the entire instruction manual before using the  
product and then save it for future reference.
We reserve the right for any errors in text or images and any 
necessary changes made to technical data. In the event of 
technical problems or other queries, please contact our  
Customer Services.

Installation

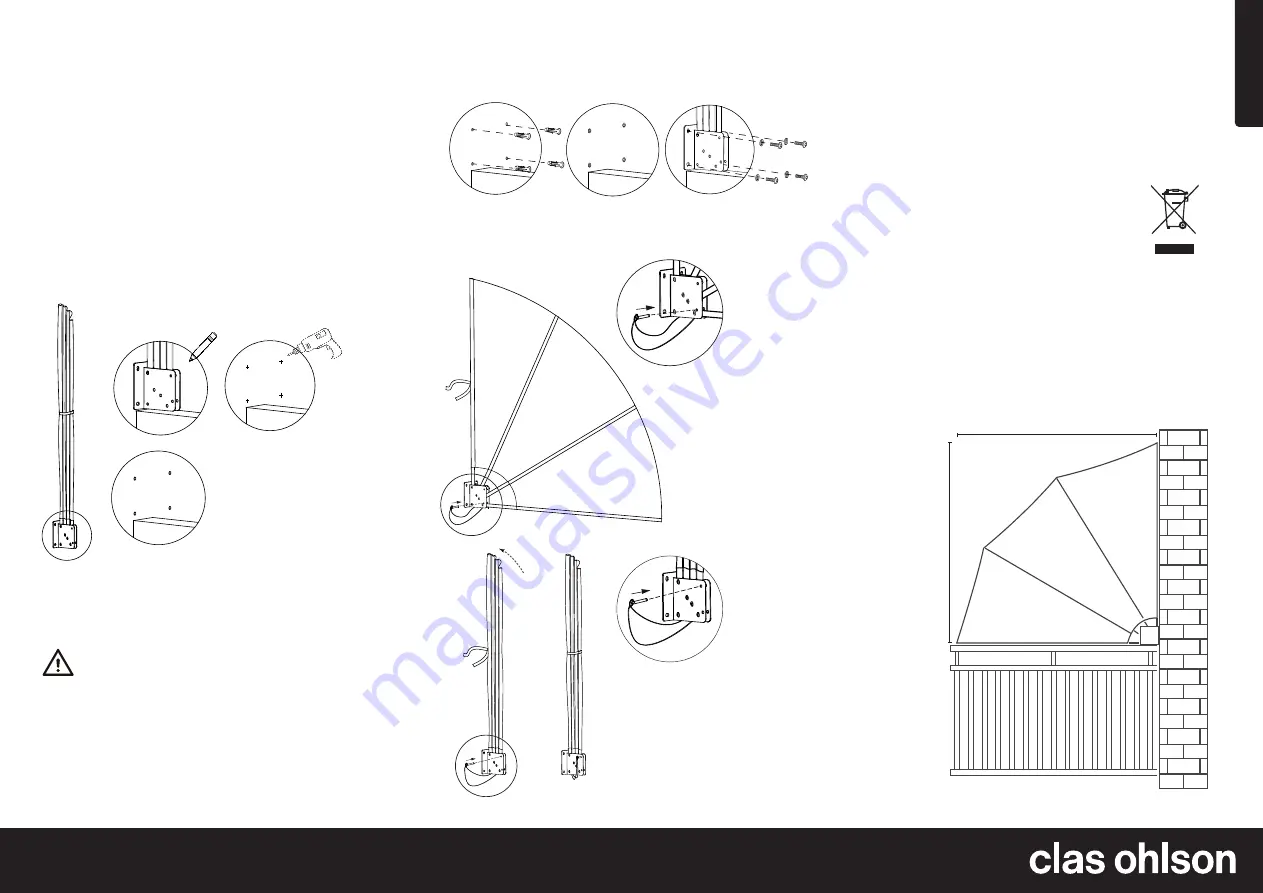
1.  Using the wall bracket as a guide, mark out the position of 

the mounting holes. If using the included screws and wall 
plugs, the holes should be drilled using a 10 mm drill bit.

Use fasteners (screws/wall plugs) suitable for the wall material 
and ensure that there are no electrical wires or water pipes in 
the wall where you intend to drill/screw.

2.  Screw the side screen to the wall.

4.  To close the side screen, remove 

the locking pins, fold up the screen, 
put the locking pins back into their 
respective holes and tie the bundled 
screen together using the hook-
and-loop strap.

Care and maintenance

Clean the product by wiping it with a damp cloth. Use only  
mild cleaning agents, never solvents or corrosive chemicals.

Responsible disposal

The product should be disposed of in accordance 
with local regulations. If you are unsure how to  
proceed, contact your local council.

Specifications

Height:

   117 cm

Length:

   117 cm

117 cm

117 cm

3.  Pull out the locking 

pins, open the side 
screen and lock it open 
by inserting the locking 
pins into their respective 
holes again.

Содержание 31-6199

Страница 1: ...10 mm drill bit Use fasteners screws wall plugs suitable for the wall material and ensure that there are no electrical wires or water pipes in the wall where you intend to drill screw 2 Screw the side screen to the wall 4 To close the side screen remove the locking pins fold up the screen put the locking pins back into their respective holes and tie the bundled screen together using the hook and l...

Страница 2: ... lämplig fästmetod skruv plugg etc och försäkra dig om att inga el eller vattenledningar finns i väggen underlaget där du ev avser att skruva borra 2 Skruva fast vind och insynsskyddet på väggen underlaget 4 Efter användning drar du ut låssprintarna viker ihop vind och insynsskyddet sätter tillbaka sprintarna i respektive hål och drar ihop med kardborreremmen Skötsel och underhåll Rengör produkten...

Страница 3: ... mm bor Bruk en festemetode skruer eventuelt plugger som er egnet for veggkonstruksjonen og forsikre deg om at det ikke fer el installasjoner eller vannrør i veggen der du skal skru bore 2 Skru fast vind og innsynsskjemen på veggen underlaget 4 Etter bruk trekker du ut låsesplintene bretter sammen skjermen setter låsesplintene på plass igjen og bunter alt sammen med borrelåsremmen Vedlikehold Reng...

Страница 4: ...poraa reiät 10 mm n poranterällä Käytä seinämateriaalille pinnalle sopivaa kiinnitystapaa ruuvi tulpat jne Varmista että poraus ruuvauskohdassa ei ole sähkö tai vesijohtoja 2 Ruuvaa tuuli ja näkösuoja seinään pintaan 4 Käytön jälkeen vedä lukitsimet ulos laskosta tuuli ja näkösuoja työnnä lukitsimet takaisin omiin reikiinsä ja niputa suoja tarranauhalla Huolto ja kunnossapito Pyyhi tuote kevyesti ...

Страница 5: ...el etc und sicherstellen dass dort wo ggf gebohrt oder geschraubt wird keine Strom oder Wasserleitungen verlaufen 2 Den Wind und Sichtschutz an der Wand bzw an der Oberfläche festschrauben 4 Nach der Benutzung die Verriege lungsstifte herausziehen den Wind und Sichtschutz einklappen die Streben zurücksetzten und mit dem Klettriemen zusammenziehen Pflege und Wartung Das Produkt mit einem feuchten T...

Отзывы: