Clarke CECS405C Скачать руководство пользователя страница 12

12

Parts & Service: 020 8988 7400 / E-mail: [email protected] or [email protected]

CHAIN TENSION

Correct chain tension is extremely important and must always be checked 
before starting work.

When using the chainsaw for the first time (or after replacing the chain) the 
tension should be checked regularly, as a new chain will stretch after several 
cuts. 

If the chain is too loose or too tight, the sprocket, bar and chain will wear more 
rapidly. The tension should be sufficient to keep the chain snug on the bar, but 
loose enough to allow the chain to be pulled around by hand. Taking time to 
adjust the chain tension correctly will result in improved cutting performance 
and prolonged chain life. 

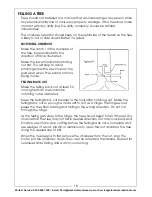
TO ADJUST THE CHAIN TENSION.

1. Ensure the chain brake lever is in 

the 

released 

position (pulled back 

towards the handle).

WARNING: ALWAYS DISCONNECT THE CHAINSAW FROM THE POWER 
SUPPLY BEFORE ADJUSTING THE BLADE TENSION.

WARNING: THE CUTTING EDGES OF THE SAW CHAIN ARE SHARP. ALWAYS 
WEAR PROTECTIVE GLOVES WHEN HANDLING THE CHAIN.

WARNING: ALWAYS MAINTAIN CORRECT BLADE TENSION TO REDUCE THE 
RISK OF KICKBACK, A LOOSE CHAIN MAY JUMP OUT OF THE CHAIN BAR 
GROOVE AND INJURE THE OPERATOR OR DAMAGE THE CHAINSAW.

WARNING: MAKE SURE THAT YOU HAVE READ AND UNDERSTOOD ALL OF 
THE SAFETY WARNINGS BEFORE CONTINUING WITH THIS SECTION.

WARNING: ALWAYS WEAR PROTECTIVE GLOVES WHEN ADJUSTING THE 
CHAIN TENSION. 

WARNING: NEVER CHECK OR ADJUST THE CHAIN TENSION WHEN THE 
CHAINSAW IS CONNECTED TO THE MAINS SUPPLY.

Содержание CECS405C

Страница 1: ...WARNING Read these instructions before using the machine OPERATION MAINTENANCE INSTRUCTIONS LS1116 ELECTRIC CHAINSAW MODEL NO CECS405C PART NO 3402073...

Страница 2: ...e date of purchase Please keep your receipt as proof of purchase This guarantee is invalid if the chainsaw is found to have been abused or tampered with in any way or not used for the purpose for whic...

Страница 3: ...use reduces the risk of electric shock 4 Use outdoor extension leads If working outdoors always use an approved cable extension suitable for the power rating of this tool see specifications the condu...

Страница 4: ...entive safety measures reduce the risk of starting the power tool accidentally 4 Store idle tools out of the reach of children and do not allow persons unfamiliar with the power tool or these instruct...

Страница 5: ...esult in personal injury 6 Always keep proper footing and operate the chainsaw only when standing on fixed secure and level surface Slippery or unstable surfaces such as ladders may cause a loss of ba...

Страница 6: ...cautions as given below 1 Maintain a firm grip with thumbs and fingers encircling the chainsaw handles with both hands on the saw and position your body and arm to allow you to resist kickback forces...

Страница 7: ...electric shock and personal injury Warning Read this user guide thoroughly before use and keep in a safe place for future reference Warning Wear safety goggles ear protectors and safety helmet when us...

Страница 8: ...et could cause an electrical hazard If the colours of the wires in the power cable of this chainsaw do not correspond with the markings on the terminals of your plug proceed as follows The wire which...

Страница 9: ...ational com OVERVIEW 1 Chain 9 Oil Filler Cap 2 Chain Bar 10 Oil Level Window 3 Chain Brake Lever 11 Chain Scabbard 4 Front Handle 12 Gripping Teeth 5 Trigger Lock 13 Air Intake 6 On Off Switch 14 Bla...

Страница 10: ...is available from your CLARKE dealer part number 3050865 4 Refit the oil filler cap 5 Wipe up any spillage before continuing 6 The oil level should be checked frequently during use and topped up as n...

Страница 11: ...into the channel shown 4 Put the chain onto the bar The chain bar is marked with an arrow showing the direction in which the chain will travel 5 Make sure all the chain links are seated correctly int...

Страница 12: ...result in improved cutting performance and prolonged chain life TO ADJUST THE CHAIN TENSION 1 Ensure the chain brake lever is in the released position pulled back towards the handle WARNING ALWAYS DIS...

Страница 13: ...nwards at the centre of the bar The chain is correctly adjusted when gentle pulling only results in it moving 2 4 mm away from the chain bar See centre diagram below 5 When the chain tension is correc...

Страница 14: ...gging material which stops the chain if cut Safety boots with toe and shin protection Close fitting hi visibility jacket CONNECTING TO THE POWER SUPPLY To prevent strain on the cable during use 1 Make...

Страница 15: ...e each use The purpose of the chain brake test is to reduce the possibility of injury due to kickback 1 Pull the chain brake lever towards the front handle to release the chain brake 2 Make sure that...

Страница 16: ...your finger and thumbs should encircle the handles Keep your body to the left of the blade at all times 4 Start the chainsaw by pushing the trigger lock button with your thumb and squeezing the trigge...

Страница 17: ...ee will fall Remove dirt stones loose bark nails staples and wire from the tree WARNING WHEN BUCKING AND FELLING OPERATIONS ARE BEING PERFORMED BY TWO OR MORE PERSONS AT THE SAME TIME THE FELLING OPER...

Страница 18: ...en the second notch is being made FELLING BACK CUT Make the felling back cut at least 50 mm higher than the horizontal notching cut as illustrated Keep the felling back cut parallel to the horizontal...

Страница 19: ...ground Remove the small limbs in one cut as illustrated below Branches under tension should be cut from the bottom up to avoid binding the chainsaw WARNING DO NOT REMOVE ANY BRANCHES THAT ARE SUPPORT...

Страница 20: ...possible the log should be raised and supported by the use of limbs logs or chocks Follow the simple directions for easy cutting SUPPORTED ALONG ITS ENTIRE LENGTH When the log is supported along its...

Страница 21: ...bucking the lower 2 3 to meet the first cut When bucking on a slope always stand on the uphill side of the log as illustrated ibelow When cutting through to maintain complete control release the cutti...

Страница 22: ...air NOTE Do not use chemical alkaline abrasive or other aggressive detergents or disinfectants to clean this chainsaw as they might be harmful to its surfaces 4 Check for worn or damaged parts Replac...

Страница 23: ...a spray of oil within seconds of the chainsaw starting 3 Check the drive sprocket Have it replaced by an authorised service centre or a similarly qualified person 4 Clear residue from the rails on th...

Страница 24: ...ce department on 0208 988 7400 to have it checked and repaired STORAGE Switch the chainsaw off and disconnect it from the power supply Clean the chainsaw as described on page 22 Store the chainsaw and...

Страница 25: ...25 Parts Service 020 8988 7400 E mail Parts clarkeinternational com or Service clarkeinternational com DECLARATION OF CONFORMITY...

Страница 26: ...26 Parts Service 020 8988 7400 E mail Parts clarkeinternational com or Service clarkeinternational com DECLARATION OF CONFORMITY...

Страница 27: ...PROTECTIVE EQUIPMENT A wide range of Personal Protective Equipment suitable for use when using a chainsaw CHAINSAW OIL 1 Litre Part number 3050865 CHAINSAW CHAIN SHARPENER ECSS 2 Electric Chainsaw Sh...

Страница 28: ......

Отзывы: