background image


                                        9


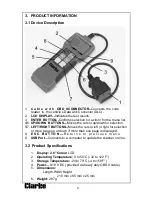
3.   PRODUCT INFORMATION


3.1 Device Description
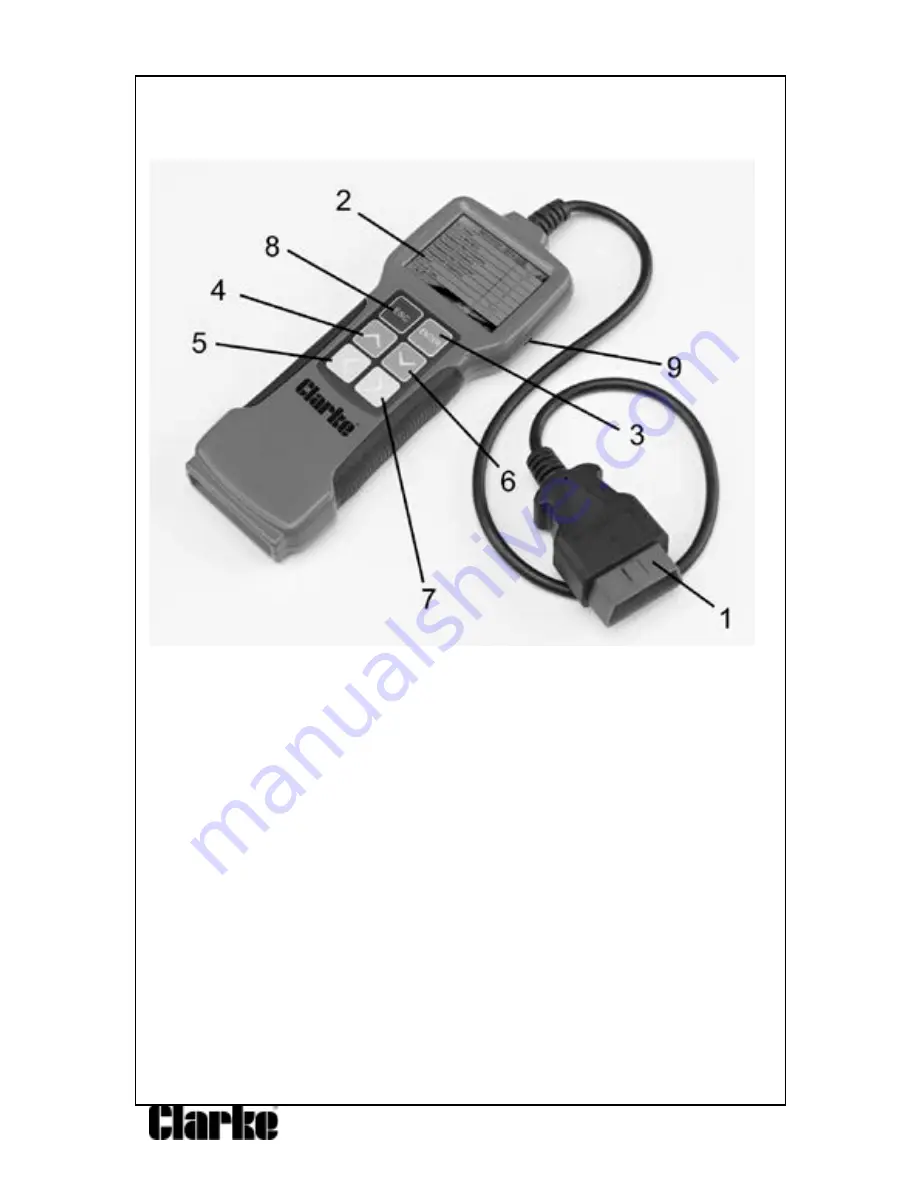


1.   

C a b l e   w i t h   OBD  II CONNECTOR--

Connects  the  code 

reader  to  the vehicle’s Data Link Connector (DLC). 

2. 

LCD  DISPLAY--

Indicates the test results. 

3.   

ENTER  BUTTON--

Confirms selection (or action) from a  menu list.


4/6.

 UP/DOWN  BUTTONS—

Moves the cursor up/down for selection. 

5/7. 

LEFT/RIGHT BUTTONS--

Moves the cursor left or right for selection 

or move page up or down if more than one page is displayed.


8.  

E S C   B U T T O N —

R e t u r n s   t o   p r e v i o u s   m e n u .  

9.  

USB Port

—Connects to a computer to update the scanner on-line. 


3.2  Product Specifications


1.  

Display: 2.8” Colour 

LCD 

2.   

Operating Temperature: 

0 to 50°C (-32 to 122 F°) 

3.  

Storage Temperature: 

-20 to 70°C (-4 to 158 F°) 

4.  

Power

—8-18 V DC (provided via heavy duty OBD II cable) 

5.   

Dimensions:


Length Width Height 

210 mm x 85 mm x 25 mm  

6.   

Weight: 

287g  

Содержание 4501130

Страница 1: ...EOBD ENGINE FAULT CODE READER Model No CEOBDPRO Part No 4501130 USER INSTRUCTIONS GC04 14...

Страница 2: ...4 OBD II Readiness Monitors 6 2 5 OBD II Monitor Readiness Status 6 2 6 OBD II Terminology 7 2 7 Vehicle Coverage 8 3 PRODUCT INFORMATION 3 1 Device Description 9 3 2 Product Specifications 9 3 3 Acce...

Страница 3: ...ety Precautions and Warnings To prevent personal injury or damage to vehicles and or the Scan Tool read this instruction manual first and observe the following safety precautions as a minimum whenever...

Страница 4: ...of Check Engine or Service Engine Soon The system will also store important information about the detected malfunction so that a technician can accurately find and fix the problem Here below follow th...

Страница 5: ...DLC Data Link Connector or Diagnostic Link Connector is the standardized 16 cavity connector where diagnostic scan tools interface with the vehicle s on board computer The DLC is usually located 12 i...

Страница 6: ...sors watching for engine misfire and monitoring fuel demands Non Continuous Monitors Unlike the continuous monitors many emissions and engine system components require the vehicle to be operated under...

Страница 7: ...wertrain Control Module PCM OBDII terminology for the on board computer that controls engine and drivetrain Malfunction Indicator Light MIL Malfunction Indicator Light Service Engine Soon Check Engine...

Страница 8: ...trim value engine coolant temperature ignition timing advance or closed loop status Fuel Trim FT Feedback adjustments to the base fuel schedule Short term fuel trim refers to dynamic or instantaneous...

Страница 9: ...LEFT RIGHT BUTTONS Moves the cursor left or right for selection or move page up or down if more than one page is displayed 8 E S C B U T T O N R e t u r n s t o p r e v i o u s m e n u 9 USB Port Conn...

Страница 10: ...ay be found for some vehicles and you will need to remove it before plugging in the OBDII cable 2 Plug the OBDII cable into the vehicle s DLC 3 5 Device Tool Setup Select Tool Setup in the Main Menu a...

Страница 11: ...ow Press or to select ON OFF and press ENTER to confirm Unit of Measurement Set the Unit of Measurement Choose Beep and press ENTER The screen will display the interface as shown below Time and Date S...

Страница 12: ...below Press or to select recording ON OFF and press ENTER to confirm 4 OPERATION 4 1 Connection 1 Turn the ignition off 2 Locate the vehicle DLC 3 Plug the OBDII cable into the vehicle 4 Turn the igni...

Страница 13: ...ing Press ESC to back to the Main Menu of Diagnostic The screen will display as follows 4 2 1 Read Codes Select Read Codes and press ENTER in Diagnostic Menu If there are any codes the screen will dis...

Страница 14: ...so show the content of the code below the number of code You can use the key to view the next code After viewing all the codes you can press ESC to return to the Diagnostic Menu 4 2 2 Erase Codes Sele...

Страница 15: ...y the Government to meet Federal clean air standards I M Readiness indicates whether or not the various emissions related systems on the vehicle are operating properly and are ready for Inspection and...

Страница 16: ...w other data of vehicle Press ENTER to return to Diagnostic Menu N A means not available on this vehicle INC means incomplete or not ready OK means Completed or Monitor OK 4 2 4 Data Stream Press the...

Страница 17: ...ow Select View All Items and press the ENTER button The screen will display the interface as shown below You can use the LEFT RIGHT buttons to view other data streams Press ENTER to return to Diagnost...

Страница 18: ...g ENTER the screen will display the interface as shown below Press ESC to return to the Diagnostic Menu Select View Graphic Items in Data stream menu and press ENTER and the screen will display the in...

Страница 19: ...a snapshot of the operating conditions at the time of an emission related fault Note if DTCs were erased Freeze Frame Data may not be stored in the vehicle memory depending on the vehicle Select Freez...

Страница 20: ...ddition not all vehicles support the Oxygen Sensors screen For results of the latest mandated on board oxygen sensor monitoring test see the graph below Select O2 Sensor Test in the Diagnostic menu an...

Страница 21: ...n below Press ESC to return to Diagnostic Menu 4 2 7 On board monitor test This function can be utilized to read the results of on board diagnostic monitoring tests for specific components systems Sel...

Страница 22: ...n Refer to the vehicle procedures necessary to stop the test Select EVAP System Test and press ENTER The screen will display the relative information about the EVAP system Some vehicle manufacturers d...

Страница 23: ...It can be switched on by pressing the LEFT RIGHT key to input number After you input the code number press ENTER to view the definition of the code After viewing the definition press ESC to return to...

Страница 24: ...w The recorded DTC will be displayed as shown You can use the keys and press the ENTER button to view detailed information 2 Review Data stream The operation is similar to the Review DTC function 3 Re...

Страница 25: ...operation is similar to the Delete DTC 4 5 Help This function is used to view Tool Information About OBD and About Data stream Tool Information includes software version hardware version serial numbe...

Страница 26: ......

Страница 27: ...27 6 DECLARATION OF CONFORMITY...

Страница 28: ......

Отзывы: