background image

39

13. Match brightness first. Move the selector arrow to 

White Balance – All.

• With the left key, reduce the brightness until 

it matches the baseline display. 

• Select the individual colors and adjust the 

amounts of Red, Green and Blue to achieve 
the best match in color and brightness to the 
baseline display. 

14. When each display matches in white, change 

T

EST


P

ATTERN

 to Gray so the displays show an internal 

gray pattern.

• The gray values range from 0 to 15, and they 

are all now set at 7. Therefore, gray can be 
adjusted up and down. Choose which dis-
play has a middle brightness and that has 
very little color in gray. This is the display 
you will match to. It 

does not

 have to be the 

same as the display chosen for white bal-
ance. 

15. When the displays match in gray, turn off the test 

pattern on each display with the top item in the 

C

OLOR

 B

ALANCE

 menu. 

C

OPY


TO

 C

LIPBOARD

 will save all the current settings to a 

temporary memory. You can then make more 
adjustments to see if it gets better or worse. R

ECALL


FROM

 C

LIPBOARD

 will restore these saved settings. The 

clipboard is only for testing. These values are not saved 
when AC power is off. 

While color balancing, change the White value by a lot, 
not just one step. It’s difficult to see one step in White. A 
large change will tell you if you are heading in the right 
direction. 

If you can’t decide which way to go or how to get this 
display closer to the others, try any change. If it is the 
wrong change, it will be quickly obvious, and you can 
go back. Use the clipboard. 

Color balance values are saved for all input sources in 
the same memory location. Color balance is the same 
for all sources

When adjusting 

WHITE


BALANCE

 - 

ALL

 you may not see all 

three of the red, green, and blue numbers decrement or 
increment. This because the 

ALL

 choice adjusts the 

colors in proportion to each other, so that the color 
remains constant as you adjust the brightness. For 
example, if you have the color set at Red-100 Green-80 
and Blue-40 and adjust down 10 clicks, you will wind 
up with Red-90, green-72 and Blue-36. The color has 
remained the same and only the brightness has 
changed. Green and blue did not change on every one 
of the ten clicks.

The 

Bengal

 has a feature that allows a boost in the 

whites. When this is on, Color Balance will become 
more difficult but will allow for brighter whites.

The 

Bengal

 has a gamma control which allows the user 

to choose between Video and Film gamma in the color 
balance menu.

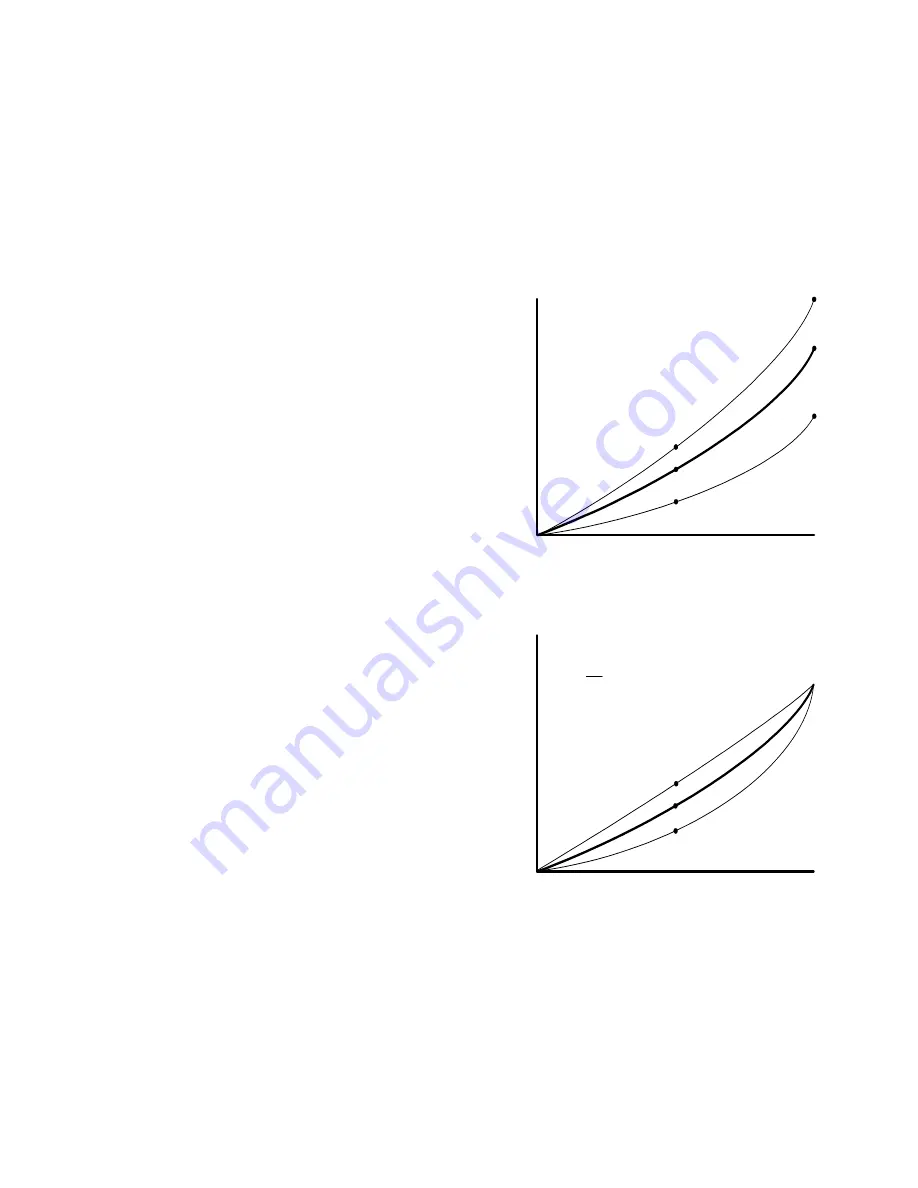
Changes in the White values

affect the Gray values.

Changes in the

Gray value move

this mid point.

Input Signal

Out

p

u

t bri

g

ht

n

ess

Input Signal

Outp

ut brightne

s

s

Changes in the

White value moves

this end point.

Changes in the Gray values do

not affect the White values.

Black

White

Dark

Bright

31

0

0

15

100

Содержание Bengal SN-6010-720

Страница 1: ...Bengal SN 6010 720 User Guide ...

Страница 2: ......

Страница 3: ...i SN 6010 720 Bengal 60 Video Display Unit User Guide 070 0147 01 19 October 2004 ...

Страница 4: ...information contained in this document is subject to change without notice Company makes no warranty of any kind with regard to this material While every precaution has been taken in the preparation of this manual shall not be liable for errors or omissions contained herein or for incidental or consequential damages in connection with the furnishing performance or use of this material LIMITED WARR...

Страница 5: ...ing Clarity will have a reasonable time to make repairs to replace Products or to credit Buyer s account LIMITATIONS Any written warranty offered by Clarity is in lieu of all other warranties express or implied Clarity neither assumes nor authorizes any other person to assume any other liabilities in connection with the sales or use of any product without limitation Clarity disclaims all other war...

Страница 6: ...iv ...

Страница 7: ...BENGAL USER GUIDE PART NUMBER 070 0147 01 DATED 19 OCTOBER 2004 You may fax this form to Attention Manuals at Or you may email comments and corrections to If you use email please mention the 070 part number listed above What I like about this manual We love to read this part What I don t like about this manual We read this part too Error s I found in the manual Yipes We thought we were perfect In ...

Страница 8: ......

Страница 9: ...stalling the Bengal 16 2 4 Connecting Source Cables 18 2 5 Connecting RS232 RS485 Cables 20 3 Adjusting 21 3 1 Aligning the Image 22 3 2 Adjusting Bengal To Its Source 26 3 2 1 Adjusting to Computer Sources 28 3 2 2 Adjusting Frequency and Phase 30 3 2 3 Adjusting to Computer Sources Digital 32 3 2 4 Adjusting to Video Sources 34 3 3 What Does Colorspace Mean 36 3 4 Color Balancing Bengal 38 3 5 S...

Страница 10: ... Numeric Display 48 4 3 Controlling Bengal with Remote 50 4 4 Controlling Bengal with RS232 RS485 52 5 Maintenance 55 5 1 Changing a Lamp 56 5 2 Changing the Air Filter 58 5 3 Cleaning the Screen 60 6 Reference Section 61 6 1 Remote Control Functions 62 6 5 Connector Wiring 98 6 7 Meaning of Terms 104 Index 113 ...

Страница 11: ...1 1 Introduction 1 1 About the Bengal 2 1 2 Accessories for Bengal 4 1 3 Using the Remote Control 6 1 4 Your Safety is Important 8 ...

Страница 12: ...blue and red A composite video input is available on a yellow RCA connector Audio There are three stereo audio inputs using RCA connectors There is an output connection for exter nal stereo speakers as well as a line out to be used as an input to an external stereo amplifier Communication Communicating with the Bengal will be done via an RJ45 RS232 input or an RJ45 RS485 input Loop through from ei...

Страница 13: ...3 ...

Страница 14: ...Wall Mounting Bar 1 Lower Retaining Bracket 1 Remote Control with batteries 1 Quick Start Card T25 L Key Torx Wrench RemovableI Ocover Customer furnished parts If you will be controlling the Bengal via RS232 or RS485 you will need CAT 5 cables with straight through wiring and RJ45 connectors on each end International customers will need to furnish their own power cables that conform to their count...

Страница 15: ...5 Power Cable Remote Control T 25 L Key Torx Wrench VGA Cable Lower Retaining Bracket Wall Mounting Bracket Removable I O Cover 8 32x3 8 pan head screws ...

Страница 16: ...e performed with the remote control Later RS232 control may be used The remote control shown below lets you control the Bengal and get it setup and adjusted initially For a complete description of remote control func tions See 6 1 Remote Control Functions on page 62 ...

Страница 17: ...7 ...

Страница 18: ...ical interlock on the screen Removing the screen does not turn off the high voltage to the lamp WARNING Possible UV exposure Use protective eye wear while operating with viewing screen removed CAUTION There are no user serviceable parts inside Refer all repair and maintenance to a qualified service technician WARNING There are protective electrical interlocks behind the left and right access panel...

Страница 19: ...9 ...

Страница 20: ...10 ...

Страница 21: ...11 2 Installation 2 1 What You Will Do 12 2 2 Unpacking the Bengal 14 2 3 Installing the Bengal 16 2 4 Connecting Source Cables 18 2 5 Connecting RS232 RS485 Cables 20 ...

Страница 22: ...r optional stand 14 DO NOT lay the Bengal on its back or face 3 Connect the source cables Data Video Audio 18 4 Connect control cables if needed RS232 RS485 20 5 Connect Power 18 6 Turn on power switch 22 7 Press the on button on the remote control 46 8 Press the source button to select source 62 Configuration 1 Align the image 22 2 Adjust data input levels 28 3 Adjust frequency and phase 30 4 Adj...

Страница 23: ...13 ...

Страница 24: ...r board accessory holder You may want to install the wall mounting bracket from the accessory kit on a wall or optional stand before unpacking the rest of the way This would provide a safe place for the Bengal 3 Remove the three foam pieces from the top of the Bengal 4 Slide the box sleeve up and off of the Bengal 5 Lift the Bengal out of the box and remove the plastic Be sure that you have a safe...

Страница 25: ...15 ...

Страница 26: ...e to the weight of the Bengal there must be bolts placed within 7 5 inches from each end The inset on the illustration highlights a pin on the main wall mounting bracket that mates with a hole in the slot on the back of the Bengal CAUTION Do not lay the Bengal on its face or on its back It must be kept upright at all times Mounting Bengal on a wall 1 Install wall mounting bracket bar on wall Make ...

Страница 27: ...mounting surface with appropriate hardware and slots Locate the bracket on the mounting surface using the locating marks made when it was on the display Hang the display on the mounting bracket Secure the display to the lower retaining bracket leave the screws a little loose to allow for adjust ment Use the hardware provided Do not push or pull the display to align it with the slotted holes in the...

Страница 28: ...tor S Video on a 4 pin DIN connector and Component video on red Pr green Y and blue Pb RCA connectors All three are compatible with NTSC PAL and SECAM Audio Connections There are three stereo audio inputs using RCA connectors There is one stereo audio line out out put using RCA connectors and one pair of switchable 3 5mm monaural audio connectors for external speakers When external speakers are us...

Страница 29: ...19 Bengal Signal Input Panel Left Side View Data Inputs Control Inputs and Loop thru Video Inputs Audio Inputs and Outputs ...

Страница 30: ...ch unit this is Connect this first Bengal s RS485 Out to the next unit s RS485 In Start with RS232 and loop all the rest with RS485 The last dispplay in a group should not usually need termination however if you are experiencing problems try terminating the last display by going to MAIN MENU ADVANCED OPTIONS SERIAL PORT SETTINGS and checking the TERMINATE RS485 box at the bottom of the menu Wiring...

Страница 31: ...usting to Computer Sources 28 3 2 2 Adjusting Frequency and Phase 30 3 2 3 Adjusting to Computer Sources Digital 32 3 2 4 Adjusting to Video Sources 34 3 3 What Does Colorspace Mean 36 3 4 Color Balancing Bengal 38 3 5 Scaling and Cropping 40 3 6 Saving Your Work and Recalling a Memory 42 ...

Страница 32: ... angle lens that allows it to be so thin causes the image to be distorted and undisplayable at the edges As a result the native 1280x720 engine resolution is not viewable on the screen The effective resolution of the display i e the number of pixels visible on the screen is about 1232x693 pixels but may vary slightly from unit to unit Because the position of internal mirrors and lenses may shift v...

Страница 33: ... on page 25 Squaring the image is be done by adjusting the small mirror behind the center access panel Use the supplied Torx wrench to make the adjust ments Loosening all three screws exactly the same amount will make the image bigger Adjusting them in will make it smaller Adjusting screws 2 and 3 the same amount will adjust the width of the top of the screen Adjusting screw 1 will adjust the widt...

Страница 34: ...allow the screen to moved out or in to compensate for the bowing The images at the right show the location of these screws 1 Loosen the three screws at the top of the screen 2 Grip the edge of the screen at the top and If the image is bowed down pull the top of the screen forward If the image is bowed up push the top of the screen back 3 Tighten the screws Image bowed down at the top of the screen...

Страница 35: ...ect GRID In the IMAGE ALIGNMENT menu select PAN IMAGE A Pan Image adjustment box I will open as shown below When Pan Image is selected remote control arrow keys will move the image up and down or left and right allowing you to center the image In the IMAGE ALIGNMENT menu select SHRINK GROW The SHRINK GROW adjustment box will open The remote con trol arrow keys will cause the image to grow or shrin...

Страница 36: ...32 Input Levels for video sources page 34 How does Input Level relate to Color Balance If you have more than one Bengal in the area and you want them to display identical colors you need to adjust input levels and do color balancing You can do Input Levels first or you can do Color Balance first It doesn t matter But they must both be done Input Levels and Color Balance do not affect each other bu...

Страница 37: ...27 ...

Страница 38: ...enu 3 4 Color Balancing Bengal on page 38 Adjusting levels completely automatically Open the AUTO SETUP OPTIONS menu and check DO BLACK WHITE LEVELS You can check the other items too particularly FREQUENCY and PHASE Now press SETUP Bengal looks for the darkest pixel and the brightest pixel in the picture and adjusts itself so that these are the truly the darkest and brightest When the BLACK WHITE ...

Страница 39: ...29 ...

Страница 40: ...ox from the left on the bottom row 6 Choose the paint bucket icon and click in the picture area It will fill with a checkerboard pattern 7 Save this picture as a bit map BMP file to some location on the hard drive so you can use it again Adjusting frequency manually 1 Press PICTURE on the remote This opens the PIC TURE menu See that the Source is Analog 1 or Analog 2 2 Display a checkerboard patte...

Страница 41: ...31 ...

Страница 42: ...e controls are advance level controls and should not be adjusted unless you have been briefed by the factory or are familiar with black level adjustments They are used to correct the digital blacks that come from video cards that have incorrect levels Note Don t use these controls unless you have been briefed by ClarityI or you are familiar with black level adjustments These controls are usually n...

Страница 43: ...is form of the Input Levels menu appears when the current source is Digital and the colorspace is RGB This form of the Input Levels menu appears when the current source is Digital and the colorspace is YPbPr ...

Страница 44: ... satisfactory 3 Adjust any other Bengal s so they have the same values for Contrast Brightness Saturation and Hue as the first Bengal Adjusting with color bars 1 If possible use a color bar pattern from the video source you will use for the program material You cannot use the color bar from the Test Patterns menu 2 In the Picture menu check Blue Only You should see only the alternate color bars al...

Страница 45: ...35 Saturation Match these Match these Adjust Saturation so the outside bars match when Blue Only is checked Hue Match these Match these Adjust Hue so the inside bars match when Blue Only is checked ...

Страница 46: ...sometimes called YUV and sometimes called component video DVD players often have a set of three component video connectors This makes a picture of substantially higher quality than the single conductor Video Out Video In connection Use the correct colorspace If the picture is coming from S Video Composite or the Component outputs of a DVD player the Bengal automatically sets the colorspace For Ana...

Страница 47: ...bPr signals or waveforms It is not nec essary to completely understand these waveforms However it should be clear that if the Bengal is set for one type say RGB and the signal is of the other type YPbPr the Bengal would process the color information incorrectly ...

Страница 48: ... remote control then select ing ADVANCED OPTIONS COLOR BALANCE 3 If color temperature is important you should first set the color temperature If it is not important start with the default 8500K which yields the brightest display Once you start adjusting the color temperature will automatically change to custom If you go back to a color temperature setting any custom settings will be lost 4 Set GAM...

Страница 49: ...ge will tell you if you are heading in the right direction If you can t decide which way to go or how to get this display closer to the others try any change If it is the wrong change it will be quickly obvious and you can go back Use the clipboard Color balance values are saved for all input sources in the same memory location Color balance is the same for all sources When adjusting WHITE BALANCE...

Страница 50: ...e will touch the bor ders of the display all around even if this means stretching and distorting the picture in one direction Letterbox Pillarbox means expand the picture until the first edges top bottom or left right touch the border of the display then fill in the other sides with a solid color Crop means expand the picture until the second edges touch the border and let the other edges of the p...

Страница 51: ...is overscan on page 22 It may be desirable to display 1280x720 images without any scaling Since the effective resolution of the Bengal is less than 1280x720 scaling will occur and cause some artifacts To avoid this choose ONE TO ONE for a scale mode No scaling will occur and a few pixels on the edge of the picture will be cropped off ONE TO ONE can be used for any input mode It will be cropped if ...

Страница 52: ...y you want it including all the adjustments listed in this section Then press the SAVE button twice This opens the Save grid Navigate to an unchecked slot number or to a checked slot if you want to overwrite what s already saved Press ENTER This menu shows all the data that will be saved You can t change anything but the name in this menu To save immediately press ENTER The appear ance of this men...

Страница 53: ...43 ENTER ENTER ...

Страница 54: ...44 ...

Страница 55: ...45 4 Operating 4 1 Normal Start Up 46 4 2 Reading the Alpha Numeric Display 48 4 3 Controlling Bengal with Remote 50 4 4 Controlling Bengal with RS232 RS485 52 ...

Страница 56: ...turn it on when it is hot so the fans run for a minute or so to be sure it is cool If you have turned off the lamp using the remote control the Bengal will start a 45 second cool down During this time you cannot turn the lamp on At the end of the cool down period the alpha numeric display will say READY and you can now light the lamp using the remote control ON button The Bengal will then lock on ...

Страница 57: ...47 ...

Страница 58: ...panels is open Fan Stopped high voltage power supply fan has stopped Engine Fan Stopped either the DMD fan or the lamp fan has failed HV Power Supply ballast voltage to the lamp has failed Opt Engine Com optical engine is no longer communicating with the electronics module Lamp Failed lamp not striking Cooling Down xx xx is a countdown of the num ber of seconds starting at 45 until it is ok to lig...

Страница 59: ...49 ...

Страница 60: ...e visible if the lamp is on For a complete list of all remote actions see 6 1 Remote Control Functions on page 62 If the remote doesn t work The batteries in the remote are dead or installed wrong The remote was not aimed at the screen Something is blocking the IR receiver in the Ben gal The remote control has a large spread of its IR radiation If you find you are having a difficult time controlli...

Страница 61: ...51 ...

Страница 62: ...ial loop use for the address To address a single display use the specific ID of that display such as A6 or 00 or 1B To address all the displays with a certain Group ID use an address like 3 which will address all the displays in group 3 To address all the displays with a certain Unit ID use an address like 0 or 3 When you don t know the ID of any display you can address the first one in the serial...

Страница 63: ...53 ...

Страница 64: ...54 ...

Страница 65: ...55 5 Maintenance 5 1 Changing a Lamp 56 5 2 Changing the Air Filter 58 5 3 Cleaning the Screen 60 ...

Страница 66: ...e The median lamp life for the Bengal lamp is 4000 hours If you routinely change the lamp at 4000 hours you may be throwing away thousands of hours of useful life And you may be replacing it with a lamp that is destined to last less than 1000 hours There are some actions that can shorten lamp life Turning off AC power when the lamp is on Turn off the lamp with the remote and let it cool until the ...

Страница 67: ... one that was used 8 Replace the access panel Resetting the lamp hours It is a good idea to reset the lamp hours to zero when you install a new lamp If you are replacing a lamp under warranty you will be asked how many hours were on the lamp when it failed The following menu train will lead you to Reset Lamp Hours 6 A spare lamp is provided installed on the filter housing Remove the left access pa...

Страница 68: ... inspections will give you some idea of how often the filter needs changing If it doesn t need changing after six months inspect again in a year As long as the environment doesn t change you can build an appropriate schedule in this way If new construction occurs in the vicinity of the Clarity displays watch out New construction usually means DUST Changing the Filter 1 Turn off the lamp and wait t...

Страница 69: ...59 ...

Страница 70: ...el for cleaning is Scott Shop Towels These blue lint free paper towels are generally available at auto parts stores home fix it stores and hardware stores Cheesecloth is another good choice This open weave cotton material is light and absorbent and doesn t leave lint Removing dry dust Often the cleaning problem is just dust not finger prints or other oily dirt If it s just dust wiping with a dry c...

Страница 71: ...on 6 1 Remote Control Functions 62 6 2 Menus Structures 66 6 3 Analog Mode Tables 88 6 4 Bengal Drawings 96 6 5 Connector Wiring 98 6 6 Regulatory Information 102 6 7 Meaning of Terms 104 6 8 Specifications for Bengal 106 ...

Страница 72: ...62 6 1 Remote Control Functions The next four pages explain the actions of the remote control Turns the lamp on and off See 3 1 Aligning the Image on page 22 ...

Страница 73: ...63 Starts the process of scanning the input connectors for the next available source See Saving Your Work and Recall ing a Memory on page 42 ...

Страница 74: ...Turns the curtain on and off Curtain pattern is selected in the Miscellaneous menu See page 79 Changes the value of the high lighted item In some menus like PIcture Position these buttons con trol left right movement The but ton moves you to the next menu when there is an arrow in the cur rent highlighted item Mute mutes the audio ...

Страница 75: ...ems in a menu In some menus Position Position these button control up down movement Selects the highlighted item If there is an arrow in the item this button goes to that menu Selects the previous menu See Picture on page 66 ...

Страница 76: ...ure menu when the selected source is Digital You cannot adjust Horizontal Frequency in Analog because that is determined by the source so it is grayed out In the Source item the left right keys choose the source Other items can be adjusted if they are not grayed out In most menus this area describes what the selected high lighted function will do or what it is used for Picture ...

Страница 77: ...rrectly All of the picture is shown Justify moves the picture to the top middle or bottom or to the left center or right This has no function when the Scale Mode is Fill All One to One means show the picture without any scal ing If it is larger than the display s native resolution it will be cropped if it is smaller it will be shown with a black border This is most useful for 1280x720 reso lution ...

Страница 78: ...lots are grayed out and you can t land on them Press ENTER to open the Recall detail menu The detail menu shows what will be recalled when you press ENTER again When Current appears in the Slot to Recall line it means that the Bengal is already doing exactly what this slot would tell it to do ENTER Press SAVE once to open the Recall grid directly ...

Страница 79: ...ppears if the Save to Slot number currently has something saved in it To save highlight Save Now and press ENTER A Current notice will appear in Save to Slot to indicate that the save was successful and that the slot now con tains exactly what the Bengal is doing now To change the Name of a memory slot highlight Name and press ENTER A bar appears below the name which indicates character position U...

Страница 80: ...ass response Speaker Enable disables both internal and external speakers It does not affect line out Balance use the keys on the remote control to adjust the balance between both internal and external speakers Line Out Balance use the keys on the remote control to adjust the balance between inputs to an external amplifier Use Channel 1 2 3 for selected source allows you to select which audio input...

Страница 81: ...Then adjust the other two colors until they just touch 0 also Do not push this value lower than 0 because the number will not change but the picture will get worse Now display a white picture from the source computer Select the White lev els and adjust them until the value just touches 255 Do not push them higher than 255 because the number will not change but the picture will get worse When the s...

Страница 82: ...digital level controls are not often used because most digital sources don t need them Reset is a button that will return the system to the default values for digital sources When the source is Digital and the colorspace is YPbPr See 3 3 What Does Colorspace Mean on page 36 For Analog Sources see page 71 For Video Sources see page 73 ...

Страница 83: ...urce is video correspond to similar controls on television receivers although PAL and SECAM receivers do not use a hue control The Blue Only check box is for adjusting the picture with color bars from the source See 3 2 4 Adjusting to Video Sources on page 34 For Digital Sources see page 72 For Analog Sources see page 71 ...

Страница 84: ...e this menu Lamp On when the lamp fails you can t see this menu Mode ID Each mode has a number and this is the number of the one used now For XGA for instance there are several each with a different vertical fre quency number of active lines total number of lines Last Fault Shows the last event that caused the lamp to go off and the elapsed system time not clock time in hours minutes since that ha...

Страница 85: ...r a command meant for a group of which this display is a member such as a command addressed to 3 when this display s group ID 3 Not This display a command meant for one or more other displays in this circuit but not this one such as addressed to 45 or 4 or 6 when this display s ID is 37 This display Alone a command address exclusively to this display such as addressed to 37 and this display s ID i...

Страница 86: ...u turns on a variety of internally generated test images These block any incom ing picture Be sure to choose None when you are finished testing Diagnostics Test Patterns Press MONITOR four times to open the Test Patterns menu ...

Страница 87: ...y You cannot change anything in this menu It is for refer ence only The Setup Summary menu looks different for digital or video sources Slot is only visible when the current settings are exactly the ones in a numbered memory slot ...

Страница 88: ...ning Time is the amount of time the optics have the lamp on that is how long light has gone through the optical parts of the Bengal Lamp is supposed to be the amount of time the lamp has been on but it may be only the amount of time since this meter was last reset To reset lamp hours select one of the resets press ENTER press the left arrow press ENTER again ...

Страница 89: ...le getting your video card to output a picture when attached to our display you can try disabling Plug and Play and rebooting the computer to see if it acts any better Normally Plug and Play should be enabled EDID for DVI Analog 2 allows you to set up whether you have an Analog or a Dig ital source attached to the second connector This connector shares a single EDID line between the two sources so...

Страница 90: ...ts the colors in proportion to each other so that the color remains constant as you adjust the brightness For example if you have the color set at Red 100 Green 80 and Blue 40 and adjust down 10 clicks you will wind up with Red 90 green 72 and Blue 36 The color has remained the same and only the brightness has changed Green and blue did not change on every one of the ten clicks Match the grays Adj...

Страница 91: ...inute before lighting again A rapid on off on sequence may reduce lamp life Also the lamp should be allowed to heat up for at least five minutes before turning them off Before shutting down due to a missing source Bengal will search each of the other connectors for an active source If another source is not found Lamp Saver if checked will turn off the lamp after a specified length of time When shu...

Страница 92: ... message CR carriage return LF line feed Baud Rate is 2400 4800 9600 or 19200 Terminate RS 485 Group ID can be 0 9 A Z caps only Unit ID can be 0 9 A Z caps only In combination this gives 1296 unique IDs The ID is the identification of the individual display The address is the part of an RS232 that specifies which display or displays should execute the command Put another way the ID is the number ...

Страница 93: ...ctor is lost Bengal will stop on the next con nector that has a picture sync Do Black White Levels automatically adjusts the lightest and darkest pixels to be white and black This fully automatic method is prone to small errors in the white level Semi automatic level adjustment is better Do Frequency and Do Phase automati cally adjust the electronics module to the frequency and phase of the select...

Страница 94: ...ink or grow the image all sides proportionally Test Pattern allows you to choose the Grid pattern the alignment pattern or none Reset to Default resets the image to factory reso lution Illuminate Border turns the border outside the image green If the green border is visible the picture is either not properly sized or centered ...

Страница 95: ...ess the SIZE POS to access the PIcture Position menu directly From the Main Menu select Position to access the Picture Position menu For more information on positioning and aligning the image See 3 1 Aligning the Image on page 22 ...

Страница 96: ... V Position move the location of the menus on the screen Menu Timeout sets how long menus will remain on the screen before disappearing on their own The choices are 5 15 and 60 seconds and Never Time Out which keeps the menu on indefinitely ...

Страница 97: ...87 Program Information The middle section shows the native resolution of the Bengal and the Revision number of the firmware ...

Страница 98: ...0 75 800 APP0667 APP0667_ 23 640 480 66 6 864 VGA 24 640 480 61 2 850 EIA0729X EIA0629 480i_ 4 alt 0 Yes 640 480 30 780 ITU0925X ITU0725K ITU072 alt 1 Yes 640 480 25 944 APP0667 APP0667_ alt 23 640 480 66 6 896 SMT0760 480p 480SH 480p_ alt 25 640 480 59 9 800 SMT0760 480p 480SH 480p_ alt 25 640 480 59 9 780 APP06750 67 640 870 75 832 IBM0770 PW0670 alt 17 720 350 70 1 900 DMT0785H 15 720 400 85 1 ...

Страница 99: ..._ 48 1024 768 75 1328 PW1080 49 1024 768 80 1376 APP1075 50 1024 768 74 9 1328 IBM1070 51 1024 768 70 1368 SUN1077 52 1024 768 77 1 1360 IBM1076 53 1024 768 75 8 1408 SNY1072 54 1024 768 71 8 1296 DMT1070 55 1024 768 70 1 1328 DMT1060_1 56 1024 768 60 1344 DMT1085 57 1024 768 85 1376 PW1090 58 1024 768 90 1376 APP1059 59 1024 768 59 3 1328 PW10100 60 1024 768 100 1392 DMT1043 3 Yes 1024 768 43 5 1...

Страница 100: ...88 SUN1276G SNY1276G 81 1280 1024 76 1 1664 DMT1275G HWP1275G 82 1280 1024 75 1688 DMT1260G PW1460 83 1280 1024 60 1 1688 PW1272 84 1280 1024 72 1728 DMT1243G 6 Yes 1280 1024 43 4 1696 DMT1285G 85 1280 1024 85 1728 PW1280 86 1280 1024 80 1744 SUN1267G 1267_ 87 1280 1024 66 7 1648 HWP1272G 90 1280 1024 72 1728 IBM1060Q IBM1260G HWP126 alt 74 1280 1024 60 1708 SUN1276G SNY1276G alt 81 1280 1024 76 1...

Страница 101: ...5 1136 IBM1043 2 Yes 1053 754 43 5 1286 DMT1043 3 Yes 1024 768 43 5 1264 IBM1043_ 4 Yes 1056 768 43 5 1280 NEC1140B 5 Yes 1120 750 40 1456 DMT1243G 6 Yes 1280 1024 43 4 1696 1024i 7 Yes 1024 1024 30 1 1320 IBM1352 8 Yes 1360 1024 51 5 1824 1080i29 9 Yes 1920 1080 30 2200 DMT1648 10 Yes 1600 1200 48 2160 PW0660 11 640 200 60 3 896 APP0560 APP0560B 12 512 384 60 1 640 APP0560 APP0560B alt 12 560 384...

Страница 102: ...72 PW0759 27 720 480 59 4 935 PW0775 28 720 576 75 944 DMT8075 29 800 600 75 1056 DMT0856 30 800 600 56 3 1024 PW0872 31 800 600 72 1040 DMT0860 32 800 600 60 3 1056 PW0880 33 800 600 80 1056 DMT8085 34 800 600 85 1 1048 PW0890 35 800 600 90 1056 PW08100 36 800 600 100 1072 PW08110 37 800 600 110 1072 PW08120 38 800 600 120 1088 APP0875 39 832 624 75 1 1120 DMT0872 40 800 600 72 2 1040 PW0985 41 9...

Страница 103: ...66 1528 SUN1176X 1176_ 69 1152 900 76 1 1472 SUN1176X 1176_ alt 69 1152 900 76 1 1504 DMT1275A 70 1280 960 75 1680 DMT1260A 71 1280 960 60 1800 DMT1285A 72 1280 960 85 1728 IBM1267G IBM1267_ 73 1280 1024 67 1696 IBM1060Q IBM1260G HWP126 alt 74 1024 1024 60 1408 IBM1060Q IBM1260G HWP126 74 1280 1024 60 1760 IBM1060Q IBM1260G HWP126 alt 74 1280 1024 60 1708 PW1660_1 77 1280 1024 60 1712 SUN1061Q 78 ...

Страница 104: ...0 VSC1960 alt 91 1440 1080 60 1936 VSC1660V VSC1460 VSC1960 91 1680 1080 60 2256 r1080p60 r1080p59 92 1920 1080 60 2200 1080p30 93 1920 1080 30 2200 r1080p24 94 1920 1080 24 2750 PW1960 97 1920 1200 60 2112 PW1955 98 1920 1200 55 2112 DMT1660 104 1600 1200 60 2160 PW2046 118 2048 1536 46 2240 PW2040 119 2048 1536 40 2240 Analog Modes in Mode ID Order Mode Name Mode ID Interlace Horiz Res Vert Res ...

Страница 105: ...95 ...

Страница 106: ...96 6 4 Bengal Drawings Bengal Front View Dimensions in inches ...

Страница 107: ...97 Left Side View Rear View Signal Input Panel LCD Display ...

Страница 108: ... If the color of the wires on the two connectors is the same left to right the cable is straight thru The order of the colors doesn t matter as long as they are both the same DB15 standard VGA connector Yellow wire pin 3 Black wire pin 2 Green wire pin 5 RJ45 9 pin 6 3 5 5 3 2 1 2 3 4 6 7 9 8 5 The wiring shown for this adapter is correct for straight thru network cables 1 8 RJ45 looking into the ...

Страница 109: ...nc Vsync 4 TMDS data 4 16 Hot plug detection 5 TMDS data 4 17 TMDS data 0 6 DDC clock 18 TMDS data 0 7 DDC data 19 TMDS data 0 5 shield 8 Analog vertical sync 20 TMDS data 5 9 TMDS data 1 21 TMDS data 5 10 TMDS data 1 22 TMDS clock shield 11 TMDS data 1 3 shield 23 TMDS clock 12 TMDS data 3 24 TMDS clock C1 Analog Red C3 Analog Blue C2 Analog Green C4 Analog H sync C5 Analog ground DVI Connector S...

Страница 110: ...100 4 Chrominance 0 3 V burst 75 ohms Pin Signal ...

Страница 111: ...101 ...

Страница 112: ...rates uses and can radiate radio frequency energy and if not installed and used in accordance with the instructions may cause harmful interference to radio communica tions However there is no guarantee that interference will not occur in a particular installation If this equip ment does cause harmful interference to radio or television reception which can be determined by turning the equipment off...

Страница 113: ...103 ...

Страница 114: ...with it See also unit display C Video Composite video a video distribution system in which all the video informa tion is sent on one wire DA Distribution amplifier a device that takes in one input and gives out many of the same type DAs are avail able for video computer and digital signals display One display unit without regard to oth ers that may be in a wall with it DVI Digital Video Interface ...

Страница 115: ...e Russia and the former Soviet Bloc countries Sequential Color and Memory See also NTSC and PAL Term Meaning SOG Sync on green usually for RGB sources source A source of pictures such as a com puter a VCR a DVD player or the loop thru from another Clarity cube SVGA Super VGA a standard for distributing analog computer pictures with a res olution of 800 pixels by 600 pixels S Video A video distribu...

Страница 116: ... WN 4030 WXGA Wide XGA a standard for distributing analog computer pictures with a res olution of 1280 pixels by 768 pixels XGA eXtended VGA a standard for distrib uting analog computer pictures with a resolution of 1024 pixels by 768 pix els Term Meaning ...

Страница 117: ...107 ...

Страница 118: ...22 76 002 cm Mullion 0 75 1 905 cm Electrical and Heat Specification Maximum Minimum Typical Notes Video input amplitude Component YPbPr Input 1 0 V p p 714 Vp p 0 5 V p p 75 ohm termination Conforming to standards 480i 480p 720p 1080i Composite analog 1 0 V p p 0 714 0 5 V p p 75 ohm termination Conforming to standards NTSC PAL SECAM TTL H and V sync 5 0 V 2 5 V 3 5 V TTL at 330 ohm termination I...

Страница 119: ...tive Resolution 1280 x 720 Color Wheel 6 segment RGB spinning up to 5X display frame rate Resolution Resolution Horizontal Native 1280 Pixels Resolution Vertical Native 720 Pixels Resolution Horizontal Viewable 1232 Pixels Resolution Vertical Native 693 Pixels Brightness Peak Center 115FL DNP Screen 150W WP 10 Internal White field test pattern Peak Bottom Center 135FL DNP Screen 150W WP 10 Interna...

Страница 120: ...imum of 5 pixels due to optical engine tolerances and 4 pixels due to chassis screen tol erances Focus Focus Quality 3 Grade Scale 1 Grade Scale 2 Grade Scale IFC Focus Pattern 2 meters from screen 9 locations Audio Audio inputs 3 inputs to handle any selected source Line Out Buffered output of currently selecte input to drive headset or external amplifier Speaker output 10W channel Environmental ...

Страница 121: ...111 ...

Страница 122: ...112 ...

Страница 123: ... bytes received 75 bytes sent 75 C cables for RS232 straight thru 98 center point 28 certifications 102 clearance rear 108 Color Balance Hide menu 38 color balance menu 80 color balancing 26 38 color bars adjusting video with 34 colorspace 36 71 72 commands received 75 composite sync definition of 104 composite video definition of 104 computer source adjusting to 26 28 computer sources adjusting t...

Страница 124: ...Saver 81 last fault 74 last packet address 75 last packet type 75 LEDs definition of 104 letterbox 67 levels adjusting 28 adjusting semi automatically 28 computer sources adjusting to 71 digital sources adjusting to 72 video sources adjusting to 73 Line out Balance 70 Lion definition of 104 lost signal retry on 83 Loudness 70 Lower Retaining Bracket 5 M manual adjustment of levels for computer sou...

Страница 125: ...arance 108 Red in Color Balance 39 regulatory information 102 remote control arrow keys 64 65 curtain 64 enter 65 freq phase 65 lamp 62 lamp on off 62 menu 62 on off 62 prev 65 save 63 setup 64 source 63 remote definition of 105 Removable I O cover 5 resolution native 87 definition of 105 retry on lost signal 83 RGB colorspace 36 RGB levels 71 RGB definition of 105 RGBHV definition of 105 RGBS def...

Страница 126: ...ature operating 110 terms used in this manual meanings of 104 test pattern menu 76 this display alone 75 Tigress definition of 105 timeout menu 86 Torx wrench 5 treble 70 U ultra violet radiation 8 unhide Color Balance menu 38 unit ID 82 unit definition of 105 UV radiation 8 UXGA definition of 105 V V position 86 ventilation requirement 108 VGA definition of 105 video composite definition of 104 d...

Страница 127: ...n background has vertical bands in it Whenever I try to _______ I get a message on the screen that says _________ The lamp will not turn on When I changed it with another lamp it still did not turn on There is a black line on the left side and I can t move the picture over there with the Position control I see flashing red and amber lights on the screen Note the sequence of the colored lights It s...

Страница 128: ...l Systems Inc All rights reserved 27350 SW 95th Avenue Suite 3038 Wilsonville OR 97070 7708 Main Phone 1 503 570 0700 Customer Service Phone 1 503 570 4634 Fax 1 503 570 4657 www ClarityVisual com Service ClarityVisual com ...

Отзывы: