background image

3

VX807

English

English

Owner’

s Manual

Select the BT Phone Mode .................................................................................35
Bluetooth Telephone Settings ............................................................................35
Registering Your Phone (Pairing) ........................................................................36
Select the Phone .................................................................................................36
Get the Phone Book Data ...................................................................................36
Telephone Operations ........................................................................................36

15. TUNER OPERATIONS .....................................................................................38
16. SiriusXM® Satellite Radio OPERATIONS  ....................................................39

Activating Your SiriusXM Subscription ...............................................................39
Selecting a Satellite Radio Mode ........................................................................39
Displaying the SiriusXM Radio ID .......................................................................39
Channel Selection by Up/Down Button ..............................................................40
Channel Selection by Channel Number ..............................................................40
Tuning to Channels from the Channel List .........................................................40
Tuning to Channels from the Preset Channel List ..............................................40
Tuning to Channels from the Category List ........................................................40
Parental Control Lock / Unlock ...........................................................................40
Setting the Password ..........................................................................................40
Replay .................................................................................................................41
SmartFavorites ....................................................................................................41
TuneStart™ .........................................................................................................41
TuneMix™ ...........................................................................................................41

17. HDMI MODE ....................................................................................................42

Wire Connection of HDMI Mode .........................................................................42
Select HDMI Source  ..........................................................................................43

18. Apple CarPlay

 ..............................................................................................43

To start Apple CarPlay ........................................................................................43
To go to Apple CarPlay screen  ..........................................................................44
To move to Apple CarPlay screen  .....................................................................44
To return to original screen  ................................................................................45

19. AUX  .................................................................................................................46
20. CAMERA INPUT OPERATIONS .....................................................................46
21. REAR SOURCE OPERATIONS .......................................................................47

DVD Video in Rear ..............................................................................................47
DVD Video Rear Source Control Info Mode. ......................................................47
DVD Video Rear Source Control Direct Mode.  ..................................................47
AUX Video in Rear...............................................................................................48

22. FULL DIGITAL SOUND SYSTEM....................................................................48
23. SETTING OPERATIONS ..................................................................................49

General Setup Menu ...........................................................................................49
Video Setup Menu ..............................................................................................50
Audio Setup Menu ..............................................................................................50
Others Setup Menu .............................................................................................50
Set the Anti-Theft Code ......................................................................................51

24. TROUBLESHOOTING .....................................................................................52

General ................................................................................................................52
DVD Player ..........................................................................................................52
USB Device .........................................................................................................53
Bluetooth ............................................................................................................53
SiriusXM Advisory Messages..............................................................................54
TFT Screen ..........................................................................................................55

25. ERROR DISPLAY.............................................................................................56

DVD/CD Player ...................................................................................................56

26. SPECIFICATIONS ............................................................................................57
27. WIRE CONNECTION GUIDE ...........................................................................59

Содержание VX807

Страница 1: ...DVD MULTIMEDIA STATION WITH BUILT IN BLUETOOTH 7 TOUCH PANEL CONTROL Owner s Manual VX807 ...

Страница 2: ... des informations important de produits Enregistrer à www clarion com c est facile de mettre à jour votre produit Clarion Querido Cliente Felicitaciones por su compra de producto electrónico móvil de Clarion Estamos seguros que usted gozará de su experiencia con el producto de Clarion Hay muchas ventajas al registrar su producto Le invitamos a que visite nuestro sitio en internet www clarion com p...

Страница 3: ... Audio 23 Tag Display Function 23 Playback MP3 WMA AAC menu 24 9 USB AUDIO OPERATIONS 25 Notes on Using USB Memories 25 Select USB Audio Mode 25 Playing Audio Files in USB Memory 26 10 USB VIDEO OPERATIONS 27 Notes on Using USB Memory Device 27 Select USB Video Mode 27 Playing Video Files in USB Memory 27 Playable Video Format 27 11 iPod OPERATIONS 29 Notes on Using iPod iPhone 29 iPod Audio Menu ...

Страница 4: ...ssword 40 Replay 41 SmartFavorites 41 TuneStart 41 TuneMix 41 17 HDMI MODE 42 Wire Connection of HDMI Mode 42 Select HDMI Source 43 18 Apple CarPlay 43 To start Apple CarPlay 43 To go to Apple CarPlay screen 44 To move to Apple CarPlay screen 44 To return to original screen 45 19 AUX 46 20 CAMERA INPUT OPERATIONS 46 21 REAR SOURCE OPERATIONS 47 DVD Video in Rear 47 DVD Video Rear Source Control In...

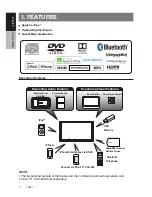
Страница 5: ...71 CCA 802 Sold separately Apple CarPlay Optical Digital Output Latest Map Guarantee iPod Expanding Visual Features Rear Monitor Rear Vision Camera Expanding Audio Features External Power ÅÈÄÁŲ Ê External Sound Processor iPhone USB Memory Bluetooth Telephone iPhone Smartphone via HDMI SiriusXM Connect Vehicle Tuner VEHICLE TUNER Connect via CCA 771 CCA 802 ...

Страница 6: ... TPGUXBSF NBZ DPOUBJO JOBDDVSBUF PS JODPNQMFUF JOGPSNBUJPO EVF UP UIF QBTTBHF PG UJNF changing circumstances and the sources of information used Please respect current traffic conditions and regulations at all times while driving t FFQ UIF BNPVOU PG UJNF TQFOU WJFXJOH UIF TDSFFO XIJMF ESJWJOH UP B TUSJDU NJOJNVN t IBOHFT PS NPEJmDBUJPOT OPU FYQSFTTMZ BQQSPWFE CZ UIF QBSUZ SFTQPOTJCMF GPS DPNQMJBODF...

Страница 7: ...r your body This transmitter must not be co located or operating in conjunction with any other antenna or transmitter t DN 4UBUFNFOU The device meets the exemption from the routine evaluation limits in section 2 5 of RSS 102 and compliance with RSS 102 RF exposure users can obtain Canadian information on RF exposure and compliance Le dispositif rencontre l exemption des limites courantes d évaluat...

Страница 8: ...vere vibration may cause the sound to skip 3 This unit uses a precision mechanism Even in the event that trouble arises never open the case disassemble the unit or lubricate the rotating parts This device complies with Industry Canada license exempt RSS standard s Operation is subject to the following two conditions 1 this device may not cause interference and 2 this device must accept any interfe...

Страница 9: ...gh dirt apply some neutral detergent diluted in water to a soft cloth wipe off the dirt gently then wipe again with a dry cloth Do not use benzene thinner car cleaner etc as these substances may damage the cabinet or cause the paint to peel Also leaving rubber or plastic products in contact with the cabinet for long periods of time may cause stains ƹ Ä ÆÁÆ ÌÀ ÄÁÉÍÁ ÊÑËÌ Ä È Æ Ä The liquid crystal ...

Страница 10: ...D GSPN JUT TUPSBHF DBTF press down on the center of the case and lift the disc out holding it carefully by the edges t P OPU VTF DPNNFSDJBMMZ BWBJMBCMF EJTD protection sheets or discs equipped with stabilizers etc These may damage the disc or cause breakdown of the internal mechanism Storage t P OPU FYQPTF EJTDT UP EJSFDU TVOMJHIU PS any heat source t P OPU FYQPTF EJTDT UP FYDFTT IVNJEJUZ or dust ...

Страница 11: ...its compliance with safety and regulatory standards Please note that the use of this accessory with iPod or iPhone may affect wireless performance iPhone iPod and Siri are trademarks of Apple Inc registered in the U S and other countries Apple CarPlay and Lightning are trademarks of Apple Inc ƹ AndroidTM is the trademark of Google Inc ƹ The Bluetooth word mark and logos are registered trademarks o...

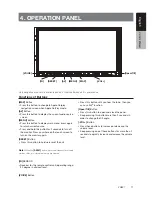
Страница 12: ...UTTON TO HARDWARE RESET THE UNIT Note When the RESET button is pressed frequencies of radio stations titles etc stored in memory are cleared IR SENSOR s 2ECEIVER FOR THE REMOTE CONTROL UNIT OPERATING RANGE DEGREE IN ALL DIRECTIONS VOICE Button s Press this button until you hear the tone then you can use Siri function Open Tilt Button s 0RESS THIS BUTTON TO OPEN AND CLOSE THE PANEL s EEP PRESSING T...

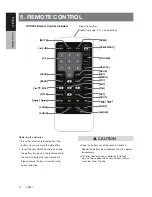
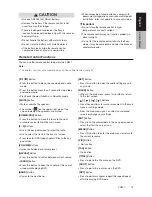
Страница 13: ...SURE THE TRAY IS INSERTED IN THE CORRECT DIRECTION s EEP THE BATTERY OUT OF THE REACH OF CHILDREN 3HOULD THE BATTERY BE SWALLOWED CONSULT A DOCTOR IMMEDIATELY s ATTERIES BATTERY PACK OR BATTERIES INSTALLED MUST NOT BE EXPOSED TO EXCESSIVE HEAT SUCH AS SUNSHINE lRE OR THE LIKE 3IGNAL TRANSMITTER PERATING RANGE ª IN ALL DIRECTIONS 0 9 SRCH BACK TITLE ZOOM MUTE AUDIO POWER SRC VOLUME SET PIC TAG RPT ...

Страница 14: ... 0RESS TO lX THE ENTERED DATA IN THE KEY PAD SCREEN OR SELECT THE ITEM THE CURSOR IS ON MENU Button s 0RESS THIS BUTTON TO ENTER THE MAIN MENU OR RETURN TO THE CURRENT RESOURCE PIC Button s O FUNCTION TAG Button s O FUNCTION TITLE Button s 0RESS TO GO TO THE TITLE MENU ON THE 6 ROOT Button s 0RESS TO GO TO THE ROOT MENU ON THE 6 RPT Button s 0RESS TO PERFORM CHAPTER REPEAT TITLE REPEAT REPEAT OFF ...

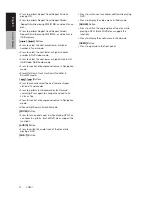
Страница 15: ...US8 MODE UTTONS s 0RESS TO MANUALLY SELECT THE NEXT LOWER OR HIGHER STATION IN 4UNER MODES s 0RESS TO PERFORM FAST BACKWARD OR FAST FORWARD SEARCHING 0RESS AGAIN TO CHANGE THE SPEED TO X X X OR X s 0RESS FOR CONTROL OF BACKGROUND SOURCE IN AVIGATION MODE s HANNEL 5P OWN IN 3IRIUS8 MODE ZOOM Button s 0RESS TO TURN ON AND ZOOM IN WHILE PLAYING 6 9OU CAN ZOOM IN UP TO X OT ALL 6 DISCS SUPPORT THIS FU...

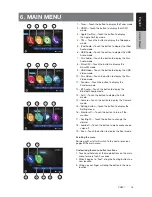
Страница 16: ...ANDORA MODE 4 UDIO 4OUCH THE BUTTON TO DISPLAY THE LUETOOTH UDIO MODE 58 4OUCH THE BUTTON TO DISPLAY THE 58 MODE AMERA 4OUCH THE BUTTON TO DISPLAY THE AMERA MODE 3ETTING BUTTON 4OUCH THE BUTTON TO DISPLAY THE 3ETTING MENU ONITOR OFF 4OUCH THE BUTTON TO TURN OFF THE MONITOR AY IGHT 4OUCH THE BUTTON TO CHANGE THE DIMMER UDIO OFF 4OUCH THE BUTTON TO MAKE AUDIO SOURCE VOICE OFF 8KGX 4OUCH THE BUTTON T...

Страница 17: ...D RW unit Cause disc characteristics cracks dust dirt dust dirt on player s lens etc t If a CD R or CD RW disc that has not been finalized is played it will take a long time to start playing Also it may not be possible to play depending on its recording conditions t You cannot play SuperAudio CD The CD player is not supported even if it is a hybrid disc ºÇÍÌ ˀƯ Ư ÈÄ Ñº à This unit can play back CD ...

Страница 18: ... THE PARENTAL LEVEL ID 3AFE ID 3AFE G ENERAL UDIENCES PG 0ARENTAL UIDANCE 3UGGESTED 0 0ARENTS 3TRONGLY AUTIONED 0 2 0ARENTAL UIDANCE 2ESTRICTED R 2ESTRICTED O NE ND 5NDER DMITTED DULT NLY DULT s 4HE CONTENTS THAT THE PARENTAL LEVEL RESTRICTS VARY WITH THE COUNTRY CODE Note 4HE RATING CAN BE SELECTED ONLY UNDER THE password unlocked status and the limits can be set only under the password locked st...

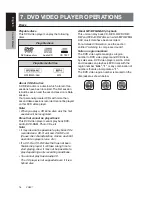
Страница 19: ...WN OR UP FROM CURRENT LOCATIONS AS MANY TIMES AS THE BUTTON IS TOUCHED AND THEN PLAYBACK STARTS Skip use seek bar 4OUCH THE SPHERICAL ON SEEK BAR AND DRAG IT TO ANY POSITION WHERE YOU WANT TO START PLAYBACK Fast Forward Fast Backward 4OUCH or BUTTON AND HOLD SECONDS TO START FAST BACKWARD OR FAST FORWARD DURING PLAYBACK 4HE PLAYBACK SPEED STARTS AT X THEN WILL INCREASE TO X X AND X 2ELEASE THE BUT...

Страница 20: ...LANGUAGES MAY BE RECORDED OR DETAILS SEE THE MARK OF THE DISC NDICATES THAT AUDIO LANGUAGES HAVE BEEN RECORDED 7HEN THE POWER IS TURNED ON AND WHEN THE DISC IS CHANGED TO A NEW ONE THE LANGUAGE SET AS THE FACTORY DEFAULT IS SELECTED F THAT LANGUAGE HAS NOT BEEN RECORDED ON DISC THE LANGUAGE IS SPECIlED ON THE DISC EPENDING ON THE DISC SWITCHING MAY BE COMPLETELY IMPOSSIBLE OR IMPOSSIBLE ON SOME SC...

Страница 21: ...ACKWARD SPEED MAY DIFFER depending on the disc Repeat Playback 4HIS OPERATION PLAYS BACK VIDEO lLES RECORDED ON THE DISC REPEATEDLY 2EPEAT LL IS THE FACTORY DEFAULT REPEAT SETTING 3HOWING THE VIDEO lLES PLAYER MENU TOUCH BUTTON 4OUCH BUTTON ONCE FOR 2EPEAT 4RACK AGAIN FOR 2EPEAT OLDER 4OUCH BUTTON AGAIN FOR 2EPEAT LL Switching Audio 3OME VIDEO lLES WILL HAVE TWO OR MORE AUDIO CHANNELS YOU CAN SWIT...

Страница 22: ...IDEO lLES STORED ON DISC AVI lLES s FORMAT 0 6ISUAL 3IMPLE s 0ICTURE SIZE X s UDIO FORMAT 0 s UDIO SAMPLING FREQUENCY Z MP lLES s FORMAT 0 6ISUAL 3IMPLE s 0ICTURE SIZE X s UDIO FORMAT s UDIO SAMPLING FREQUENCY Z MPG lLES s FORMAT 0 s 0ICTURE SIZE X s UDIO FORMAT 0 s UDIO SAMPLING FREQUENCY Z ...

Страница 23: ...S PLAYBACK FROM THE BEGINNING OF THE NEXT TRACK s 4OUCHING BUTTON STARTS PLAYBACK FROM THE BEGINNING OF THE CURRENT TRACK 7HEN THIS BUTTON IS TOUCHED AGAIN WITHIN SECONDS PLAYBACK STARTS FROM THE BEGINNING OF PREVIOUS TRACK Fast Forward Fast Backward 4OUCH or BUTTON AND HOLD MORE THAN SECONDS TO START FAST BACKWARD OR FAST FORWARD DURING PLAYBACK 4HE PLAYBACK SPEED STARTS AT X THEN WILL INCREASE T...

Страница 24: ...NS LWAYS ADD A lLE EXTENSION h 0 v OR h MP v TO AN 0 lLE AND h 7 v OR h WMAv TO A 7 AND h M Av TO A lLE BY USING SINGLE BYTE LETTERS F YOU ADD A lLE EXTENSION OTHER THAN SPECIlED OR FORGET TO ADD THESE lLE EXTENSION THE lLE CANNOT BE PLAYED N ADDITION IF YOU USE UPPER CASE AND LOWER CASE LETTERS CAPITAL AND SMALL LETTERS MIXED FOR lLE EXTENSIONS NORMAL PLAY MAY NOT BE POSSIBLE ILES OTHER THAN 0 7 ...

Страница 25: ...DER 2EPEAT LL AND 2EPEAT 4RACK 2EPEAT OLDER AND 2EPEAT LL URRENT FOLDER LIST s 3HOWING TITLE OF CURRENT FOLDER s 4HE NUMBER ON THE FOLDER SYMBOL IS THE NUMBER OF lLES AND FOLDERS IN THE CURRENT FOLDER s 4OUCH THE TITLE OF CURRENT FOLDER PLAYLIST WILL SHOW lLES AND FOLDERS IN UPPER FOLDER Other operations about playing MP3 WMA AAC are almost the same as CD Player mode 3TOP 0LAYBACK 4OUCH BUTTON TO ...

Страница 26: ...THE FOLDER STRUCTURE s 4HE FOLDER HIERARCHY MUST BE WITHIN HIERARCHICAL LEVELS THERWISE PLAYBACK MAY BE IMPOSSIBLE s 4HE MAXIMUM ALLOWABLE NUMBER OF FOLDERS IS INCLUDING ROOT DIRECTORY AND FOLDERS WITH NO 0 7 lLE s 4HE MAXIMUM ALLOWABLE NUMBER OF lLES IN A FOLDER IS s 9OU CAN STORE THE 0 7 lLES TOGETHER IN A FOLDER s 4HE SYSTEM MAY BECOME SLOW IF THE lLES OR FOLDERS EXCEED THE LIMITATION ABOVE Not...

Страница 27: ...t work F 0 AUDIO lLE CONTAINS ALBUM ART IMAGE IN THE PICTURE WILL BE DISPLAYED IN THIS AREA ID3 Information Area 4HIS AREA DISPLAY INFORMATION OF PLAYING lLE Skip Using Seek Bar 4OUCH ON SEEK BAR AND DRAG IT TO ANY POSITION WHERE YOU WANT TO START PLAYBACK Select a Folder on the Display List 4OUCH THE FOLDER TITLE ON THE DISPLAY LIST THE DISPLAY LIST WILL DISPLAY lLES AND FOLDERS IN THE SELECTED F...

Страница 28: ... THE 53 6IDEO MODE 4HE SYSTEM CHANGES TO THE 53 6IDEO MODE AND STARTS PLAYBACK FROM THE PREVIOUS POSITION OR FROM THE BEGINNING Note 4HIS SYSTEM HAS TWO 53 CONNECTORS AND CAN CONNECT TWO 53 DEVICE 9OU CAN SELECT THE DESIRED 53 DEVICE BY TOUCHING THE LIST OF 53 ROOT MENU 4HIS SYSTEM INDICATES THE 53 DEVICE AS h Y 53 v h Y 53 v ON THE LIST Playing Video Files in USB Memory F THE VIDEO IS PLAYING TOU...

Страница 29: ...UTTON TO RESUME PLAYBACK 4HE SCREEN WILL GO TO VIDEO SCREEN AUTOMATICALLY Switch to Previous Next file 4OUCH the or BUTTON DURING PLAYBACK TO PLAY PREVIOUS NEXT lLE s 4OUCH the BUTTON TO START PLAYBACK FROM THE BEGINNING OF THE NEXT TRACK s 4OUCH the BUTTON TO START PLAYBACK FROM THE BEGINNING OF THE CURRENT TRACK WHEN THIS BUTTON IS TOUCHED AGAIN WITHIN SECONDS PLAYBACK STARTS FROM THE BEGINNING O...

Страница 30: ...N ON THE AIN ENU SCREEN Note 4HIS SYSTEM HAS TWO 53 CONNECTORS PLEASE CONNECT TO THE 53 WITH THE LABEL OF hI0OD I0HONEv Y CONNECTING ANOTHER 53 CABLE I0OD I0HONE CAN T PLAY back the music 7HEN AN I 3 DEVICE IS CONNECTED VIA 53 AND LUETOOTH AT THE SAME TIME AND IN THE I0OD MODE THE I 3 DEVICE IS CONTROLLED THROUGH THE 53 CONNECTION 7HEN AN IN THE I0OD MODE AND OPERATE THE AUDIO PLAYER OR INTERNET R...

Страница 31: ... AGAIN TO TURN OFF THE FEATURE Album Art work F CURRENT AUDIO lLE CONTAINS ALBUM ART IMAGE IN THE PICTURE WILL BE DISPLAYED IN THIS AREA ID3 Information Area 4HIS AREA DISPLAYS INFORMATION OF THE PLAYING lLE SONG TITLE ARTIST INFORMATION ALBUM INFORMATION ENRE PLAYLIST AND RELEASE TIME Category List 3ELECT DIFFERENT SONG CATEGORIES TO PLAY 4HE CATEGORY IS SAME AS ON THE I0OD I0HONE iPod Audio Play...

Страница 32: ...PLAYBACK FROM THE BEGINNING OF THE NEXT TRACK Note s 3OME TRACK ARE NOT ABLE TO BE SKIPPED s F SKIP LIMIT HAS BEEN REACHED 3KIP TRACKS IN THIS FUNCTION WILL NOT AVAILABLE s 4RACK RATING 4OUCH THE OR BUTTON TO 4HUMBS DOWN OR 4HUMBS UP CURRENT TRACK AND THE BUTTON WILL LIGHT UP OTE s 4OUCH THE BUTTON WILL SKIP TO NEXT TRACK IF THE SKIP LIMIT HAS NOT BEEN REACHED s 3OME TRACK ARE NOT ABLE TO BE RATED...

Страница 33: ...SLY CONNECTED DEVICE NDROID OR I 3 7HEN BOTH NDROID 4 I0HONE 4 OR 53 ARE CONNECTED AT THE SAME TIME AND THE h O NOT SHOW AGAINv SETTING IS NOT CHECKED A POPUP WILL DISPLAY TO SELECT THE DEVICE 3 When connecting the mobile phone by Bluetooth or USB when in the Pandora mode there is a case the change device button will not work correctly We recommend that after finished with the Pandora mode then con...

Страница 34: ...LREADY ESTABLISHED YOU MAY SELECT THE USIC FUNCTION 0RESS THE 5 BUTTON ON THE PERATIONAL 0ANEL TO RETURN TO THE AIN ENU s 7HEN A CONNECTION WITH A LUETOOTH AUDIO PLAYER HAS BEEN ESTABLISHED THE ICON IS DISPLAYED AT THE TOP OF THE SCREEN Bluetooth Audio Player Settings 9OU CAN CONlRM VARIOUS SETTINGS REGARDING THE LUETOOTH INTERFACE FEATURES 4OUCH THE BUTTON TO DISPLAY THE INFORMATION ON THE SCREEN...

Страница 35: ...DEVICE 4OUCH THE DESIRED DEVICE BUTTON YOU WISH TO USE 4OUCH THE BUTTON TO SELECT IT AS YOUR ACTIVE DEVICE 4HE CORRESPONDING PHONE IS SET AS THE CURRENT TELEPHONE 4OUCH THE BUTTON TO RETURN TO THE PREVIOUS SCREEN Controlling the Bluetooth Audio Player Note s CCASIONALLY DEPENDING ON THE ENVIRONMENT PLAYBACK sounds may be fragmented or noises may be generated Playing Music FTER THE CONNECTION WITH ...

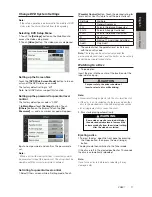
Страница 36: ... ARE DISPLAYED AT THE TOP OF THE SCREEN Bluetooth Telephone Settings 9OU CAN CONlRM VARIOUS SETTINGS REGARDING ABOUT THE LUETOOTH INTERFACE FEATURES 4OUCH THE BUTTON TO DISPLAY THE INFORMATION ON THE SCREEN 3ELECT THE SETTING FOR THE DESIRED ITEM 3EE THE FOLLOWING SECTIONS FOR DETAIL 7HEN YOU lNISH CONlRMING THE LUETOOTH INFORMATION TOUCH THE BUTTON TO RETURN TO THE PREVIOUS SCREEN 3ETTING UTOMATI...

Страница 37: ...RNS TO THE 4ELEPHONE SCREEN s 4O DELETE THE PHONE REGISTRATION 4OUCH THE BUTTON TO DELETE THE DEVICE CONlRMATION SCREEN IS DISPLAYED 4OUCH THE BUTTON TO CONlRM DELETE Select the Phone 4O CHANGE THE CURRENT PHONE TO THE OTHER DEVICE WHICH IS ALREADY REGISTERED PERFORM THE FOLLOWING OPERATION 4OUCH THE BUTTON TO DISPLAY THE EVICE 3ELECT SCREEN 4OUCH THE CURRENTLY CONNECTED DEVICE THEN TOUCH BUTTON T...

Страница 38: ...FUNCTION THE 0HONE OOK DATA MUST be sent from the phone s NLY THE 0HONE OOK ITEMS WITH AT LEAST ONE TELEPHONE NUMBER REGISTERED IN THE CAPTURED 0HONE OOK DATA ARE DISPLAYED ON THE 0HONE OOK SCREEN 4OUCH THE BUTTON TO DISPLAY THE 0HONE OOK SCREEN 4OUCH THE DESIRED NAME BUTTON YOU WISH TO DIAL s 3WIPE THE LIST UP AND DOWN TO SCROLL THE LIST 4OUCH THE BUTTON TO CALL THE SPECIlED NUMBER 4HE 4ELEPHONE ...

Страница 39: ...OR PRESET TUNING 4OUCH AND HOLD THE DESIRED 0RESET BUTTON YOU WANT TO STORE FOR ABOUT SECONDS Auto Store 4HE UTO 3TORE IS A FUNCTION FOR STORING UP TO STATIONS THAT ARE AUTOMATICALLY SEARCHED SEQUENTIALLY F THE NUMBER OF RECEIVABLE STATIONS CANNOT REACH TO THE PREVIOUS STORED STATION REMAINS 4OUCH THE FM1 2 3 AM BUTTON TO SELECT THE DESIRED BAND OR 4OUCH THE BUTTON AND THEN TOUCH THE BUTTON TO STA...

Страница 40: ...ns please contact s 6ISIT WWW SIRIUSXM CA ACTIVATEXM s ALL 8 CUSTOMER ARE AT As part of the activation process the SiriusXM satellites will send an activation message to your tuner When your radio detects that the tuner has received the activation message your radio will display Subscription Updated Once subscribed you can tune to channels in your subscription PLAN OTE THE ACTIVATION PROCESS USUAL...

Страница 41: ...set touch and hold a preset button for more than 2 seconds to save the channel to that preset button Tuning to Channels from the Category List Satellite Radio allows you to select broadcast channel category contents 1 Touch the Category List button on the SiriusXM Menu display to enter category list preview mode 2 Touch and swipe the category list up or down 3 Touch the desired category item butto...

Страница 42: ...tes for SXV200 and SXM1 SXM2 SXM3 bands for SXV300 or later TuneStart With the TuneStart feature turned ON you will hear the beginning of the song when you tune to one of your Preset channels It may take a minute or two for the feature to work after power up or after changing preset bands You can turn TuneStart On or Off in the following operation 1 Touch the Option Setting button to enter the set...

Страница 43: ...I0HONE I0HONE 0LUS I0HONE S I0HOE S 0LUS I0HONE 3 I0HONE AND I0HONE 0LUS CAN BE CONNECTED BY USING THE CONNECTOR CABLE SUPPLIED WITH THE RESPECTIVE DEVICE AND CABLE SOLD IN THE MARKET AND DIGITAL 6 ADAPTER Note 4HE FOLLOWING ARE WIRING EXAMPLES EPENDING ON THE DEVICE IT MIGHT BE ABLE TO CONNECT TO THE LARION DEVICE DIRECTLY WITH THE EPENDING ON THE ADAPTER OR DEVICE AUDIO AND OR VIDEO NOISE MIGHT ...

Страница 44: ...Depending on the application and model of the mobile phone a black frame may appear around the screen 18 Apple CarPlay PPLE AR0LAY IS IMMEDIATELY STARTED WHEN YOU CONNECT I0HONE TO I0OD I0HONE 53 CABLE PPLE AR0LAY 5 IS AUTOMATICALLY DISPLAYED IN ANY SITUATION EXCEPT OTE Note1 Original navigation guidance is active VX807 continues navigation guidance Won t change to Apple CarPlay UI Note2 Other USB...

Страница 45: ...io icon CarPlay now playing screen is displayed and start playback music The indicator displays as follows To go to Apple CarPlay screen by Main menu and Shortcut menu 1 When you press and hold MAP button for 2 seconds CarPlay maps screen is displayed 2 When you press VOICE button Siri screen is displayed The indicator displays as follows To move to Apple CarPlay screen by hard button ...

Страница 46: ... English Owner s Manual 1 Press MENU button Main menu screen is displayed 2 Press AV button original screen is displayed if original audio source is active The indicator displays as follows To return to original screen ...

Страница 47: ...WILL DISPLAY THE EXTERNAL CAMERA VIDEO 4HE SCREEN WILL DISPLAY h O 6IDEO 3IGNALv MESSAGE IF A VALID CAMERA IS NOT CONNECT TO THIS DEVICE 0RESS 5 BUTTON ON PERATIONAL 0ANEL TO RETURN TO THE AIN ENU Setting Camera audio 3ELECT h v BUTTON IN THE AMERA UDIO SETTING OF THE ENERAL SETTING 4HE AUDIO FROM CAMERA WILL BE HEARD WHEN REVERSE GEAR IS ENGAGED 4HE VOLUME CONTROL IS AVAILABLE BUT NOT INDICATED O...

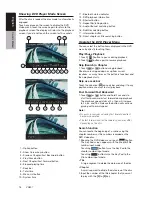
Страница 48: ... button to close the Rear Source Note F THE SOURCE IS SELECTED AS THE FRONT THE SOURCE IN REAR CAN T BE SELECTED F THE SOURCE IS SELECTED AS THE REAR THE SOURCE IN FRONT CAN T BE SELECTED 4OUCH THE RONT BUTTON TO ACCESS THE MAIN MENU BUT NOT CLOSE THE 2EAR 3OURCE DVD Video in Rear PTION BUTTON 3HOW URSOR KEYS 0REVIOUS HAPTER AST ACKWARD BUTTON 0LAY 0AUSE BUTTON EXT HAPTER AST ORWARD BUTTON LAPSED ...

Страница 49: ...HE SPEAKER THUS DELIVERING AN UNCOMPROMISED HIGH lDELITY EXPERIENCE OR MORE INFORMATION VISIT OUR WEBSITE AT WWW CLARION COM 4HE FOLLOWING ARE COMPONENTS OF THE LARION ULL IGITAL 3OUND 3YSTEM ULL IGITAL 3OUND 0ROCESSOR 4WEETERS AND OMMANDER ULL IGITAL 3PEAKER 7 ULL IGITAL 3UBWOOFER OR DETAIL CONNECTION OPERATION AND SETTING PLEASE READ THE USER MANUAL OF THE AND 7 ARE SOLD SEPARATELY 4O CONNECT TO...

Страница 50: ...ULAR PHONE AFTER THE CONNECTION IS LOST OR THE SYSTEM IS RESTARTED 4 UTO NSWER F A CALL COMES IN ANSWER AUTOMATICALLY AFTER SECONDS AIN 9OU CAN ADJUST THE INPUT LEVEL OF THE MICROPHONE IN LEVELS 4OUCH THE LEVEL INDICATOR BUTTON OF THE ICROPHONE AIN ITEM TO ADJUST THE INPUT LEVEL 7ALLPAPER HOOSE THE DESIRED WALLPAPER 4HERE ARE THREE OPTIONAL IMAGES WHICH YOU CAN IMPORT FROM 53 3ELECT h MPORTED v AN...

Страница 51: ...ORMAL OR REVERSE IGH 0ASS ILTER HOOSE THE FREQUENCY FOR THE HIGH PASS lLTER OR THROUGH 4HE FREQUENCIES INCLUDE Z Z AND Z OW 0ASS ILTER HOOSE THE FREQUENCY FOR THE LOW PASS lLTER OR THROUGH 4HE FREQUENCIES INCLUDE Z Z AND Z AGNA ASS 8 HOOSE THE LOUDNESS N OR FF MP ANCEL 3ELECTING TURNS OFF THE INTERNAL AMPLIlER IN THE 68 Note PTIONAL CABLE SOLD SEPARATELY IS NECESSARY WHEN YOU USE UDIO LINE OUT Oth...

Страница 52: ...FT CODE 4OUCH 9 3 BUTTON THE NUMERICAL KEYPAD IS DISPLAYED NTER THE NEW PASSWORD TWICE THEN ANTI THEFT CODE IS SET AND YOUR UNIT IS SECURED 7HEN THE NTI THEFT IS h Nv YOU NEED TO ENTER THE CORRECT NTI THEFT CODE TO TURN THE UNIT ON F YOU ENTER WRONG CODE THREE TIMES THE UNIT IS LOCKED AND MUST BE UNLOCKED BY THE PROFESSIONALS F YOUR UNIT IS SECURED HOLD THE BUTTON MORE THAN SECONDS THEN THE NTI 4H...

Страница 53: ... control unit it may not work The battery of the remote control unit is dead or there is no battery in the remote control unit Check the battery of the remote control unit ÊÇºÄ Å Cause Measure Disc cannot be loaded A disc is already loaded Eject the disc before loading the new one There is foreign matter already in the disc slot Remove the foreign matter or consult a service station Sound skips or...

Страница 54: ...USB device Sound skips or is noisy ˀƯ ŲÄ Ë Ê ÆÇÌ encoded properly Ë ˀƯ ŲÄ Ë Æ Ç properly The video image of iPod iPhone is disturbed The TV Signal setting of the iPod iPhone is not set correctly Set the TV Signal setting NTSC PAL of the iPod iPhone correctly Bluetooth ÊÇºÄ Å Cause Measure Cannot pair the Bluetooth enable device with the car audio system The device does not support ÌÀ ÈÊÇŲÄ Ë Ê ÉÍÁ...

Страница 55: ...LLATION MANUAL FOR MORE INFORMATION ON ANTENNA INSTALLATION 2EPLACE THE ANTENNA IF THE CABLE IS DAMAGED 3IRIUS8 PRODUCTS ARE AVAILABLE AT YOUR LOCAL CAR AUDIO RETAILER OR ONLINE AT WWW SHOP SIRIUSXM COM 3UBSCRIPTION 5PDATED 4HE RADIO HAS DETECTED A CHANGE IN YOUR 3IRIUS8 SUBSCRIPTION STATUS 0RESS THE v NTERv BUTTON TO CLEAR THE MESSAGE N THE 5 3 VISIT WWW SIRIUSXM COM OR CALL IF YOU HAVE QUESTIONS...

Страница 56: ... the Dimmer properly The operating condition is not good The temperature inside the vehicle may be 0 C or lower Set to an appropriate temperature 25 C or so and check it again The headlight of the vehicle is lit The display is made dark at night to prevent the glare When the headlight of the vehicle is lit in the daytime the display gets dark There are red green and blue points in display This is ...

Страница 57: ...Cause Measure BAD DISC A disc cannot be played due to scratches etc Replace with a non scratched non warped disc Invalid Disc A disc is loaded upside down inside the DVD deck and does not play Eject the disc then reload it properly PARENTAL VIOLATION Parental level error Set the correct Parental level Region code error Region code error Eject the disc and replace correct region code disc ...

Страница 58: ...TIVITY AT 6 OUTPUT IGH M6RMS ID M6RMS OW 6RMS Audio Video output 6IDEO OUTPUT VOLTAGE 6P P 3CREEN 3IZE v WIDE TYPE 0IXELS 2ESOLUTION X X 2 Bluetooth 3PECIlCATION LUETOOTH 6ER 0ROlLE 0 ANDS REE 0ROlLE 30 EADSET 0ROlLE 0 DVANCED UDIO ISTRIBUTION 0ROlLE 62 0 6 2EMOTE ONTROL 0ROlLE 0 0 0HONE OOK CCESS 0ROlLE 300 3ERIAL 0ORT 0ROlLE 0OWER LASS 2 USB 3PECIlCATION 53 3 0LAYABLE UDIO FORMAT 0 7 0LAYABLE 6I...

Страница 59: ...58 VX807 English Owner s Manual 68 DIMENSIONS 68 WEIGHT KG ...

Страница 60: ... º ËÍÊ ÌÇ ŲÐ ÏÁÌÀ ÌÀ Ä ÅÈƖ GHRK 5VZOIGR GHRK 9URJ OT ZNK SGXQKZ USSGTJKX TIR JKJ RR OMOZGR 9 H UULKX 9URJ YKVGXGZKR_ RR OMOZGR 9 H UULKX 9URJ YKVGXGZKR_ RR OMOZGR 9VKGQKX 9URJ YKVGXGZKR_ RR OMOZGR 9VKGQKX 9URJ YKVGXGZKR_ RR OMOZGR 9U TJ 6XUIKYYUX OZN KKZKX 9URJ YKVGXGZKR_ Lightning cable Included with iPod iPhone iPod iPhone Note For prevent the disconnection of the Optical cable please fix the cab...

Страница 61: ...5HDU OHIW 9 DFFHVVRU 5HYHUVH JHDU FRUG 3DUNLQJ EUDNH FRUG 2 Pink 6SHHG SXOVH Note 1 Connecting the PHONE INTERRUPT terminal The phone interrupt will mute the audio if the lead receives a negative or ground signal 2 This product is connected here to detect the distance the vehicle travels Always connect the vehicle s speed detection circuit Failure to make this connection will increase errors the v...

Страница 62: ...Clarion Co Ltd All Rights Reserved Copyright 2017 Clarion Co Ltd 2017 01 VX807 ...

Страница 63: ...sult in injury or material damage Installation Precautions WARNING s 7HEN INSTALLING THE UNIT TO A VEHICLE WITH AN AIRBAG SYSTEM NEVER INSTALL it in a place where it may affect the operation of the airbag s O NOT INSTALL THIS UNIT IN THE FOLLOWING LOCATIONS A location interfering with the driver s visual range or operation A location where the gear shift or brake pedal are hindered A location wher...

Страница 64: ...e grommets If the coatings of the cables are worn out by RUBBING THIS MAY CAUSE AN ACCIDENT lRE OR A SHORT CIRCUIT s FTER WIRING CABLES lX THEM WITH INSULATION TAPE s E SURE TO SWITCH OFF THE VEHICLE WHEN CONNECTING OR DISCONNECTING cords to from the unit otherwise an electric shock injury or accident may occur WARNING s 0LEASE NOTE THE POSITION OF PIPES TANKS AND ELECTRICAL WIRINGS BEFORE install...

Страница 65: ...o tap 2 Flush mount bolts 8 Hexagon Head Screw 8 12 pin AV cable 1 20 pin AV cable 1 Lead clamp 1 Trim ring 1 3 General Cautions 1 Do not open the case There are no user serviceable parts inside If you drop anything into the unit during installation consult your dealer or an authorized Clarion service center 2 Use a soft dry cloth to clean the case Never use a rough cloth thinner benzine or alcoho...

Страница 66: ...les use the parts attached to the vehicle and follow the instructions in Figure 6 2 Wire as shown in Section 7 3 Reassemble and secure the unit in the dashboard and set the face panel and center panel Figure 4 For NISSAN vehicle Mounting Screw Holes Side View of the Main Unit For TOYOTA vehicle Installing the Main Unit in NISSAN Vehicle Figure 5 Spacer thickness 1mm Not attached to the main unit 6...

Страница 67: ...anel 1 2 1 Some panel openings are too small for the unit depending on the vehicle type and model In such a case trim the upper and lower sides of the panel frame by about 0 5 to 1 5 mm so the unit can be inserted smoothly 2 If a hook on the installation bracket interferes with the unit bend and flatten it with a nipper or similar tool Typical Mounting Brackets Example 1 Example 2 Affix the screws t...

Страница 68: ...east 10 cm away from the windshield s 7IPE OFF the dirt of the mounting surface before installing the GPS antenna GPS antenna s Mount the GPS antenna the passenger side dashboard where GPS signal interruption is minimized s Wire the GPS antenna cord Fasten the cord using the cord holders Cord holder Double sided tape Bottom face of the GPS antenna s Stick the double sided tape to the bottom face o...

Страница 69: ...n of the arrow Parking brake signal cord Connecting the parking brake cord Connect the cord to parking brake lamp ground in the meter panel Note s ONNECTING THE PARKING BRAKE CORD TO LAMP GROUND ALLOWS YOU TO WATCH I0OD I0HONE VIDEO 6 VIDEO AV input when the parking brake is engaged s 7HEN THE PARKING BRAKE CORD IS NOT CONNECTED THE MONITOR WILL NOT SHOW ANY VIDEO SOURCES s F h 5 9v APPEARS ON THE...

Страница 70: ...tion ou au remplacement du produit qui est sujet uniquement aIa discretion de Clarion 6 Ce produit doit est retourne dans son emballage d origine ou equivalent Le colis doit etre entierement assure et tous frais de transport doivent etre prepayes Clarion n assumera aucune responsabilite en cas de perte ou dommages survenue lors du transport 7 TOUS PRODUITS CLARION ACQUIS PAR L ENTREMISE AUTRE QUE ...

Страница 71: ...ir of the product or replacement of the product at the sole discretion of Clarion 6 Product must be shipped in its original carton or equivalent carton fully insured with shipping charges prepaid Clarion will not assume any responsibility for any loss or damage incurred in shipping 7 CLARION PRODUCTS PURCHASED FROM A SOURCE OTHER THAN AN AUTHORIZED CLARION DEALER INCLUDING ANY AND ALL PURCHASES VI...

Отзывы: