background image

18

NZ502

English

English

Pairing

You can register up to 3 cellular phones.
1. Turn on Bluetooth function of your mobile phone.
2. Touch Bluetooth Audio or Telephone icon on main 

menu.

3. Touch the Device key [

] to display the Device 

Select screen.

4. Touch the [

] key to display the Inquiring Device 

screen.

5. Touch your desired Cellular key to select the key 

for the cellular phone to be registered, and press [

] button to register for the Bluetooth audio 

player.

6. After pairing successfully,  icon on the bottom right 

of the screen turns blue.

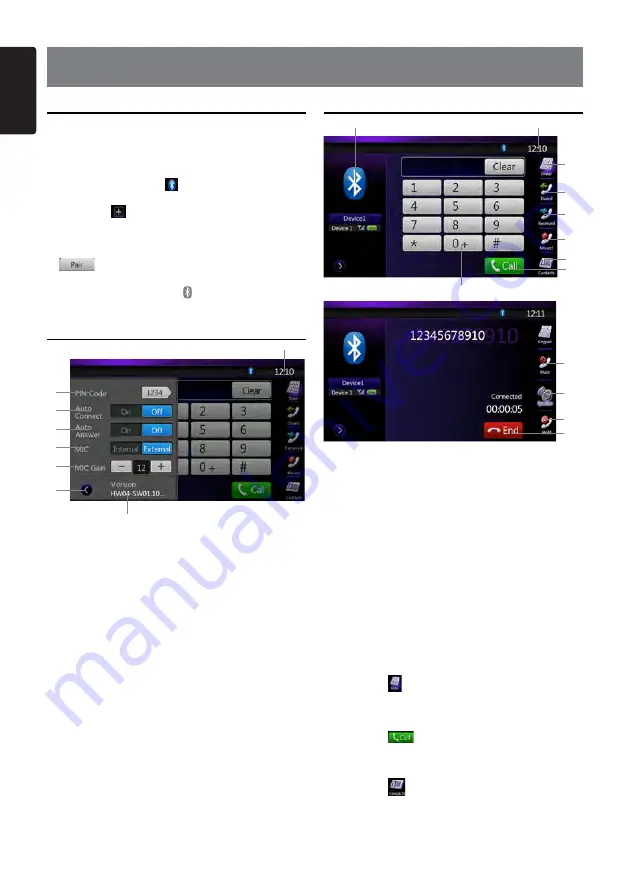
Bluetooth settings

1

2

3

4

5

6

8

7

1- Set Pin Code
2- Auto Connect on/off
3- Auto Answer on/off
4- Set Internal/ External MIC
5- MIC Gain
6- Close the Settings Page
7- System time
8- Software Version of bluetooth

Bluetooth Telephone menu

3

1

9

2

4

5

6

7
8

10

11

12

13

1- Device information
2- System time
3- Display Key pad
4- Dialed calls
5- Received calls
6- Missed calls
7- Contacts
8- Call the entered number Call 
9- Keyboard
10-Mute the microphone
11- Talk by using the cellular phone and canceling the 

hands-free function

12- Hold the current phone call
13- Hang up

•Making a call using the Ten-Key pad

1. Touch the [

] key to display the Ten-Key pad 

screen.

2. Enter the telephone number by using the Ten-Key 

pad displayed on the screen.

3. Touch the [

] (Send) key to call the entered 

number.

•Making a call using the Contacts

1. Touch the [

] key to display the Phone Book 

screen.

2. Touch the desired Name key you wish to dial.

• Flick the list up and down to scroll the list.

10. Bluetooth MODE OPERATIONS

Содержание NZ502

Страница 1: ...on Gu a de inicio r pido y Manual de instalaci n Multimedia Station With Built in Navigation 7 Touch Panel Control Station multim dia avec navigation int gr e et commande par cran tactile de 7 pouces...

Страница 2: ...1 NZ502 1 English NX602...

Страница 3: ...iPod audio List mode screen 15 9 iPod VIDEO MODE OPERATIONS 16 iPod Video ID3 mode screen 16 iPod VideoList mode screen 16 iPod Video Settings mode screen 16 iPod Simple Control Mode 17 10 Bluetooth...

Страница 4: ...Menu 28 Set the Anti Theft code 29 19 Start using Clarion Mobile Map 30 INSTALLATION WIRE CONNECTION GUIDE 32 Notes For details of functions and operation of this product refer to Owner s manual The...

Страница 5: ...an that an electronic accessory has been designed to connect specifically to iPod or iPhone respectively and has been certified by the developer to meet Apple performance standards Apple is not respon...

Страница 6: ...English English Changes or modifications to this product unapproved by the manufacturer will viod the warranty and will violate FCC approval NZ502 1 1 1 65x75mm 2 80g 3 PANTONE Black C 4 INFORMATION F...

Страница 7: ...ardware reset the unit Note When the RESET button is pressed frequencies of radio stations titles etc stored in memory are cleared AUX1 JACK AUX 1 Connector Buttons Short press to search next track or...

Страница 8: ...lable when a call incoming or in telephone talking Press to reject call when a call incoming press to end a call when in telephone talking ISR SEND Button ISR Function When in tuner mode press and hol...

Страница 9: ...POWER button on the panel to turn on the unit Selecting a Source Press MENU POWER button on the PANEL to show main source menu Change page by dragging left or right or touching other buttons Touch the...

Страница 10: ...elephone Press the button to display the Telephone mode Bluetooth Audio Press the button to display the Telephone mode Rear Button Press the button to display the Bluetooth Audio mode Setting Button P...

Страница 11: ...eginning of a scene using the chapter numbers or title numbers recorded on the DVD Video disc 1 Showing the DVD menu touch button The Key Pad screen appears with the chapter title number input mode To...

Страница 12: ...4 5 6 7 8 9 10 11 12 13 1 Next page 2 Previous Track Fast Backward long press 3 Play Pause 4 Next Track Fast Forward long press 5 Progress bar 6 Show Video files list 7 System time 8 Bluetooth status...

Страница 13: ...folder 22 Current Folder Showing title of current folder The number on the folder symbol is the number of files and folders number in current folder Touch the title of current folder play list will s...

Страница 14: ...at Button 4 Random Button 5 Next Track Fast Forward Button 6 MP3 WMA files in list 7 Folders in list 8 Folders browse control 9 Playback status info 10 Album Art 11 Current ID3 info area 12 Elapsed pl...

Страница 15: ...ndicator Seek bar 5 Display USB video menu 6 Repeat playback 7 System time 8 Bluetooth status 9 Playback info USB Video Menu 1 3 4 5 2 6 7 10 15 9 8 11 12 14 13 16 18 17 1 Open option menu 2 Play Paus...

Страница 16: ...ckward long press 5 Play Pause 6 Next Track Fast Forward long press 7 ID3 Information area touch to hide ID3 Information 8 Next Page Previous Page 9 Category List 10 System Time display 11 Bluetooth S...

Страница 17: ...ss bar iPod Video ID3 mode screen 1 2 3 4 9 10 11 5 6 7 8 13 12 1 Display video settings mode screen 2 Previous Track Fast Backward long press 3 Play Pause 4 Repeat playback 5 Next Track Fast Forward...

Страница 18: ...ss it is iPod Audio or iPod Video mode But only Previous Track Play Pause and Next Track can be operated 1 2 4 3 5 6 7 8 9 10 1 Previous Track 2 Display the video of iPod iPhone 3 Next Track 4 Play Pa...

Страница 19: ...C Gain 6 Close the Settings Page 7 System time 8 Software Version of bluetooth Bluetooth Telephone menu 3 1 9 2 4 5 6 7 8 10 11 12 13 1 Device information 2 System time 3 Display Key pad 4 Dialed call...

Страница 20: ...nd Received calls Flick the list up and down to scroll the list 2 Touch the desired History item key you wish to dial 3 Touch the key to call the specified number The Telephone Interrupt screen is dis...

Страница 21: ...time 9 Show List Screen 10 Current station name 11 Current title Touch icon to store current title to track favorites list 12 Currentartist Touch icon to store current artist to artist favorites list...

Страница 22: ...ncies Display 5 Tune Previous 6 Tune Next 7 LO DX Display 8 Bluetooth status 9 System time 10 Information area Preset List mode 1 1 Play selected station in preset stations list Manual store station L...

Страница 23: ...D Radio Sub channel HD Radio Sub channel Function If the key is enabled please touch the key to tune to next available sub channel Note Not all stations have HD Radio sub channel broadcasts The key is...

Страница 24: ...stations 15 Current program name 16 To delete the selected preset programs Store the program 17 Playback Status 18 Fast Backward 19 Play Pause 20 Fast Forward 21 Go to Live mode 22 remain time 23 Buf...

Страница 25: ...put have audio signal the unit will broadcast audio of external device You cannot directly control external devices connected to AUX 1or AUX 2 input 16 CAMERA OPERATIONS Switching to Camera mode Press...

Страница 26: ...ext page 2 Previous Track Fast Backward long press 3 Play Pause 4 Next Track Fast Forward long press 5 Progress bar 6 Show DVD title menu 7 Front Rear switching 8 Repeat playback 9 Select audio langua...

Страница 27: ...26 NZ502 English iPod Video Rear Source ID3 Mode Same as iPod function of front source...

Страница 28: ...NDORA On or Off TFT Auto Open There are two options On and Off If current setting is On the TFT screen will slide out automatically when the system is power on If current setting is Off the TFT screen...

Страница 29: ...ed with GPS local time or not Navi Interrupt There are three choose On Popup Off On The navigation screen will cover to AV screen when reaching some key point Popup When small turn info window will po...

Страница 30: ...ed Enter the new password twice then anti theft code is set and your unit is secured When the Anti theft is On you need enter correct Anti theft code to turn the unit on If you enter wrong code three...

Страница 31: ...he destination of a route To enter an address as the destination do as follows 1 if you are on the Map screen tap to return to the Navigation menu 2 In the Navigation menu tap the following buttions 3...

Страница 32: ...location if there is no route calculated 24 Find Favourite This button opens the list of your favorite destinations 25 Find History This button opens the History list You can select one of your prvio...

Страница 33: ...Trim ring 1 Cleaning cloth 1 Warranty Card 1 Owner s manual CD R 1 Quick start guide and Installation manual 1 Electro tap 2 Mounting Bracket key Flush mount bolts 4 Hexagon Head Screw 5 AV cable 1 Fi...

Страница 34: ...that the unit will not hamper operation of the gearshift lever or obstruct your view before selecting the installation location Figure 2 3 Install the unit within 30 of the horizontal plane Figure 3...

Страница 35: ...radar detector If it is installed near these devices GPS reception may be impaired To improve the GPS signal reception install the GPS antenna horizontally on a flat plane Do not wax or paint the cov...

Страница 36: ...outer escutcheon so that all the hooks are locked Note Some car models require special mounting kits for proper installation Consult your Clarion dealer for details Fasten the front stopper securely...

Страница 37: ...ure the mounting brackets to the chassis as shown in Figure 8 Holes are pre tapped for TOYOTA and NISSAN vehicles modification such as drilling new holes of the mounting brackets may be required for o...

Страница 38: ...check to see if the wiring is correct If a fuse is blown replace it with a new one of the same amperage rating as the original 15A FUSE 4 To replace the fuse remove the old fuse on the back of the uni...

Страница 39: ...ine Out Front R Line Out Video Out Front L Video Audio R Audio L Video Out Camera Yellow White White Red Red Red White Yellow Purple Gray Gray Red Black Black Black White Connector Cable Steering Whee...

Страница 40: ...ite Black Green Green Black Blue White Orange White Red Brown Blue 12V main power Ground Rear right Rear right Parking brake cord Purple White Reverse gear cord Front right Front right Front left Fron...

Страница 41: ...main unit For detailed information refer to the instruction sheet or manual for the iPod iPhone cable Note This unit may not support all functions of all iPod iPhone devices The iPod iPhone connectio...

Страница 42: ...Clarion Co Ltd All Rights Reserved Copyright 2012 Clarion Co Ltd Printed in China Imprime au Chin Impreso en China...

Отзывы: