background image

NX603/FX503

9

English

For details on how to use applications, 
refer to the Help for each application that is 
started up on the smartphone.

Procedure up to Smartphone 
linking

The Smartphone linking procedure is as 
follows.

(For iPhone)
1.  

Start up Smart Access on the 
smartphone.

2.   Connect the unit to the smartphone.

Use CCA-750 (sold separately) and VTR 
cable.

3.   Start Smartphone linking on the unit.

(For Android smartphones)
1.  

Start up Smart Access on the 
smartphone.

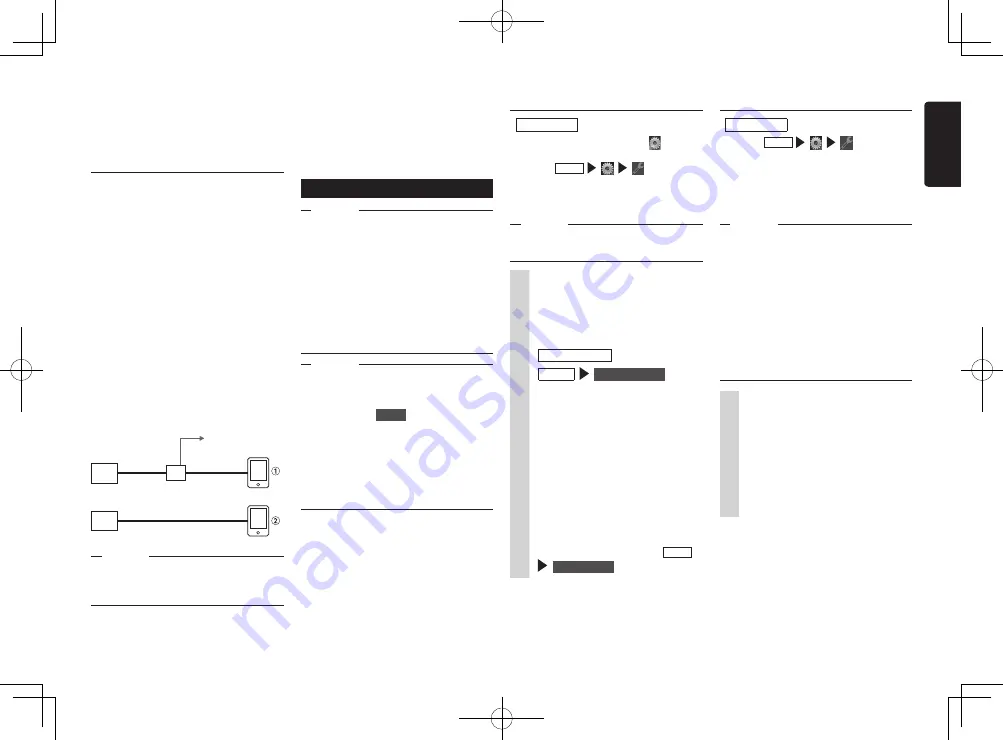
2.   Connect the unit to the smartphone.

There are two methods of connection as 
follows depending on the smartphone 
model.

The unit

The unit

HDMI cable

HDMI 
cable

HDMI/MHL 
conversion adapter

HDMI/MHL 
conversion cable

Connect to the 
cigarette lighter port, 
etc. on the vehicle to 
supply power.

Smartphone

Smartphone

Attention

• 

For the HDMI/MHL convertion adapter, 
only an adapter that supports EDID 
transfer can be used.

For iPhone

Preparations


Set “Connection Method” of 

 on the 

iPod video screen to “USB + VTR”.


Select     MENU         


 and then set 

“Device:In-car-device LNK” to “iPhone”.


Start up Smart Access on the 
smartphone.

Notice

• 

During Smartphone linking, operations on 
the smartphone are not possible.

1

Connect the smartphone to the 
unit.

Connect iPhones with the video jack 
of CCA-750 (sold separately) still 
connected to the VTR cable.

2

   Smart  Access   

 , or  

   MENU   


 Smart Access 

Start up Smart Access. The list of 
linking-related applications installed 
on the smartphone is displayed.
When an application is started up 
on the smartphone, the screen is 
switched to the application screen.

3

Select the application you want 
to start up.

The application starts up. The 
application can be operated from 
screens on the unit as if you are 
operating the smartphone.
To end an application, touch   MENU      


 Smart Access 

 .

Connect a smartphone that supports the 
following Bluetooth profile via Bluetooth for 
use.


SPP (Serial Port Profile)


HID (Human Interface Device Profile)

3. Start Smartphone linking on the unit.

Starting up applications

Notice

• 

The unit sometimes does not support 
smartphone multi-touch or flicking 
functions.

• 

Applications cannot be added or deleted 
from the unit. Execute addition or deletion 
of applications on the smartphone.

• 

During Smartphone linking, do not set 
the smartphone to a sleep state. Doing 
so might prevent the smartphone from 
functioning properly.

MEMO

• 

When Smart Access is used for the first 
time, the Terms of Use confirmation 
screen is displayed. Check the terms of 
use, and touch 

 Check 

 .

• 

“!” will be displayed when there is a 
new version of Smart Access available. 
To update Smart Access, remove the 
smartphone from the unit, and execute 
the update by operating the application 
on the smartphone.

For Android smartphones

Preparations


Select    MENU         


 and then set 

“Device:In-car-device LNK” to “Android”.


Register (pair) the smartphone to the 
unit. 

 P.7


Start up Smart Access on the 
smartphone.

MEMO

• 

With some smartphone models, the HDMI 
output setting on the smartphone must be 
enabled.

• 

When you connect an Android 
smartphone, the unit can display pictures 
of the following formats by Smartphone 
linking.


-  the HDMI output resolution of 

smartphones: 
480p (720×480/640×480), 576p 
(720×576)

1

Connect the smartphone to the 
unit.

Connect the smartphone by HDMI 
cable and enable the connection via 
Bluetooth. 

 P.7

From here on, operations are the 
same as from step 2 of the procedure 
for “For iPhones”.

S-GPF_NAM_QSG.indb   9

2013/03/26   13:52:41

Содержание NX503

Страница 1: ...H PANEL CONTROL MULTIMEDIA STATION 6 2 INCH TOUCH PANEL CONTROL STATION MULTIM DIA DVD AVEC NAVIGATION INT GR E ET COMMANDE PAR CRAN TACTILE DE 6 2 POUCES STATION MULTIM DIA ET COMMANDE PAR CRAN TACTI...

Страница 2: ...product information Register at www clarion com it s easy to keep your Clarion product up to date INFORMATIONS DE L ENREGISTREMENT DE PRODUITS CLARION Pour les tas Unis et le Canada seulement www clar...

Страница 3: ...complies with Canadian ICES 003 Cet appareil num rique de la classe B est conforme la norme NMB 003 du Canada FCC ID AX2NX603 Bluetooth QD ID No B020554 NX603 CLARION CO LTD 7 2 SHINTOSHIN CHUO KU SAI...

Страница 4: ...rformance iPhone iPod iPod classic iPod nano iPod touch and iTunes are trademarks of Apple Inc registered in the U S and other countries DivX DivX Certified and associated logos are trademarks of Rovi...

Страница 5: ...d 5 This is where the microSD card is inserted to enjoy data in microSD cards 6 The map microSD is housed in here To update the map open this cover and remove and insert the card Do not open the cover...

Страница 6: ...om the remote control sold separately 5 This is the Antitheft Indicator This light blinks when the Antitheft Activation setting is set to ON to indicate that the antitheft function is activated This d...

Страница 7: ...When the unit turns on the default language is set to English Switch to your language to use the unit 1 MENU 2 System Language 3 Select the language you use 4 OK When you switch the language the unit...

Страница 8: ...etimes cannot be executed if the Bluetooth function is not enabled on the cellphone too For details refer to the User s Manual for the cellphone During hands free operations making outgoing calls taki...

Страница 9: ...is called Smartphone linking The following lists the smartphones that can be linked to the unit Covered models iPhone 4 iPhone 4S Android smartphones iPhone and iPad other than the above are not supp...

Страница 10: ...cation starts up The application can be operated from screens on the unit as if you are operating the smartphone To end an application touch MENU Smart Access Connect a smartphone that supports the fo...

Страница 11: ...21 20 13 14 17 18 12 To enlarge this small map and open the Map screen tap Show Map button 13 Zooming in and out 14 Tilting up and down 15 Rotating left and right 16 2D or 3D view 17 Compass in 2D ma...

Страница 12: ...d below This may cause a fire accident or electrical shock A location exposed to rain or dust An unstable location or where the system may fall Do not install this unit in a place exposed to direct su...

Страница 13: ...GPS antenna NX603 only Notice The provided disc CD ROM manual cannot be played back on this unit 3 GENERAL CAUTIONS Do not open the case There are no user serviceable parts inside If you drop anything...

Страница 14: ...icle Screws marked are attached to the vehicle Figure 4 3 Mounting bracket 1 pair for the left and right sides 8 Hexagonal screw M5 x 8 Main Unit Center Panel 2 2 Some panel openings are too small for...

Страница 15: ...he GPS antenna Stick the double sided tape to the bottom face of the GPS antenna Double sided tape Bottom face of the GPS antenna Vehicles other than NISSAN and TOYOTA In some cases the center panel m...

Страница 16: ...w Red White Red White audio input terminal video output terminal SiriusXM Connect Vehicle Tuner terminal sold separately Rear audio output terminal Android smartphone Android smartphone External Ampli...

Страница 17: ...ng brake lead Grass green Parking brake signal lead Parking brake lead to battery How to attach the electro tap 1 Place the Parking brake lead at the stopper and fold it back in the direction of the a...

Страница 18: ...All Rights Reserved Copyright 2013 Clarion Co Ltd Printed in Japan Imprim au Japon Impreso en Jap n QY 1010U QZ 3010U 2013 4 280 9153 01 S GPF_NAM_QSG indb 54 2013 03 26 13 53 03...

Отзывы: