FZ105
6
English
Radio Operation
[ ] Tuning Up / [ ]
Tuning Down Buttons
Select Radio as Playing
Source
Selecting the Radio Band
1. Press the
[ ] / [ ]
button to seek to
the next strongest station.
Press the
[ SOURCE ]
button to select the
RADIO mode.
Press the
[ BAND / SEARCH ]
button on the
front panel to select one Radio band among F1,
F2, F3, AM.
2. Press and hold the
[ ] / [ ]
button
Preset Scan
Preset scan receives the stations stored in preset
memory in order. This function is useful
when
searching for a desired station in memory.
1. Press the
[AS/PS]
button.
2. When a desired station is tuned in, press the
[AS/PS]
button again to continue receiving
that station.
Auto Store
Only
stations
with
sufficient
signal
strength
will
be detected and stored in the memory.
Press
and hold the
[AS/PS]
button
to
start
automatically select
six
strong
stations
and
store
them
into
six presets
.
The
new
stations
replace
any
stations already
stored
in
the
band
.
Manual Store
Recall the Stored Stations
Local Seeking
When one expected radio station has been
detected, press and hold number button 1-6 to
store it in the memory.
Press one numeric button among 1 to 6 on the
front panel to select the corresponding stored
stations.
When LOCAL seeking is ON, only those radio
stations with strong radio signal could be
received.
To select LOCAL function, press the
[ MENU ]
button on the front panel, then press the
[ ]
/ [ ]
button repeatedly until LO or DX display
on the LCD, rotate the
[VOLUME]
knob to select
local or distant mode.
Area Set
This option allows you to select the appropriate
frequency spacing for your area.
1. Press the
[MENU]
button.
2. Press the
[ / ]
button to select
AREA
"
"
3. Rotate the
[VOLUME]
knob to select:
"U.S.A", "LATIN”,"EUROPE",
"
ASIA"
4. Press
the
[MUTE]
button
to
confirm
.
BAL (Balance)
Rotate the
[VOLUME]
knob to adjust the
balance between the right and left speakers
from 10R (full right) to 10L (full left).
FAD (Fader)
Rotate the
[VOLUME]
knob to adjust the f
ader
between the front and rear speakers from
1
0R (full rear) to
1
0F (full front).
SUB LPF (SUB ON)
Rotate
[VOLUME]
knob to adjust
the
subwoofer
Low Pass Filter range:
80
HZ/
120
HZ/
160
HZ
SUB GAIN (SUB ON)
Rotate the
[VOLUME]
knob to adjust
the
subwoofer
gain
range
: 0
to
12
XBS
On
/
Off
Rotate the
[VOLUME]
knob
to
turn
On or
Off
the
X
-
BASS
bosster
function
.
SUB
On
/
Off
Rotate the
[VOLUME]
knob to
select
subwoofer
between ON and OFF
change intervals step by step.
SOURCE
AS/PS
1. Press the
[ ]
button to advance to the
next track/song.
Press the
[ ]
button to go to previous
track/song.
2. Press and Hold in the
[ ]
button to fast
forward through the track/song.
Press and Hold in the
[ ]
button to fast
backward through the track/song.
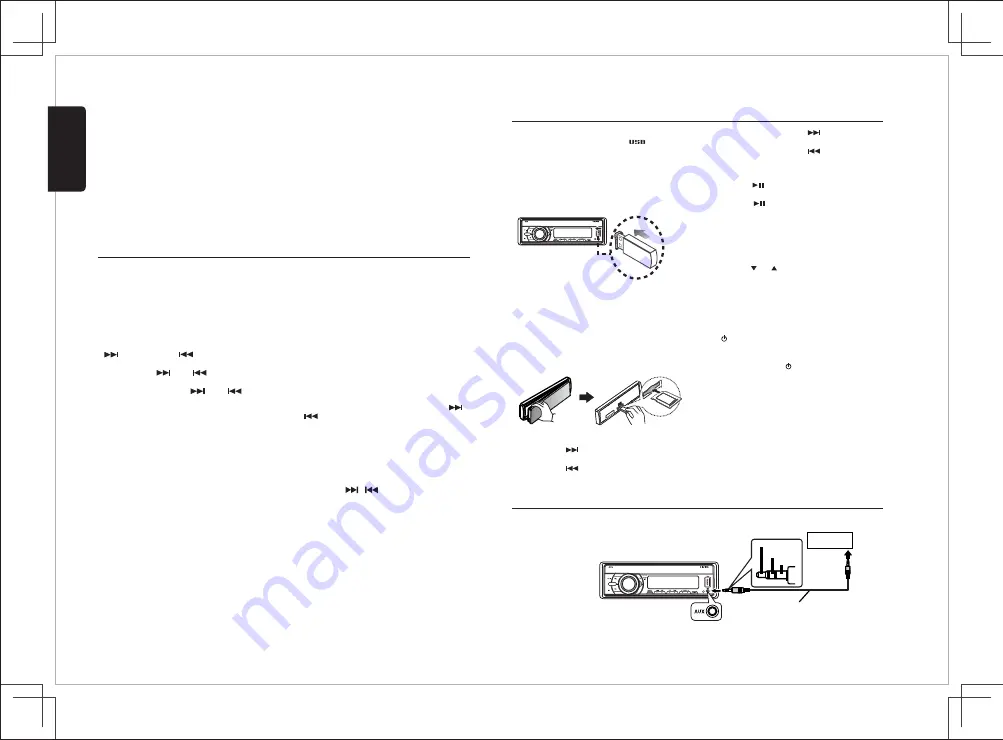
Insert the USB device
Selecting a Track
Play
/
Pause
1. Slide the USB socket cover to left.
2. Insert the USB device into the USB socket.
Press the
[SOURCE]
button to select
USB /
3. To remove the USB device, you should first
select another source or turn off the power,
order to avoid damaging the USB device.
in
Then take off the USB device.
Press the
[ ]
button to pause the track/song
that is currently playing.
Press the
[ ]
button to resume playing the
track/song that has been paused.
This function allows you to select a folder
containing MP3/WMA files and start playing
from the first track in the folder.
Press the
[ 5 / 6 ]
button to select a folder.
During playback, pressing the
[ INFO ]
button
will
cycle through the following
automatically
information on the file being played on the LCD:
FOLDER NAME->FILE NAME
->
->TITLE
ARTIST->ALBUM
Folder Select
Display Function
2. Rotate the
[ VOLUME ]
knob to search
through all folders on the device then press
[ / MUTE ]
to make your selection.
3. Rotate the
[ VOLUME ]
knob to select the
desired track within the previously selected
folder and press
[ / MUTE ]
to start playing.
Search Function
1. Press the
[ BAND / SEARCH ]
button on
front panel access the MP3 / WMA file
mode.
search
USB and SD Mode Operation
AUX Mode Operation
SOURCE
AS/PS
Left Track
Right Track
Ground
Portable audio player,
etc..
3.5mm Cable (not included)
Press the
[ SOURCE ]
button on the front panel
to select “AUX IN”.
AUX IN is just for audio content with 3.5mm
Jack connector plugged into audio-in socket on
the front panel.
4X45W
IR
4X45W
IR
1. Press the
[OPEN]
button to unlock the front
panel.
2. Hold the left hand side of the panel & pull
forward to disengage it from the chassis.
3. Insert the SD Card into the slot with label
facing left until a “CLICK” sounds is heard.
4. Replace the front panel and p
ress the
[SOURCE]
button to select SD mode to start
playing.
Insert the SD Card
IPOD
mode to start playing.
The top function resets the USD and SD player to
the first track of the device. Press the
[1 ]
button
(long press) to play the first track (track No. 1) on the
USB or SD mode.
Top function
Содержание FZ105
Страница 9: ......


