background image

Note:

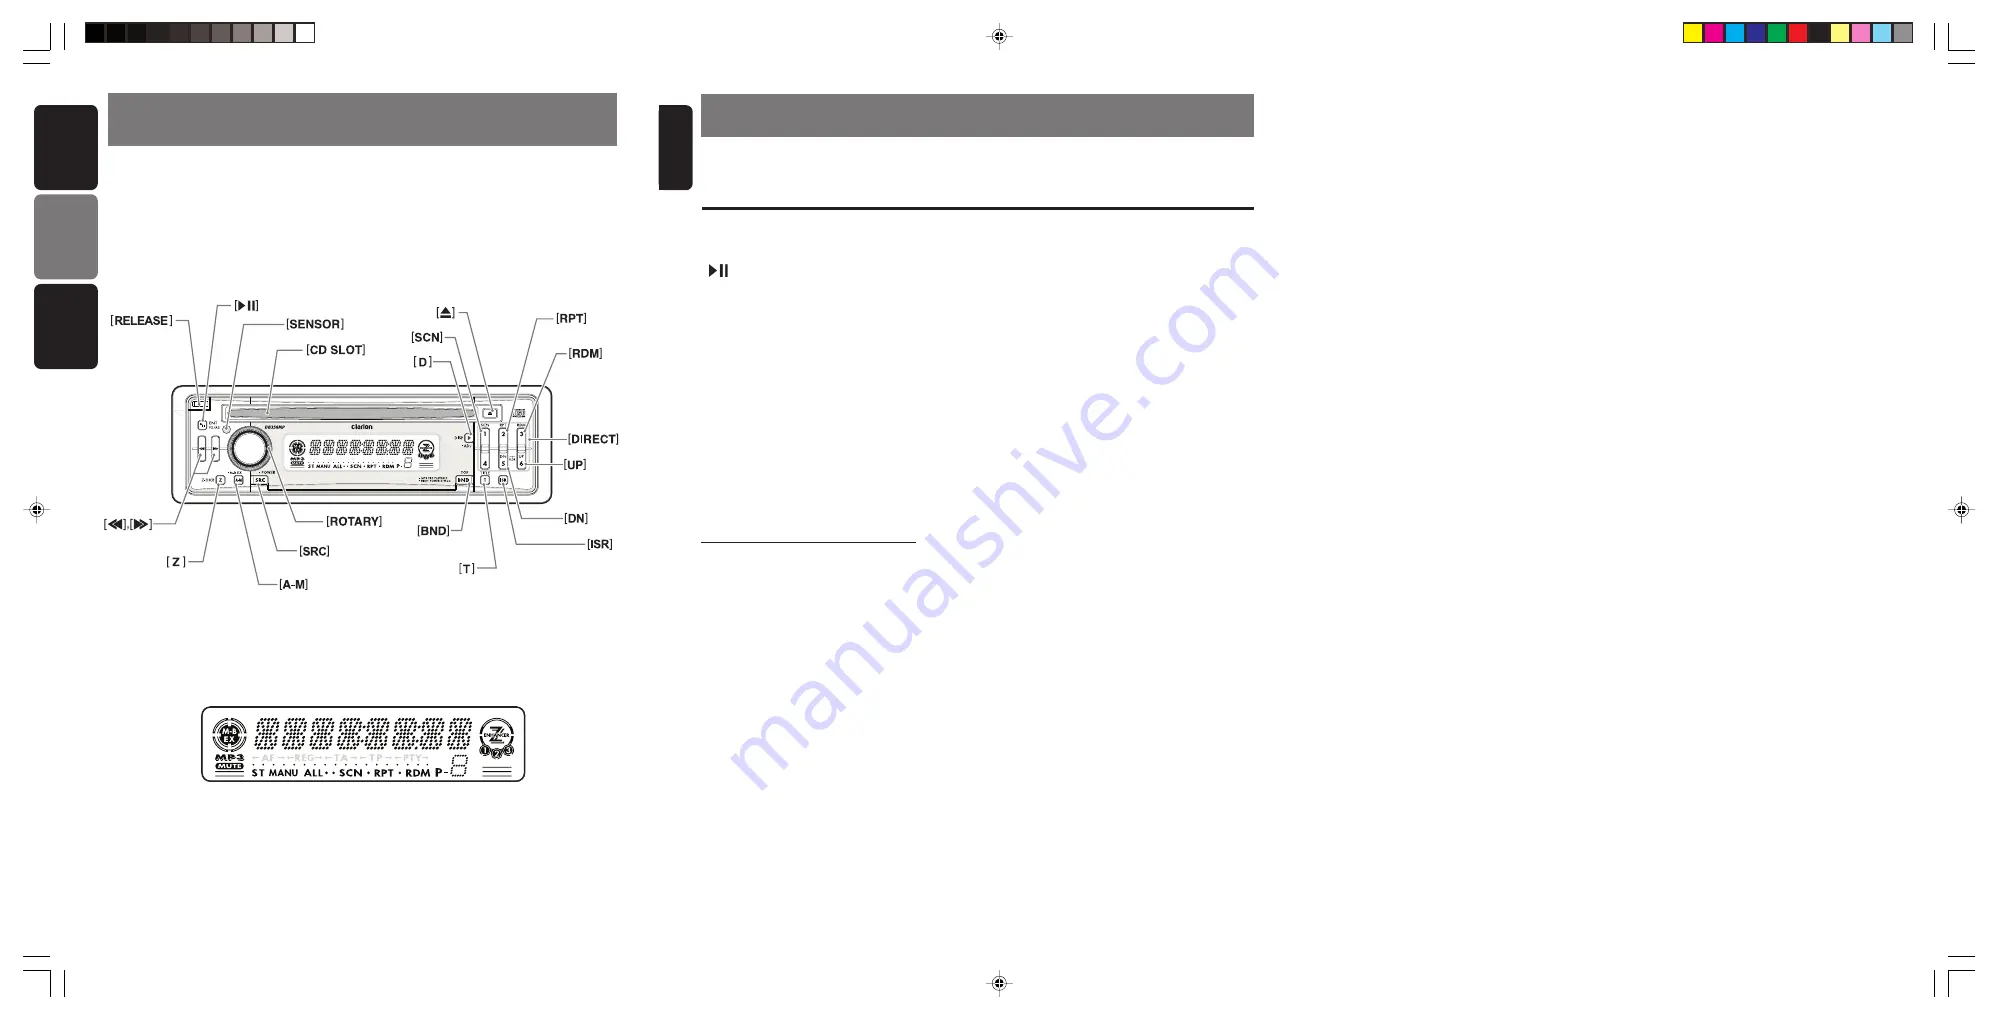
Be sure to unfold this page and refer to the front diagrams as you read each chapter.


 !"#$%&'()*+,-./

W


=

=

 !

=

=

=

=

=

=

=


=

 !"#

K

SOURCE UNIT /

 /  

 !

 !

 !

 !

 !

DISPLAY /


 /  

 !"

 !"

 !"

 !"

 !"

Note:

• Be sure to read this chapter referring to the front diagrams of chapter “

2. CONTROLS

” on page 3.

Names of the Buttons and their Functions

2. CONTROLS / 

=


English

3. BUTTON TERMINOLOGY

4

DB356MP

3

DB356MP

English


[RELEASE] button

• Press the [

RELEASE

] button to unlock the DCP.


] button

• Plays or pauses a CD while in the CD mode.
• To enter various setting.
• Performs preset scan while in the radio mode.

When the button is pressed and held, auto store
is performed.

[SENSOR] button

• Receiver for remote control unit.
• Operating range: 30° in all directions.

[CD SLOT]

• CD insertion slot.

[

Q

] button

• Ejects a CD when it is loaded into the unit.

[D] button

• Switch the display indication (Main display, clock

display).

MP3 FUNCTION-DISPLAY SELECTION
• Display changes in the following order:

Track No. / Play time 

 Folder No. / Track No.

 Title Display 

 Clock Display 

 Track No. /

Play time...

• Long press to enter adjustment mode.

[SCN] button

• Performs scan play for 10 seconds for each

track while in the CD mode.

[RPT] button

• Plays repeatedly while in the CD mode.

[RDM] button

• Performs random play while in the CD mode.

[UP] button

• Play first track of next folder which contain MP3

files.

Key function only available after MP3 indicator turned
on.

[DN] button

• Play first track of previous folder which contain

MP3 files.

Key function only available after MP3 indicator turned
on.

[DIRECT] button

• Stores a station into memory or recall it directly

while in the radio mode.

[ISR] button

• Recalls ISR radio station in memory.
• Press and hold for 2 seconds or longer: Stores

current station into ISR memory (radio mode
only).

[T] button

• Switches MP3 TITLE display.
• Press and hold for 1 second to scroll display

data.

[BND] button

• Switches the band, or seek tuning or manual

tuning while in the radio mode.

• Plays a first track while in the CD mode.
• Press and hold the button to select between CD-

DA playback and MP3 playback in Multisession
CD.

[ROTARY] knob

• Adjust the volume by turning the knob clock-

wise or counterclockwise.

• Use the knob to perform various settings.

[SRC] button

• Press the button to turn on the power.

Press and hold the button for 1 second or longer
to turn off the power.

• Switches the operation mode among radio and

CD/MP3 mode.

[A-M] button

• Press and hold the button for 1 second or longer

to switch the MAGNA BASS EX on/off.

• Use the button to switch to the audio mode

(bass/treble, balance/fader)

[Z] button

• Use the button to select one of the three types

of sound characteristics already stored in
memory. (Z-Enhancer)

[

a

], [

d

] button

• Selects a station while in the radio mode or se-

lects a track when listening to a CD.

• Press and hold the button for 1 second or longer

to switches the fast-forward/fast-backward.

DB356MP_cover

11/3/04, 9:01 AM

2

Содержание DB356MP

Страница 1: ...ine Level Output High Power 51W X 4 Clarion Co Ltd 1 FEATURES 2 2 CONTROLS 3 SOURCE UNIT 3 DISPLAY 3 3 BUTTON TERMINOLOGY 4 Names of the Buttons and their Functions 4 4 PRECAUTIONS 5 5 HANDLING COMPACT DISCS 6 6 DCP Detachable Control Panel 7 7 REMOTE CONTROL 8 Functions of Remote Control Unit Buttons 9 8 OPERATIONS 10 Basic Operations 10 Radio Mode Operations 12 CD Mode Operations 13 MP3 Mode Ope...

Страница 2: ... turned on DN button Play first track of previous folder which contain MP3 files Key function only available after MP3 indicator turned on DIRECT button Stores a station into memory or recall it directly while in the radio mode ISR button Recalls ISR radio station in memory Press and hold for 2 seconds or longer Stores current station into ISR memory radio mode only T button Switches MP3 TITLE dis...

Страница 3: ...e optical parts of the player do not use the player for about one hour and the con densation will disappear naturally to allow nor mal operation USE OF CONTROLS ADJUSTMENTS OR PERFORMANCE OF PROCEDURES OTHER THAN THOSE SPECIFIED HEREIN MAY RESULT IN HAZARDOUS RADIATION EXPOSURE THE COMPACT DISC PLAYER SHOULD NOT BE ADJUSTED OR REPAIRED BY ANYONE EXCEPT PROPERLY QUALIFIED SERVICE PERSONNEL 4 PRECAU...

Страница 4: ...ce of the compact disc or mark the surface with a pencil or pen Always handle the compact disc by the edges Never touch the surface To remove fingermarks and dust use a soft cloth and wipe in a straight line from the center of the compact disc to the circumference New discs may have some roughness around the edges The unit may not work or the sound may skip if such discs are used Use a ball point ...

Страница 5: ...g the DCP in the DCP case Hold the DCP in the orientation as shown in the figure below and put it into the supplied DCP case Ensure the DCP is in the correct orientation Note If the DCP is dirty wipe off the dirt with a soft dry cloth only The DCP can easily be damaged by shocks After removing it be careful not to drop it or subject it to strong shocks When the Release button is pressed and the DC...

Страница 6: ...that it slides into the compartment 4 Replace the cover and slide in until it clicks into place Notes Misuse may result in rupture of the battery producing leakage of fluid and resulting in personal injury or damage to surrounding materials Always follow these safety precautions Use only the designated battery When replacing the battery insert properly with polarities oriented correctly Do not sub...

Страница 7: ... only Switches among main display clock display Turns power on and off When press and held for 1 second Turns power off Switches between radio and CD MP3 Plays the first track Top play Moves tracks up and down When pressed and held for 1 second Fast forward fast backward Switches between playback and pause Switches between playback and pause Switch among main display folder number display TITLE di...

Страница 8: ...off the power Note Be careful about using this unit for a long time with out running the engine If you drain the car s bat tery too far you may not be able to start the engine and this can reduce the service life of the battery 1 Press the SRC button 2 The illumination and display on the unit light up The unit automatically remembers its last operation mode and will automatically switch to display...

Страница 9: ...blink for 2 seconds and return to CLOCK E Adjusting screensaver setting 1 Press the D button and press button to select SCRN SVR 2 SS ON or SS OFF will be display after 2 seconds 3 Turn the ROTARY knob clockwise to turn on the screensaver or counterclockwise to turn off the screensaver 4 If Screensaver setting is set to on Screensaver will be activated after 30 seconds no key op eration Adjusting ...

Страница 10: ... which means that a manual selection function is on 3 Press the or button to manually tune in a station Preset memory function Preset memory function can store up to 24 sta tions six stations for each of FM1 FM2 FM3 and AM Auto store function Automatic Station Store 1 Press BND button to select the desired band FM1 FM2 FM3 or AM 2 Press and hold the button for 1 second or longer The stations at wh...

Страница 11: ... them when ejected Top function Press the BND button then the CD will start play ing from the first song track number 1 For MP3 mode it will start playing from the first song of current folder Scan play Intro Music Scan At Audio CD press the SCN button the SCN is lit display shows TRK SCN then the CD will play the first 10 seconds of each track of the whole disc Press the SCN button again to disen...

Страница 12: ...o be played by writing them onto a medium such as a CD R with their file names beginning with play sequence numbers such as 01 to 99 depending on your CD writer For example a medium with the following folder file hierarchy is shown below Example of a medium s folder file hierarchy Precautions when creating MP3 disc File extensions Always add a file extension MP3 to MP3 file by using single byte le...

Страница 13: ... for MP3 CDs Random track and Random all folders 3 Each time the button is pressed random play turns on or off Scan MP3 CD 1 This function enables you to play the first 10 seconds of each track in the MP3 folder or the first track of each folder 2 There are 2 types of scan play accessible for MP3 CD Scan track and Scan all folders 3 Each time the button is pressed scan play turns on or off 3 Each ...

Страница 14: ...re insert it again as to play MP3 files 6 Types of recording that can be played are as follows 3 The displayed item can be scrolled by press ing the T button for more than 1 second 4 If a MP3 file does not support for ID3 TAG the display will show NO TAG 5 If a MP3 file encode with ID3 TAG header but no consist of any TAG information the display will show nothing 7 When a mixed mode CD is loaded a...

Страница 15: ...ompact disc with no scratches Let dry for about 1 hour with the power on Turn off the power then press the RELEASE button and remove the DCP Press the reset button for about 2 seconds with a thin rod Wipe the dirt off with a soft cloth moistened with cleaning alcohol 9 TROUBLESHOOTING To protect the system this unit has been equipped with self diagnostic functions If a fault arises a warning is is...

Страница 16: ...it may happen General Power Supply Voltage 14 4 V DC 10 8 V to 15 6 V allowable nega tive ground Current Consumption Less than 15 A Speaker Impedance 4 Ω 4 Ω to 8 Ω allowable Weight 2 42 lb 1 1 kg Dimensions 178 mm Width X 50 mm Height X 152 mm Depth 11 SPECIFICATIONS 50 mm 178 mm 58 mm 188 mm 152 mm AM tuner Frequency Range AM 531 kHz to 1629 kHz Usable Sensitivity 25 µV CD player System Compact ...

Страница 17: ...ine Level Output High Power 51W X 4 Clarion Co Ltd 1 FEATURES 2 2 CONTROLS 3 SOURCE UNIT 3 DISPLAY 3 3 BUTTON TERMINOLOGY 4 Names of the Buttons and their Functions 4 4 PRECAUTIONS 5 5 HANDLING COMPACT DISCS 6 6 DCP Detachable Control Panel 7 7 REMOTE CONTROL 8 Functions of Remote Control Unit Buttons 9 8 OPERATIONS 10 Basic Operations 10 Radio Mode Operations 12 CD Mode Operations 13 MP3 Mode Ope...

Отзывы: