background image


18 

 ClareVision Network Video Recorder Installation Guide 

Configuring basic parameters of IP cameras 

After adding the IP camera, the basic information displays on the page. You can 

configure the basic parameters of the IP camera.  

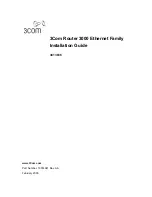
To configure basic parameters: 

1.  Click the   icon to edit the parameters. Edit the IP address, protocol, and 

other parameters. 


2.  Click 

Apply

 to save the settings, and then click 

OK

 to exit the editing 

interface. 

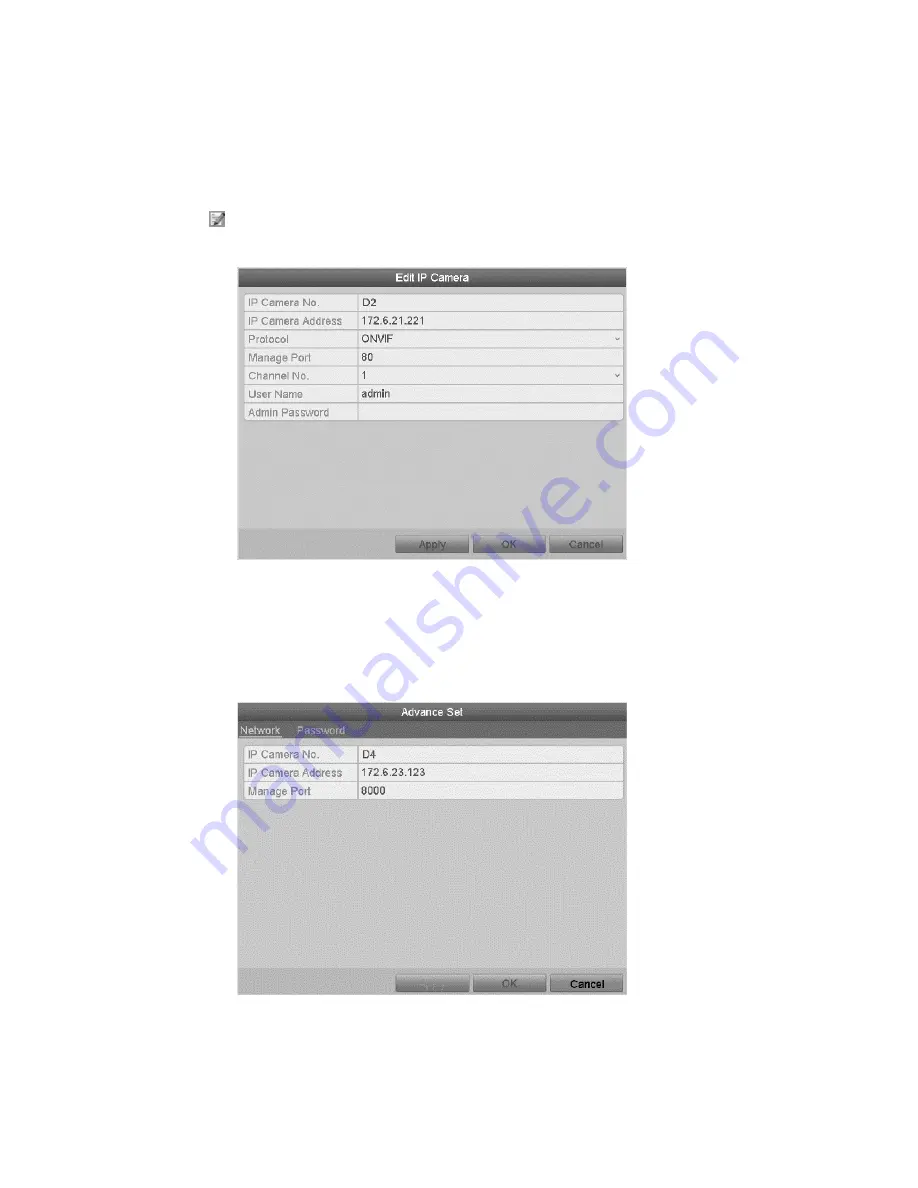
To edit more parameters: 

1.  Click the 

Advance Set

 icon. 


2.  You can edit the network information and the password of the camera. 
3.  Click 

Apply

 to save the settings, and then click 

OK

 to exit the interface. 

Содержание ClareVision CV-M16810-04

Страница 1: ...ClareVision Network Video Recorder Installation Guide Model CV M16810 04 Last modified 09 29 2016 Doc ID 346 Rev 05...

Страница 2: ...ational copyright law Trademarks The ClareVision name is a trademark of Clare Controls LLC Other trade names used in this document may be trademarks or registered trademarks of the manufacturers or ve...

Страница 3: ...alarm connectors 9 Controller connection 9 HDD storage calculation chart 10 Menu operation 11 Menu structure 11 Startup and shutdown 11 Using the Setup Wizard 12 Live View 16 Adding and configuring IP...

Страница 4: ...ii ClareVision Network Video Recorder Installation Guide Specifications 26 Regulatory information 28 Warranty information 29 Contact information 29...

Страница 5: ...X 16 channel NVR appliance 1 X AC power cord 1 X optical mouse 1 X remote control 3 X SATA hard drive cables 2 short 1 long 16 X mounting screws 2 X rack mount ears NVR installation When installing th...

Страница 6: ...ng a hard disk drive HDD A factory recommended HDD should be used for this installation Up to 8 SATA hard disks can be installed on the NVR Tools required screwdriver To install the hard disk drive in...

Страница 7: ...ClareVision Network Video Recorder Installation Guide 3 3 Connect the power cable to the HDD 4 Place the HDD on the bottom of the device and then fasten the screws on the bottom to affix the HDD...

Страница 8: ...l buttons DIRECTION In menu mode the direction buttons are used to navigate between different fields items and select setting parameters In playback mode the Up and Down buttons are used to speed up a...

Страница 9: ...to change the tab pages In PTZ control mode it zooms in the image 4 GHI ESC Enter numeral 4 Enter letters GHI Exit and back to the previous menu 5 JKL EDIT Enter numeral 5 Enter letters JKL Delete cha...

Страница 10: ...nd down In Live View mode it can be used to cycle through different channels In the Playback mode it can be used to jump 30 seconds forward backward in video files In PTZ control mode it can control t...

Страница 11: ...ovided 9 Termination Switch RS 485 termination switch Up position is not terminated Down position is terminated with 120 resistance 10 RS 485 Interface Connector for RS 485 devices T and T pins connec...

Страница 12: ...l relay between the alarm input and the device Wiring of alarm output Note Connect to a security system zone To connect to an alarm output AC or DC load use the following diagram DC Load Connection Di...

Страница 13: ...devices to the NVR 1 Disconnect the pluggable block from the ALARM IN ALARM OUT terminal block 2 Unfasten the stop screws from the pluggable block insert signal cables into the slots and then fasten t...

Страница 14: ...storage space used based on recording at one channel for an hour at a fixed bit rate Table 1 Storage calculation chart Bitrate Storage Used 96 K 42 M 128 K 56 M 160 K 70 M 192 K 84 M 224 K 98 M 256 K...

Страница 15: ...procedures are crucial to expand the life of the NVR To start the NVR 1 Check that the power supply is plugged into an electrical outlet It is highly recommend that you use an Uninterruptible Power S...

Страница 16: ...menu Menu Shutdown 2 Select Shutdown 3 Click Yes Using the Setup Wizard By default the Setup Wizard starts once the NVR has loaded To operate the Setup Wizard 1 Select the system language from the dr...

Страница 17: ...up Wizard the next time by selecting the Start wizard when NVR starts checkbox 3 Click Next on the Wizard window to enter the Login window 4 Enter the admin password By default this password is secure...

Страница 18: ...e internal NIC IPv4 address should be configured for the cameras connecting to the PoE network interface of the NVR 8 Click Next to enter the HDD Management window 9 Click Init to initialize the HDD I...

Страница 19: ...nstallation Guide 15 12 Select the IP camera to be added and then click Add 13 Click Next Configure the recording for the searched IP Cameras 14 Click Copy to copy the settings to other channels 15 Cl...

Страница 20: ...the channel so that you can identify problems quickly Table 2 Live View icons Icon Description Alarm video loss tampering motion detection or sensor alarm Record manual record schedule record motion d...

Страница 21: ...cameras with same network segment 1 Click Search to search the online cameras 2 Select the checkboxes for the cameras to be added 3 Click Quick Add to add the cameras To add other IP cameras 1 On the...

Страница 22: ...he IP camera To configure basic parameters 1 Click the icon to edit the parameters Edit the IP address protocol and other parameters 2 Click Apply to save the settings and then click OK to exit the ed...

Страница 23: ...s before you set the PTZ camera Before you begin ensure the PTZ and the NVR are connected properly through RS 485 interface PTZ settings To set PTZ 1 Enter the PTZ Settings interface Menu Camera PTZ 2...

Страница 24: ...PTZ Control icon to enter the PTZ panel Table 4 PZT control icons Icon Description Direction button and the auto cycle button The speed of the PTZ movement 3 D Zoom Patrol Previous item Stop the patr...

Страница 25: ...es recorded during the last five minutes on this channel will be played back Playback by channel To playback by channel 1 Enter the Playback menu Mouse Right click a channel in Live View mode and sele...

Страница 26: ...ant to switch playback to another channel or execute simultaneous playback of multiple channels Backup Recorded files can be backed up to various devices such as USB flash drives USB HDDs or a DVD wri...

Страница 27: ...u want to back up and click Export 4 Enter the Export interface choose a backup device and then click Export to start exporting Note You can choose to export the record files and the related log files...

Страница 28: ...ion quality and bit rate Streaming video is content sent in compressed form over a network and processed in real time that is as it is received Streaming video types Main Stream the high quality video...

Страница 29: ...eras etc Generally 5 MP at 30 fps requires around 20 Mbps for best quality A 4 channel NVR is currently limited to 16 Mbps Adjusting settings Be aware of your NVR s capacity and make adjustments if ne...

Страница 30: ...60 Hz 1280 1024 60 Hz 1280 720 60 Hz 1024 768 60 Hz VGA output 1 ch resolution 1920 1080P 60 Hz 1600 1200 60 Hz 1280 1024 60 Hz 1280 720 60 Hz 1024 768 60 Hz Audio output 2 ch BNC linear 600 Playback...

Страница 31: ...240 VAC 6 3 A 50 to 60 Hz Consumption without hard disk or DVD R W 40 W Working temperature 14 to 131 F 10 to 55 C Working humidity 10 to 90 Chassis 19 inch rack mounted 2 U chassis Dimensions W D H...

Страница 32: ...undesired operation This product and if applicable the supplied accessories too are marked with CE and comply therefore with the applicable harmonized European standards listed under the Low Voltage D...

Страница 33: ...the date of shipment from Clare Controls To view complete limited warranty details including limitations and exclusions www clarecontrols com warranty Scan the code to view product warranty details C...

Страница 34: ......

Страница 35: ......

Страница 36: ......

Отзывы: