Clabel CT320B Скачать руководство пользователя страница 4

KEY DESCRIPTION

3

(1)Press and hold the power button for 2 seconds to turn the 

       printer on.

(2)When the power is on, press and hold the power button for 

       2 seconds to turn the printer off.

(3)In standby mode, click the power button to enter the setup menu.
(4)When entering the setup menu, press the power button to return 

       to the previous level page.

Press and hold the Power button and OK button at the 
same time to print the self-test page.

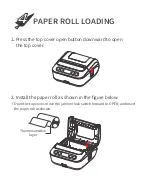
(1)Label sheet: Click OK to walk away from a label sheet to position 

       and adjust it to the start of the next label.

(2)Continuous paper: click OK to go 10mm, long press to keep going, 

       release the button to stop going.

(3)When you enter the Setup menu, click OK to confirm your selection.

When entering the Setup menu click the Down button to go down 
and select the Setup item.

(1)When entering the Setup menu click the Up button to go up 

       and select a setting item.

(2)Increase the number of prints upwards when entering the offline 

       print confirmation template.

Содержание CT320B

Страница 1: ...CT3 2 0 B Label Printer Quick Installation Guide...

Страница 2: ...NPACKING CHECKLIST 1 Printer Data cable Installation Guide Installation...

Страница 3: ...NENT 2 Front view Open the top cover USB connector Lanyard hole position Display Cutter Power Menu Con rmation Paper advance button Top cover opening button Upward Downward Fixer Rubber roller Printhe...

Страница 4: ...t the same time to print the self test page 1 Label sheet Click OK to walk away from a label sheet to position and adjust it to the start of the next label 2 Continuous paper click OK to go 10mm long...

Страница 5: ...top cover move the jammer lock switch forward to OPEN and insert the paper roll as shown Thermosensitive layer 1 Press the top cover open button downward to open the top cover 2 Install the paper rol...

Страница 6: ...ner to the left until it snaps the paper roll properly and then push the locking switch back to lock it Pull out part of the paper roll and close the top cover making sure that both sides of the top c...

Страница 7: ...ooth is paired the icon is always on External Power Supply Indication Always on when the USB port is connected to the power supply and the icon disappears when the power is disconnected Battery Level...

Страница 8: ...down 5 minutes 10 minutes 15 minutes 30 minutes 60 minutes o Horizontal O set 10mm 10mm Vertical O set 10mm 10mm Prompt tone On o Display Language Chinese English Restore factory settings Press the Co...

Страница 9: ...ing Top cover not closed The printer top cover is not closed in place please close the cover Lack of paper The printer paper bin is out of paper please install the paper roll Factory settings have bee...

Страница 10: ...download YunPrint Please operate the software follwing the software guidance iOS Android Visit website https yunprint dlabel cn pc to download YunPrint and driver Download label editing app YunPrint f...

Страница 11: ...ely 5 Do not allow the printer to start printing when there is no recording paper installed otherwise the printhead and rubber roller will be damaged 6 Disconnect the DC adapter when the printer is no...

Страница 12: ...ute ethyl alcohol gently wipe the dust and particles o the thermal printhead surface 4 Only use the printer for printing until the cleaning alcohol evaporates completely and the cover is closed 1 Make...

Страница 13: ...isencouraged to try to correct the interference by one or more of thefollowing measures Reorient or relocate the receiving antenna Increase the separation between the equipment and receiver Connect th...

Отзывы: