


™
This button can be used to stutter the track by returning it to the set cue point of the main CUE button (19) and
continuing playback.
19. Cue Button
Pressing the CUE button during play provides a return to the position at which play was started. If PAUSE is used
before CUE or a CUE POINT was set, that will become the cue point. Alternately pressing the Play button and the CUE
button allows the CD to be played from the same position any number of times. The CUE Button will light up from the
time the CUE button is pressed until the CD has reset to the position at which play was started. Steady lighting of this
button indicates the ready condition. The CUE button can be held down to play a CD. When you release the CUE button
it instantly returns to the CUE POINT.
20. Cue 1 Button
This button has the same function as (19) but enables the user to set a second cue point on the track.
21. Play/Pause Button
Use this button to start playback. Press once to start playback, once again to set the pause mode, and once more to
resume playback.
22. Seamless loop IN Button
This button allows you to set the IN point of a seamless loop, pressing the IN button in pause mode will set the IN point
as the CUE point. When an IN point has been set the button will illuminate orange.
23. Seamless Loop OUT/EXIT Button
This button allows you to set the OUT point of a seamless loop. Once the OUT point has been set the unit will enter
seamless loop mode, the buttons will flash to indicate that it is in this mode. When in seamless loop mode pressing the
OUT/EXIT button will return the unit back to play mode and the buttons will stop flashing but remain lit, this indicates
that there is a loop available to use.
24. Reloop Button
If a seamless Loop has been made, but the CD Player is not actively in Seamless Loop mode, press the RELOOP
button to reactivate the Seamless loop mode, the seamless loop LED’s will flash to indicate a loop is in process.
To exit loop, press the END/EXIT button.
When the LOOP start point is set, the LED flashes.
When in LOOP mode, the LED’s flash.
Installation Notes
The control unit and player have rack-fixing holes on the front panel to enable them to be easily fitted into a suitable case.
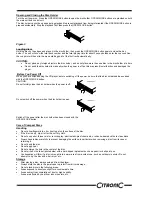
Mounting
The player will work normally when the main unit is mounted with the front panel at within 15 degrees of the vertical plane. If
the unit is tilted excessively, discs may not be loaded or unloaded properly.
The control panel's LCD's are designed to be clearly visible within the angles shown in Figure 2. Mount the control unit so
that the visual angle is within this range.
Connections
1. Turn off the POWER switch.
2. Connect the RCA phone jack (phono) cable to the input on your mixer.
3. Connect the control cords to the REMOTE connector on the main unit.
CAUTION:
•
Be sure to use the supplied control cords. Using another type of cable may result in damage.
Be sure the power is off when connecting the control cords. Otherwise the units may not work properly.
Содержание CD-4.2
Страница 1: ......
Страница 10: ...To see more products in the range visit www citronic com...