background image

41

Serial Interface Setting Options 

 The following available options can be set via the DIP switches

on the interface:

Baud Rate

19200, 9600, 4800, 2400, 1200. 600, 300 or 110

Parity

None, odd or even

Data Bit

8-bit  or 7-bit data length

Stop Bit

2-bit or 1-bit

Protocol

XON / XOFF or DTR / DSR

Warning:

 Before you make any connection be sure that the power

to the printer and the computer is off.

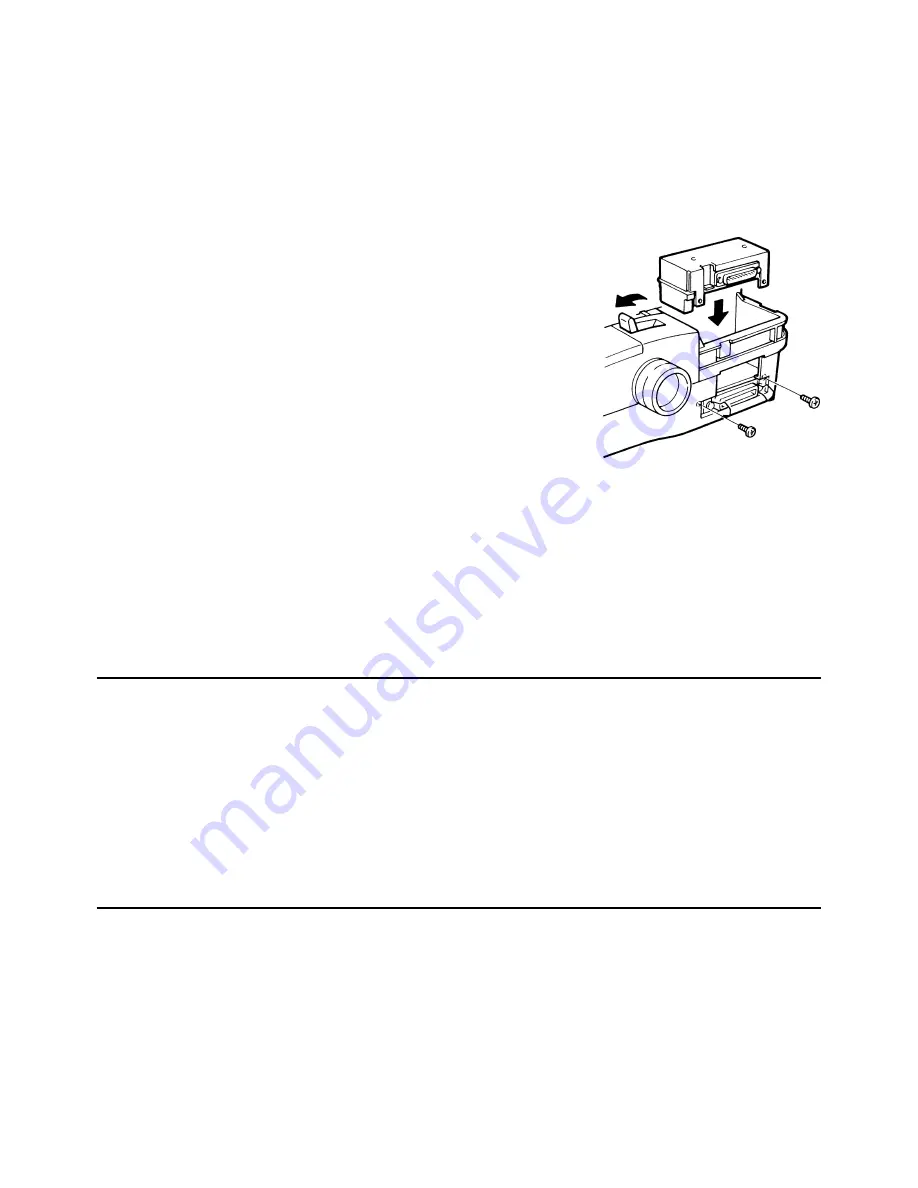
Serial Interface Installation 

Serial interface installation is a

straightforward process. First lift the cover away from the IC card
compartment. Then take your serial interface unit, and holding it
facing out, plug the connector end into the connector socket in
the compartment, making sure that at the same time the sup-
porting bars slip through the slots. With a cross-point screw-
driver you complete the installation process by screwing the bars
to the printer.

Serial Interface Protocols 

The serial interface is configured through the DIP switches on the

interface.  The serial interface offers two communication protocols: data ready and XON/XOFF.
The first is a hardware protocol and the second is a software protocol. These protocols help to
ensure that your computer doesn’t send information to the printer faster than it can print it.

To select a protocol you need to look at the manuals for the programs that you will be using with
your printer. They will tell you which serial protocol they use, select the same protocol for your
printer.

Dip Switch

Function

Switch Off

Switch On

3-1

Baud rate

See below

3-2

Baud rate

See below

3-3

Baud rate

See below

3-4

Protocol

XON/XOFF protocol

Data ready protocol

3-5

Data bit

8 bit

7 Bit

3-6

Parity

Parity check off

Parity check on

3-7

Parity

Even

Odd

3-8

Reserved (un-used)

Dip Switch

3-3

3-2

3-1

Baud Rate

ON

ON

ON

19200  (not Swift 90,120D 90x)

OFF

OFF

OFF

9600

ON

OFF

OFF

4800

OFF

ON

OFF

2400

ON

ON

OFF

1200

OFF

OFF

ON

600

ON

OFF

ON

300

OFF

ON

ON

110 or 150

Содержание Swift 120D

Страница 1: ...1 User s Manual Swift 90 Swift 120D and Swift 90x Swift 240 and Swift 240x Swift 330 and Swift 330x ...

Страница 2: ...e Push Position 13 Installing The Tractor Unit In The Pull Position 14 Setting The Paper Thickness 14 Adjusting The Paper Thickness Lever 15 Setting the Paper Select Lever 15 Paper Handling Summary Chart 15 Printing On Continuous Paper 16 Printing On Single Sheets 16 Printing On Multi Part Forms 17 Printing On Continuous Feed Labels 18 Printing On Envelopes 18 Printing On Overhead Transparencies 1...

Страница 3: ...ulation 31 Codepages International Characters 32 Euro Currency Symbol 32 Chapter 5 33 Maintenance And Fault Finding 33 Problems And Solutions 34 Error Messages And Their Causes 35 Chapter 6 37 Printer Accessories 37 RAM Modules 37 Automatic Sheet Feeder 37 Installing The Automatic Sheet Feeder 38 ASF Specification 39 Changing Between Continuous Forms And Single Sheets 39 The Colour Kit 39 Using Th...

Страница 4: ...Computer IBM PC IBM Proprinter International Business Machines Corporation Microsoft Windows Microsoft Corporation NEC Nippon Electric Company All rights reserved No part of this publication may be reproduced stored in a retrieval system or transmitted in any form or by any mean mechanical photocopying recording or otherwise without the prior written permission of Citizen Systems Europe No liabili...

Страница 5: ...dards If you are in any doubt contact your dealer or a registered electrician 8 Ensure that the power cable supplied with your printer matches the power cables of your other computer equipment If it does not please contact your dealer or a registered electrician 9 Do not allow anything to rest on the power cable and do not position the product where the power cable may be walked on 10 Except as ex...

Страница 6: ...eatures and functions for those customers who need more control About This Printer Manual Chapter 1 tells you how to unpack and assemble your printer Chapter 2 describes the various paper handling facilities of the printer Chapter 3 describes the control panel and its functions Chapter 4 deals with the actual printing process and activating the printer from your computer using popular commercial s...

Страница 7: ...elow If you live in the United Kingdom you can call our Printer Helpdesk on 0891 515 797 Calls are charged at 50p per minute correct at time of printing For the latest information http www citizen europe com Our web site contains the latest information on all our products This will include updates printer drivers details of codepages currently supported by our printers and a comprehensive FAQ freq...

Страница 8: ...n box Are all Items Undamaged Examine the printer and all the parts for obvious damage If there are any contact your dealer or delivery agent immediately Installing The Paper Feed Knob To install the paper feed knob simply insert the cylinder end of the knob with the four prongs into the paper knob opening on the right hand side of the printer Push the knob in gently until it engages Then turn it ...

Страница 9: ...ypes of forms It is located inside the printer at the left hand side adjacent to the platen F The tractor is the sprocket assemblies that feed continuous paper into the printer and keep the paper properly aligned Continuous paper also called fan fold tractor feed or pin feed paper is what you probably think of as computer paper It consists of continuous perforated sheets with holes punched along t...

Страница 10: ...ection Your printer can be connected to your computer by either using the parallel or an optional serial interface The difference is that with a serial connection data is sent to the printer one bit at a time whereas a parallel connection allows several blocks of data to be sent simultaneously The choice depends on the type of computer you own and whether it has other peripheral devices connected ...

Страница 11: ...the right viewed from the back This socket has three prongs so that cable will fit only one way Make sure that power switch is off before installing the power ca ble Push the cable firmly into the socket to make the connection secure The other end should be connected to a standard mains power outlet socket ...

Страница 12: ...e as 10 1 inches Thick Paper Paper up to 007 inches thick feeds smoothly through this printer This allows you to use bond or ledger up to 100 gsm However for thicker papers you must adjust the printhead away from the platen See Setting the Paper Thickness Lever in this chapter for details Multi Part Forms The printer can print on three part forms one original and two copies with the tractor mechan...

Страница 13: ...r or installed it in pull position Figure E shows the positions when removing the tractor unit Figure F shows the positions when installing the tractor unit The components are as follows A Tractor unit B Release tab C Groove D Pin 1 Remove any paper from the tractor 2 To remove the tractor from the pull position use two hands Place your thumbs on the release tabs and your fingers on the outside of...

Страница 14: ...ar will be above the square crossbar 7 Rest the bottom of the spring arms B pin into the half circle notch C Keep the tractor seated while you press downward from the tractor unit The notches extending down wards from the tractor unit A will engage the two forward pins B When correctly installed the tractor unit clicks into place and feels very solidly attached The tractor feeders will be almost v...

Страница 15: ...r select lever adjusts the printer for either continuous or single sheet paper If you look closely at the lever you ll see what looks like a paper stack and single sheet next to the lever The lever is moved forward to the paper stack for continuous paper and back to the single sheet for single sheets Paper Handling Summary Chart The following table provides recommendations for the type of paper yo...

Страница 16: ...e cov ers to clamp the paper 5 Adjust the paper feeders until the paper is just taut between them then relock the levers 6 Install the paper guide sheet separator in the sheet separator position Do this by sliding the small pins that point into the printer onto the L shaped channel openings on the Outside of the printer guide extensions Recline the paper guide backward At the same time slide the p...

Страница 17: ...face down between the paper holders as you would load paper in a typewriter Push the paper down gently to be sure it is all the way in 6 Wait a brief time The paper automatically feeds into the printer and stops when it reaches the correct position for the starting line of print The PAPER OUT light stops flashing 7 Prepare to print by pressing the ON LINE key which illuminates the ON LINE light Yo...

Страница 18: ...n the paper feed knob clockwise until the second sheet of the forms s at the correct starting print position When printing with the tractor in the pull position the first sheet of the forms is unusable 10 Set the paper thickness lever to 1 for 3 part forms 2 for 4 part forms 11 Replace the top cover pressing on the push locations The transparent part of the cover rests against the tractor unit 12 ...

Страница 19: ...r off line the sequence is With paper in the parked position pressing the PARK LOAD key feeds the paper to the top of form position With paper in the top of form position pressing the PARK LOAD key feeds the paper to the tear off position With paper in the tear off position pressing the PARK LOAD key retracts the paper to the park position The sequence starts again if you press the PARK LOAD key a...

Страница 20: ...his feature A Tear bar B Top cover C Rear feed paper When your computer sends a form feed com mand and no further data indicating the end of a print job the printer automatically ad vances the continuous paper up to the tear bar and stops All you have to do is reach over and pull the paper across the tear bar When your computer sends more data to the printer the paper retracts back down to the cor...

Страница 21: ...tting is the factory set ting which is approximately 8mm from the edge of the paper to the top of a normal height character 6 Press the PARK LOAD key to adjust the paper upwards in 1 60 increments or you can press the LF FF key to adjust the paper downwards in 1 60 inch increments The up arrow A and down arrow B on the control panel remind you which key moves the paper in which direction 7 Save yo...

Страница 22: ...ches at the same time On the other side of each display window there is a func tion light or LED These are used to tell you what the printer is doing They are used in a number of different ways as you will learn later in this chapter but the main use is to show which of the options has been selected with the function switches The function LEDs are also used to signal error conditions these are des...

Страница 23: ...Line Feed moving the paper up by one line or Form Feed feeding one page through the printer With SW1 in the On Line position but the ON LINE LED off pressing the LF FF button once will feed the paper up by one line Pressing and holding down the LF FF button for about a second will perform a FORM FEED and move the paper to the start of the next page The LF FF key is also used for micro adjustment m...

Страница 24: ...t please refer to the FONT LOCK option under the STYLE menu later in this section Changing The Text Pitch To change the pitch 1 Set slide switch SW1 to MODE 2 Move slide switch SW2 to PITCH to display the pitch menu The options are 10 CPI Pica the default 12 CPI Elite 15 CPI and Proportional If you choose Proportional the spac ing between characters is adjusted according to their width giving a pl...

Страница 25: ...printer in 12 cpi mode the condensed version will be 20 cpi Power On Settings When you switch on the power to your printer it sets its many adjustable functions to predeter mined settings The printer has a memory in which it keeps these settings even when the printer has been switch off The printer comes set up with a pre determined set of factory default settings when you buy the printer However ...

Страница 26: ... new defaults will then be used when you next turn on the printer To set the printer in menu mode 1 Set slide switch SW1 to SETUP 2 Press the MENU function switch and hold it down for about 3 seconds until the top three function LEDs begin to flash The printer will print out a heading and the first menu item with the current default value shown by underlining 3 Open the top cover so you can see th...

Страница 27: ...for the ASF with the envelope feeding facility EMULATION is used to set which emulation to use The AUTO option will automatically try to determine the correct emulation However in certain circumstances you may need to be more specific and choose from EPSON or IBM and in some case NEC FONT gives a choice of six letter quality fonts a DRAFT font for quick printing and a high speed or HS DRAFT font f...

Страница 28: ...ctions allow you to select from a choice of national language character sets The list of nation language character sets is always changing and we refer you to our web site for further information on this Details of this are shown at the beginning of the manual under the section for the latest information OPTION RAM only appears when extra RAM is installed where available It enables you to control ...

Страница 29: ... of the PARK LOAD button 2 Set the slide switch SW1 to ON LINE 3 Press and hold down the ON LINE and QUIET SAVE function switches together for about three seconds until the two function LEDs begin to flash 4 Use the PARK LOAD and LF FF keys to move the cut position forwards or backwards until the paper is in the correct position 5 Press the SAVE function key to store the new position in the printe...

Страница 30: ...rinter off and on again alt defaults are now reset The Buffer Memory The printer s internal memory capacity is known as the buffer This is used to store data sent from the computer before it is printed The computer can then get on with other tasks while the stored data is printed There may be occasions when you need to clear data still in the buffer for example if you decide to stop printing a doc...

Страница 31: ...inter driver for your printer If you cannot find a driver in the original software package you should initially speak to the dealer who supplied you with the printer Alternatively please visit our web site details of which are given at the front of this manual in the section titled For The Latest Information IBM PCs Or Compatibles Most IBM and compatibles now use Windows operating systems as stand...

Страница 32: ...ts and codepages are constantly being developed your printer may contain more character sets than can be seen in this manual It is our policy to introduce new codepages as soon as standards have been confirmed For the latest details on what codepages are avialable in specific versions of printers please refer to the section at the beginning of the manual called For The Latest Information Euro Curr...

Страница 33: ...veral million characters before needing replacement When printed characters begin to appear feint it is time to replace the ribbon cartridge Replacing the ribbon is a simple matter of taking out the old cartridge and replacing it with a new one Before removing the old cartridge always turn off the power and allow the print head to cool as it can be extremely hot Then slide the print head to the le...

Страница 34: ...NT STYLE menu Change the initialisation string that your software sends see your software manual Turn the printer off line right after your program begins printing make your selection through the control panel and then put it back on line Printing Starts Half Way Down A Page Turn the printer off and use the paper feed knob to align the perforation between forms with the top of the print head or th...

Страница 35: ...Ribbon Become Mixed While some col our contamination is unavoidable you can minimise it by using unidirectional printing when you are overprinting different col ours This can be selected via the control panel in the Print Mode category Check on the control panel that the colour ribbon is selected Be sure that your software is installed to support col our If you are seeing horizontal coloured lines...

Страница 36: ...NE Power is turned off and then on again and the printer comes back ON LINE Cause The position of the print head is not correct referred to as a home error This is usually caused by something jamming the print head Remove the top cover of the printer and check for obstructions including torn paper or an incorrectly placed ribbon If the problem persists you make need to take the printer to your nea...

Страница 37: ... direct sunlight or other temperature sources Ensure that the module is for the correct printer There are two types of module available a 32K RAM module and a 128K RAM module The function of optional RAM modules can be changed via the control panel to either increase the internal receive buffer from 8K byte to 40 136K byte enabling your PC to quickly move to another task or it can be used to downl...

Страница 38: ... both ends of the automatic sheet feeder with the front pair of triangle marked pins in the printer then lower the automatic sheet feeder in position 3 Rest the rear half of the top cover on the front cover of the automatic sheet feeder 4 Set the paper select lever to the cut sheet 5 Select ASF ON in the INSTALL mode move SW1 to setup and press SAVE for three seconds to save the ASF as default Loa...

Страница 39: ...do not have to remove the continu ous forms from the tractors when printing on single sheets You need only carry out the following steps 1 Turn the printer off line 2 If the continuous form paper is in the tear off position press the PARKILOAD key once if it is in the TOF position press the PARK LOAD key twice The paper will retract to the parking position 3 Set the paper select lever to the singl...

Страница 40: ...LL menu then move the slide switch to SETUP and press SAVE for three seconds to in stall the option Using The Colour Kit The colour option can be activated via the control panel on the top of the printer You use the control panel to scroll through all seven colours the four basic and three mixed including black The selection sequence is black red blue violet yellow orange green if you press the ke...

Страница 41: ...nter Serial Interface Protocols The serial interface is configured through the DIP switches on the interface The serial interface offers two communication protocols data ready and XON XOFF The first is a hardware protocol and the second is a software protocol These protocols help to ensure that your computer doesn t send information to the printer faster than it can print it To select a protocol y...

Страница 42: ...code XON 11 HEX to the computer to tell it to resume sending information If the computer doesn t stop sending information within 256 characters after it receives an XOFF code the information that overfills the buffer will be lost The printer will send an XON code when it goes on line to get things started It will send an XOFF code to stop the computer from sending information if there is an error ...

Страница 43: ... 1 Draft 1 1 1 1 1 1 LQ 6 6 6 6 6 6 Scalable LQ 2 2 2 2 Character Matrix H x V LQ 10 cpi 24x18 24x18 36x24 36x24 36x24 36x24 Draft 10 cpi 12x9 12x9 12x24 12x24 12x24 12x24 Resolution 240x216 240x216 360x360 360x360 360x360 360x360 Line spacing n 216 n 216 n 360 n 360 n 360 n 360 Paper Single sheet 7 2 10 1 7 2 16 1 7 2 10 1 7 2 16 1 7 2 10 1 7 2 16 1 Continuous 4 0 10 1 4 0 16 1 4 0 10 1 4 0 16 1 ...

Страница 44: ...unique 2 years including the printhead Repair MTBF 4000 hours excluding life of printhead MTTR 20 minutes or less Lifetime Printhead life 200 million stokes per wire Ribbon life 2 million characters original black ribbon Interfaces Parallel Standard RS232C Standard on Swift 120D Optional user installable on all other models Approvals EN60950 EN55022 All machines carry CE approval Character sets Ep...

Отзывы: