background image

16

OPERATION (CONTINUED)

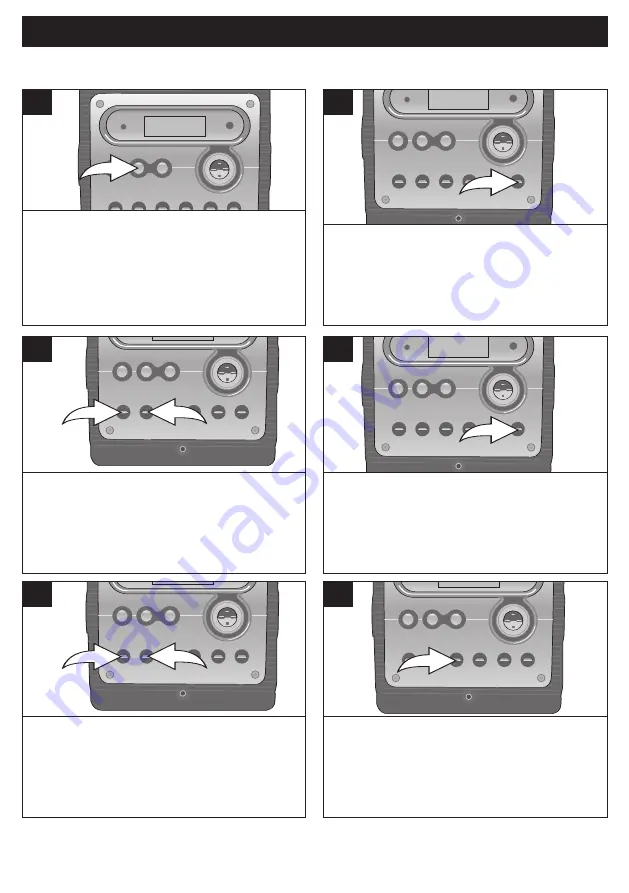
Repeatedly press the FUNCTION button

to select the CD mode. Insert a CD with

the label side facing up. The CD player

will read the table of contents on the disc

and the total number of tracks will

appear in the display.

1

Press the PROG/CLK button; “Memory”

will blink and “P1” will appear in the

display.

2

Use the Skip/Search/Tuning 

o 1

or 

n 2

button to select the first track to be

programmed.

2

1

3

Press the PROG/CLK button again; the

selected track has now been programmed

and counted as program 1.

4

Repeat steps 3 and 4 to program the

other desired tracks in sequence.

2

1

5

Press the PLAY/PAUSE (

®P

) button to

begin playback; playback will begin on

the first track that you programmed. 

6

TO PROGRAM THE MEMORY

See next page for notes on programming.

Содержание C300MSC

Страница 1: ...USER MANUAL C300MSC AM FM CD Micro System with MP3 Auxiliary Input 13ED20 ...

Страница 2: ...CK 8 HEADPHONE JACK 8 LISTENING TO THE RADIO 9 SETTING RADIO PRESETS 10 RECALLING RADIO PRESETS 11 PLAYING COMPACT DISCS 12 CD PAUSE CONTROL 13 TO BEGIN PLAYBACK FROM A SPECIFIC TRACK 13 FORWARD REVERSE SKIP TRACK AND HIGH SPEED MUSIC SEARCH 14 REPEAT PLAYBACK 14 RANDOM PLYBACK 15 TO PROGRAM THE MEMORY 16 PROGRAMMED REPEAT 17 AUX IN 17 CARE AND MAINTENANCE 18 TROUBLESHOOTING GUIDE 19 SPECIFICATION...

Страница 3: ...or AC connection Lightning and power surges ARE NOT covered under warranty for this product LASER SAFETY This unit employs a laser Only qualified service personnel should attempt to service this device due to possible eye injury CAUTION USE OF CONTROLS ADJUSTMENTS OR PERFORMANCE PROCEDURE HEREIN MAY RESULT IN HAZARDOUS RADIATION EXPOSURE INFORMATION This equipment has been tested and found to comp...

Страница 4: ...adiator or heat source This product should not be placed in a built in installation such as a bookcase or rack unless proper ventilation is provided or the manufacturer s instructions have been adhered to 10 POWER SOURCES This product should be operated only from the type of power source indicated on the marking label If you are not sure of the type of power supply to your home consult your applia...

Страница 5: ...e manufacturer 22 DAMAGE REQUIRING SERVICE Unplug the product from the wall outlet and refer servicing to qualified service personnel under the following conditions a When the power supply cord or plug is damaged b If liquid has been spilled or objects have fallen into the product c If the product has been exposed to rain or water d If the product does not operate normally by following the operati...

Страница 6: ...nect the speakers which are supplied with the unit The use of any other or additional speakers may cause damage to the unit Never operate the unit without the speakers connected REMOTE CONTROL BATTERY INSTALLATION The battery compartment is located on the rear of the remot control 1 Remove the battery compartment door by pressing in on the tab and lifting it off 2 Insert two 2 AAA size batteries i...

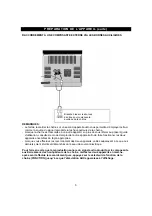
Страница 7: ...t refer to the owner s manual of the external unit as well as this manual When connecting the external unit make sure the power is off and both units are unplugged before making any connections To hear the unit connected to the Aux In jacks turn both units on then press the FUNCTION button until the AUX indicator appears in the display 5 PREPARATION FOR USE CONTINUED EXTERNAL AUDIO MP3 SOURCE Out ...

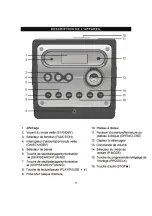
Страница 8: ...p Search Tuning n Button 7 Skip Search Tuning o Button 8 PLAY PAUSE p Button 9 Headphone Jack 10 CD Compartment 11 CD Door Open Close Area 12 Remote Sensor 13 VOLUME Control 14 P MODE Button 15 PROG CLK Button 16 STOP Button 6 LOCATION OF CONTROLS 2 1 12 4 3 5 7 6 8 9 11 10 13 15 14 16 FRONT ...

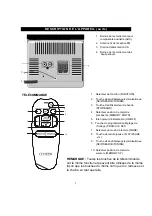
Страница 9: ...TION Button 2 Skip Search Tuning Button 3 STOP BAND Button 4 MEMORY DOWN Button 5 POWER ON OFF Button 6 PROGRAM CLK SET Button 7 MODE Button 8 PLAY PAUSE Button 9 Skip Search Tuning Button 10 MEMORY UP Button NOTE All of the buttons on the remote control can be used in the same manner as their respective buttons on the main unit ...

Страница 10: ... 2 button to set the current minute Press the PROG CLK button and the time will be set 3 2 1 5 Press the Skip Search Tuning o 1 or n 2 button to set the current hour then press the PROG CLK button again the minute digits will blink If you selected 12H time be sure to observe the AM or PM indicators to make sure you have set the hour correctly 3 2 1 4 SETTING THE CLOCK For private listening plug 3 ...

Страница 11: ... is extended to its full length You may have to vary the direction of the antenna to find the strongest signal for each FM station AM The AM ferrite bar antenna is located inside the unit It may be necessary to turn the unit slightly so that the internal antenna is pointing in the direction of the AM transmitter You may have to experiment to find the position that provides the strongest reception ...

Страница 12: ...Use the Skip Search Tuning o 1 or n 2 button to select a station 2 1 3 Press the PROG CLK button 1 Repeatedly press the MEMORY UP 2 or DOWN 3 button until the desired memory number appears on the display Press the PROG CLK button 1 again to set the station in the selected memory address 2 1 3 4 Repeat steps 3 through 4 to program stations in each band if desired If the main power supply is interru...

Страница 13: ... s backlight will light 1 Repeatedly press the FUNCTION button 1 to select the Radio mode Press the BAND button 2 to select the desired band FM or AM 2 1 2 Press the MEMORY UP 1 or DOWN 2 button to select a preset the station will automatically be tuned in 1 2 3 Adjust the VOLUME control as desired 4 RECALLING RADIO PRESETS ...

Страница 14: ...PEN CLOSE button to open the CD compartment Insert a CD with the label side facing up and close the compartment The CD player will read the table of contents on the disc and the total number of tracks will appear in the display 3 Press the PLAY PAUSE p button to begin playback on Track 1 4 Adjust the VOLUME control as desired Playback will continue until all tracks on the disc have been played 5 T...

Страница 15: ... release pause and resume normal CD playback 2 CD PAUSE CONTROL After you insert the disc into the CD player and the total number of tracks appears on the display you may press either the Skip Search Tuning o 1 or n 2 button to select a specific track for playback 2 1 1 When the desired track number appears in the display press the PLAY PAUSE p button Playback will begin on the track you selected ...

Страница 16: ...ing o button once to move the player back to the beginning of the current track Press the Skip Search Tuning o button repeatedly to move the player back to lower numbered tracks 2 FORWARD REVERSE SKIP TRACK AND HIGH SPEED MUSIC SEARCH O O N N 1 3 2 1 When the desired track number appears in the display press the PLAY PAUSE p button 1 to begin playback The specific track you selected will be repeat...

Страница 17: ...ancel Repeat Playback press the P MODE button repeatedly until the Repeat indicator disappears 4 To play the tracks on the CD in a random order while in the Stop mode press the P MODE button 1 repeatedly until Random lights in the display Then press the PLAY PAUSE p button 2 the tracks will play in random order 1 2 1 To cancel random playback press the P MODE button again until RANDOM disappears f...

Страница 18: ...blink and P1 will appear in the display 2 Use the Skip Search Tuning o 1 or n 2 button to select the first track to be programmed 2 1 3 Press the PROG CLK button again the selected track has now been programmed and counted as program 1 4 Repeat steps 3 and 4 to program the other desired tracks in sequence 2 1 5 Press the PLAY PAUSE P button to begin playback playback will begin on the first track ...

Страница 19: ...you cancel Program playback Simply press the PROG CLK button to enter the Program mode and then press the Play Pause p button to continue Program playback It is also possible to use the Program and Repeat functions together to repeat a specific program indefinitely First program the tracks you wish to hear in the order you wish to hear them as described on page 16 Then press the P MODE button twic...

Страница 20: ...e compact disc Never wipe in circular motions This unit is designed to play only compact discs bearing the identification logo as shown here Other discs may not conform to the CD standard and may not play properly Compact discs should be stored in their cases after each use to avoid damage Do not expose compact discs to direct sunlight high humidity high temperatures or dust ect Prolonged exposure...

Страница 21: ...ct Desired function is not selected press FUNCTION button to select CD or AUX The volume is not raised raise the volume No sound CD is not installed or inserted upside down install correctly RADIO FM Extend FM Wire Antenna for best FM reception AM Rotate the unit ofr best AM reception Noise or sound distored on radio broadcasts Station not tuned properly retune Radio not selected press FUNCTION bu...

Страница 22: ......

Страница 23: ...ion setup and or programming charges Should this Citizen product fail to operate during the warranty period warranty service may be obtained upon delivery of the Citizen product together with proof of purchase and a copy of this LIMITED WARRANTY statement to an Authorized Citizen Service Centre In home warranty service may be provided at Citizen Electronics discretion on any Citizen television wit...

Страница 24: ...GUIDE D UTILISATION C300MSC Microchaîne AM FM avec lecteur CD et entrée MP3 composante auxiliaire ...

Страница 25: ... STATIONS RADIO DANS LA MEMOIRE DU SYNTONISATEUR 10 RAPPEL DES STATIONS PROGRAMMÉES DANS LA MÉMOIRE DU SYNTONISATEUR 11 LECTURE DE DISQUES COMPACTS 12 COMMANDE DE PAUSE DU LECTEUR CD 13 LECTURE D UN DISQUE À PARTIR D UNE PISTE EN PARTICULIER 13 AVANCE OU MARCHE ARRIÈRE RAPIDE PAR SAUT DE PISTE SUR LE DISQUE OU BALAYAGE DU DISQUE 14 LECTURE RÉPÉTÉE 14 LECTURE ALÉATOIRE 15 LECTURE PROGRAMMÉE 16 LECT...

Страница 26: ...u il emploie pour la lecture des disques Pour utiliser correctement cet appareil veuillez lire attentivement ce guide d utilisateur et conservez le afin de pouvoir vous y référer éventuellement Si l appareil doit être réparé adressez vous à un centre de service autorisé seul du personnel qualifié est autorisé à réparer cet appareil ATTENTION L UTILISATION DES COMMANDES DES RÉGLAGES OU L EXÉCUTION ...

Страница 27: ...NTATION Cet appareil ne peut être raccordé qu à la source d alimentation indiquée sur sa plaque signalétique Si vous ne connaissez pas la tension de votre source de courant questionnez votre marchand ou votre fournisseur d électricité Pour les appareils destinés à être alimentés par des piles ou autres sources d alimentation consultez le guide d utilisateur 11 MISE À LA TERRE OU POLARISATION Cet a...

Страница 28: ...d effectuer des vérifications de sécurité pour s assurer que l appareil soit en bon état de fonctionnement 21 FIXATION AU MUR OU AU PLAFOND Ce lecteur CD portable ne doit pas être fixé au mur ou au plafond avec un accessoire n ayant pas reçu l approbation explicite du fabricant de cet appareil 22 DOMMAGES EXIGEANT DES RÉPARATIONS L appareil doit être débranché de la prise électrique et confié à un...

Страница 29: ...ur gauche sur la borne de raccordement du haut parleur gauche et le haut parleur droit sur la borne de raccordement du haut parleur droit ATTENTION Ne raccordez à la chaîne que les haut parleurs vendus avec celle ci Le raccord d autres haut parleurs sur cette chaîne risque d endommager l appareil Ne faites jamais fonctionner la chaîne sans que les haut parleurs y soient raccordés TÉLÉCOMMANDE ALIM...

Страница 30: ...aire fonctionner les deux appareils ensembles de façon appropriée Lorsque vous effectuez les raccordement des deux appareils veillez auparavant à ce que ces derniers soient éteints et débranchés du réseau de courant électrique Pour faire en sorte que la reproduction sonore du signal audio produit par la composante auxiliaire émane des haut parleurs de la chaîne mettez les deux appareils en marche ...

Страница 31: ......

Страница 32: ... de bande STOP BAND 4 Sélecteur position de mémoire précédente MEMORY DOWN 5 Interrupteur d alimentation ON OFF 6 Touche de programmation réglage de l horloge PROG CLK SET 7 Sélecteur du mode de lecture MODE 8 Touche de lecture pause PLAY PAUSE 9 Touche de saut balayage syntonisation SKIP SEARCH TUNING 10 Sélecteur position de mémoire suivante MEMORY UP REMARQUE Toutes les touches de la télécomman...

Страница 33: ... touche de programmation réglage de l horloge PROG CLK p les chiffres représentant les minutes se mettront à clignoter Assurez vous de sélectionner les heures avant AM ou après midi PM de façon appropriée Appuyez sur les touches de saut balayage syntonisation n ou o afin de régler les minutes puis appuyez de nouveau sur la touche de programmation réglage de l horloge PROG CLK p afin de terminer le...

Страница 34: ...nière à obtenir la meilleure qualité de réception Il se peut que vous ayez à changer l orientation de l antenne fil selon la station que vous tentez de syntoniser Réception des stations de la bande AM Cette chaîne stéréophonique est munie d une antenne tige en ferrite incorporée à même le boîtier de l appareil Il peut être nécessaire de faire pivoter celle ci légèrement sur elle même pour la dirig...

Страница 35: ...s la mémoire du syntonisateur Appuyez sur la touche de programmation réglage de l horloge PROG CLK n Appuyez sur le sélecteur position de mémoire suivante MEMORY UP o ou le sélecteur position de mémoire précédente MEMORY DOWN p sur la télécommande jusqu à ce qu apparaisse à l affichage le numéro de la position de mémoire à laquelle vous désirez programmer la station syntonisée Appuyez de nouveau s...

Страница 36: ... reprises afin d activer la radio RADIO Appuyez sur le sélecteur de bande BAND o pour sélectionner la bande radiophonique qui convient AM ou FM Appuyez sur le sélecteur position de mémoire suivante MEMORY UP n ou le sélecteur position de mémoire précédente MEMORY DOWN o sur la télécommande pour sélectionner directement et rapidement l une des stations programmées dans la mémoire du syntonisateur À...

Страница 37: ...sur le plateau du lecteur en veillant à le positionner de manière à ce que le côté portant l étiquette soit vers le haut Fermez le plateau à disque Le lecteur CD procédera à l examen du contenu du disque et quelques secondes plus tard le nombre total de pistes contenues sur le disque apparaîtra à l affichage Appuyez sur la touche de lecture pause PLAY PAUSE pour débuter la lecture de la toute prem...

Страница 38: ... la lecture régulière du disque le voyant de lecture cesse de clignoter à l affichage Une fois que le lecteur CD a été activé placez un disque sur le plateau à disque L appareil procède à l examen du contenu du disque Une fois que le nombre total de pistes contenues sur le disque apparaît à l affichage appuyez sur les touches de saut balayage syntonisation n ou o pour sélectionner la piste à parti...

Страница 39: ...ncée afin que le lecteur effectue un balayage rapide du disque en marche avant ou arrière à l intérieur d une même piste pour vous permettre de localiser un passage en particulier Le balayage rapide du disque se poursuivra tant que vous maintiendrez la touche enfoncée Lorsque vous relâchez la touche de saut balayage syntonisation ou l appareil poursuit la lecture du disque à vitesse régulière Pour...

Страница 40: ...cture répétée disparaissent de l affichage Pour effectuer la lecture aléatoire des pistes contenues sur un disque pendant que le lecteur se trouve en mode arrêt appuyez plusieurs fois sur le sélecteur du mode de lecture P MODE n pour activer le mode de lecture aléatoire soit jusqu à ce que le voyant de lecture aléatoire s allume à l affichage Appuyez sur la touche de lecture pause PLAY PAUSE o pou...

Страница 41: ...re total de pistes contenues sur le disque apparaîtra à l affichage Appuyez sur la touche programmation réglage de l horloge PROG CLK le mot MEMORY clignotera à l affichage et P1 y apparaîtra également Appuyez sur les touches de saut balayage syntonisation n ou o pour sélectionner la toute première piste de la programmation Une fois que le numéro de la piste désirée apparaît à l affichage appuyez ...

Страница 42: ...er sur la touche programmation réglage de l horloge PROG CLK puis d appuyer sur la touche de lecture pause PLAY PAUSE LECTURE RÉPÉTÉE D UNE PROGRAMMATION FONCTIONNEMENT DE LA CHAÎNE suite Il est possible d utiliser simultanément les fonctions de lecture programmée et de lecture répétée pour répéter indéfiniment la lecture de pistes sélectionnées sur un disque Pour débuter programmez en mémoire les...

Страница 43: ...ci contre Tout autre type de disque pourrait ne pas être de format standard et il se pourrait que l appareil ne puisse pas en faire la lecture Les disques compacts doivent toujours être soigneusement rangés dans leur étui protecteur après usage afin d éviter qu ils soient endommagés N exposez pas les disques compacts aux rayons directs du soleil à des environnements où l humidité est élevée la tem...

Страница 44: ...pas activée appuyez sur le sélecteur de fonction FUNCTION pour activer le lecteur CD ou la composante auxiliaire AUX La commande de volume est réglée à un niveau trop bas Il n y a pas de son Il n y a pas de CD dans l appareil ou ce dernier est placé à l envers Installez le correctement RADIO S il s agit d une station de la bande FM dérouler l antenne fil au maximum et disposez la de manière à obte...

Страница 45: ...f Puissance de sortie 10 watts par canal RADIO Gamme de fréquences pour la bande FM 87 5 à 108 MHz Gamme de fréquences pour la bande AM 520 à 1710 KHz LECTEUR CD Diamètre des disques 4 72 pouces ou 12 cm 3 15 pouces 8 cm pour un CD simple Lecture optique laser à semi conducteur Longueur d ondes 780 mm Les caractéristiques de cet appareil sont sujettes à modifications sans préavis 20 ...

Страница 46: ...cation i Tous les frais d installation d ajustement et ou de programmation Si cet appareil de marque Citizen devient défectueux au cours de la période pendant laquelle il est couvert par la garantie une réparation peut être obtenue conformément aux termes de la présente garantie en présentant cet appareil Citizen avec la preuve d achat originale et une copie de la présente GARANTIE RESTREINTE à un...

Отзывы: