background image


4


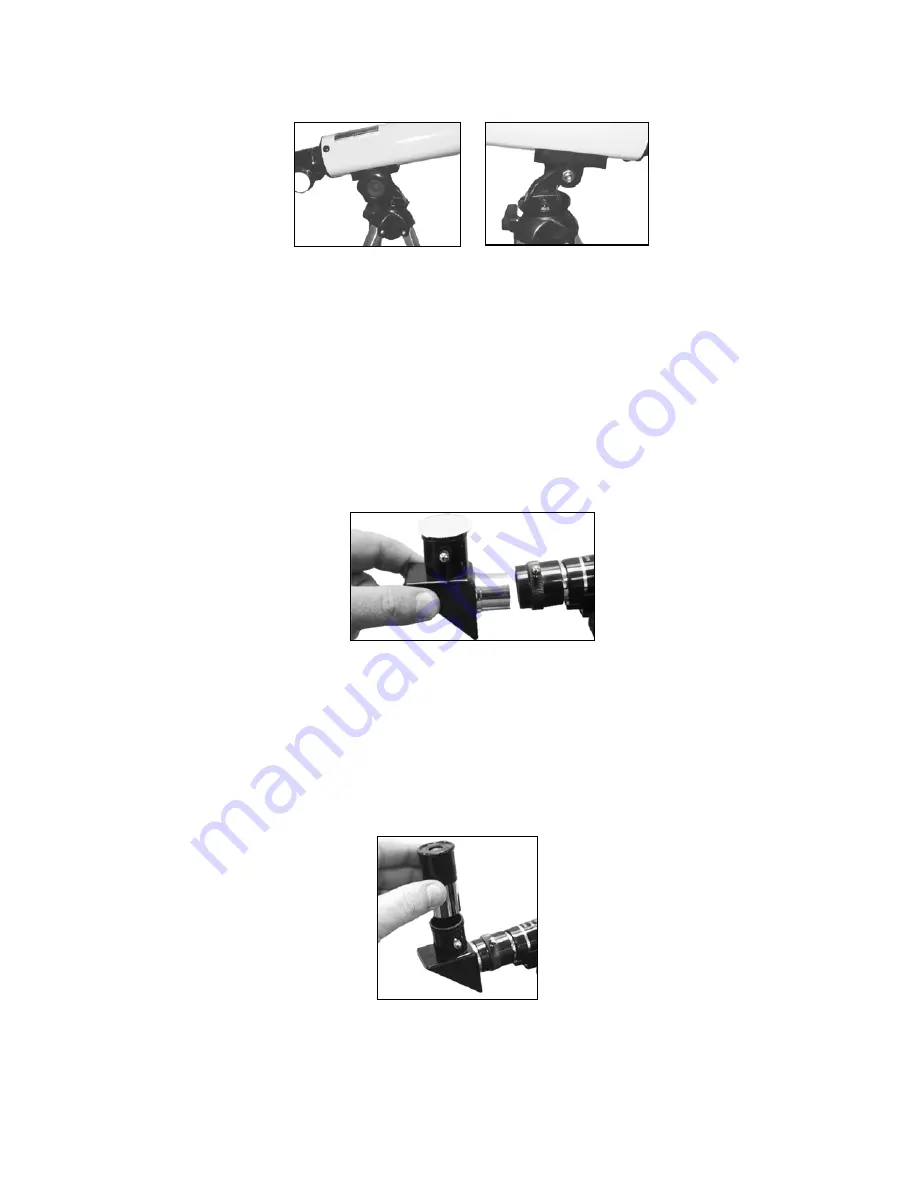
                                                 (Fig. 2)                       (Fig. 3) 


3) Place the telescope tube over the altazimuth mount. Lower the telescope tube onto the mount 

so that the plastic tongue on the mount slips into the bracket underneath the telescope tube. (See 

Fig. 2) 


4) One of the short bracket arms has a hexagonal shaped cutout around its opening. (See Fig. 3) 
Insert the nut from the altitude lock knob into this cutout. Insert the altitude lock knob through 

the bracket and tongue as shown. Turn the altitude lock knob clockwise into this nut until it stops. 

 
5) Turn the tightening knob on the tripod mount clockwise until it stops. The telescope is now 

securely attached to the tripod. 


(Fig. 4) 

 
6) Loosen the small chrome screw on the side of the focus tube by turning it counterclockwise. 

Insert the shiny chrome end of the diagonal mirror into the focus tube so that the opposite open 
end is facing upward. Tighten the small chrome screw on the side of the focus tube to hold the 

diagonal mirror securely in position. (See Fig. 4) 

 
7) Loosen the small chrome screw located on the side of the diagonal mirror by turning it 

counterclockwise. 


(Fig. 5) 


8) Insert the low power eyepiece marked “H20mm” into the diagonal mirror. Tighten the small 

chrome set screw by turning it clockwise to hold the eyepiece securely in place. (See Fig. 5) 

Содержание Orbitor C180T

Страница 1: ...orbitorTM Compact 180X Telescope Instructions Manual Part 260043...

Страница 2: ...any telescope without adult supervision Here are the main parts of your telescope A 20mm Eyepiece B Focus Tube C Telescope Tube D Dew Shield E Diagonal Mirror F Focus Knob G Azimuth Lock Knob H Objec...

Страница 3: ...s near and far in the world around us You can also use your telescope as a terrestrial land telescope to study animals and landscapes at a distance To obtain the best performance from your telescope p...

Страница 4: ...on the tripod mount clockwise until it stops The telescope is now securely attached to the tripod Fig 4 6 Loosen the small chrome screw on the side of the focus tube by turning it counterclockwise Ins...

Страница 5: ...galaxies and nebulae Higher magnification powers should only be used for highly detailed observations of the moon Jupiter and Saturn or any object that is extremely bright USING YOUR TELESCOPE FOR AS...

Страница 6: ...X Image Erector remove the diagonal mirror Insert the 2X Image Erector Then insert the 20mm eyepiece into the 2X Image Erector The image seen will now be right side up and correctly oriented As well a...

Страница 7: ...minator shows the best detail in the craters and mountains The planets The planets our solar system companions range in size from moon size rocky bodies to giant gas balls which could hold Earth 1000...

Страница 8: ...pe you will be able to enjoy exciting views of Saturn s rings Jupiter s major moons the Orion Nebula and much more 2 Why can t I see anything If you see only gray or black when looking through your te...

Отзывы: